Snitz’s Ariz/NM Adventure!
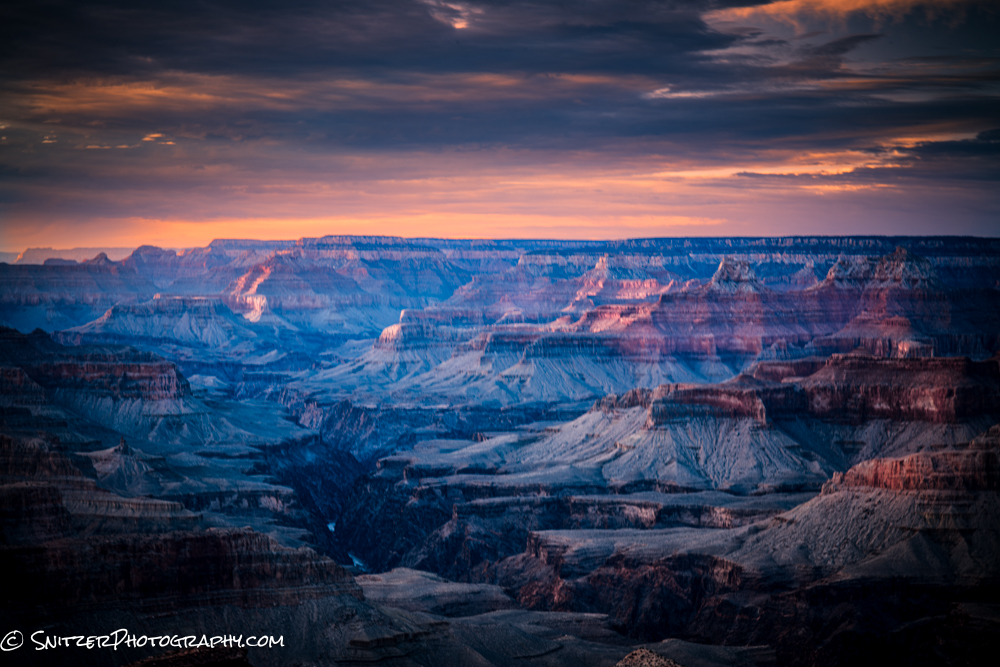
My first stop, the Grand Canyon’s South Rim. Winter is a glorious time to view the park. No crowds!
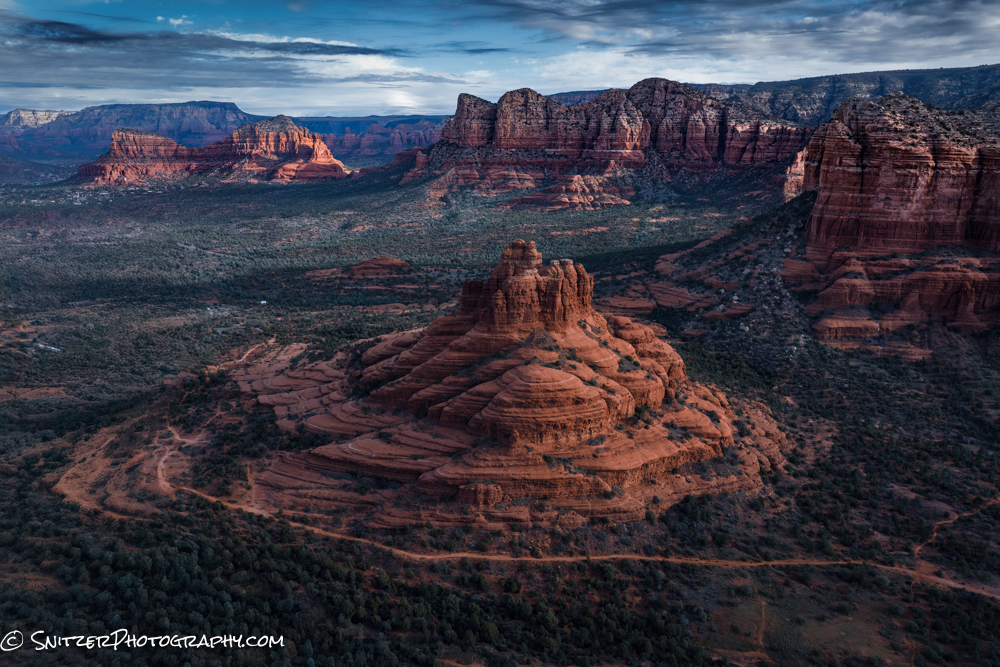
Heading South, catching morning sunrise in Sedona, Ariz . Time to fire up the drone. Bell Rock is “lit”!
default
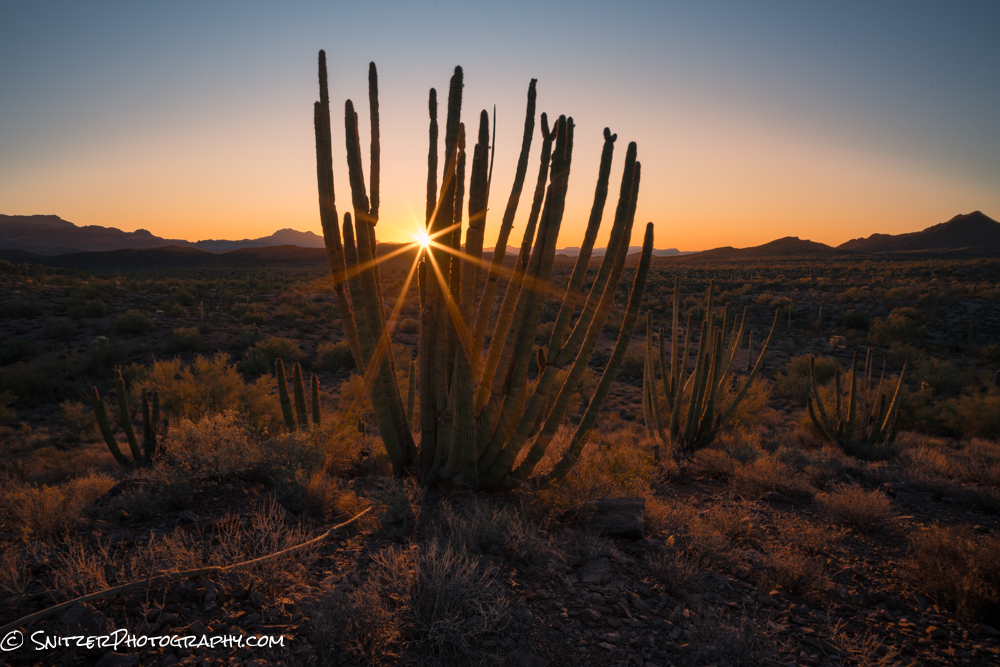
Just West of Tuscon lies Organ Pipe Nat Monument, named aptly for the cacti that resemble…you guessed it!
The park also features some bomber mountains and hiking trails to explore.
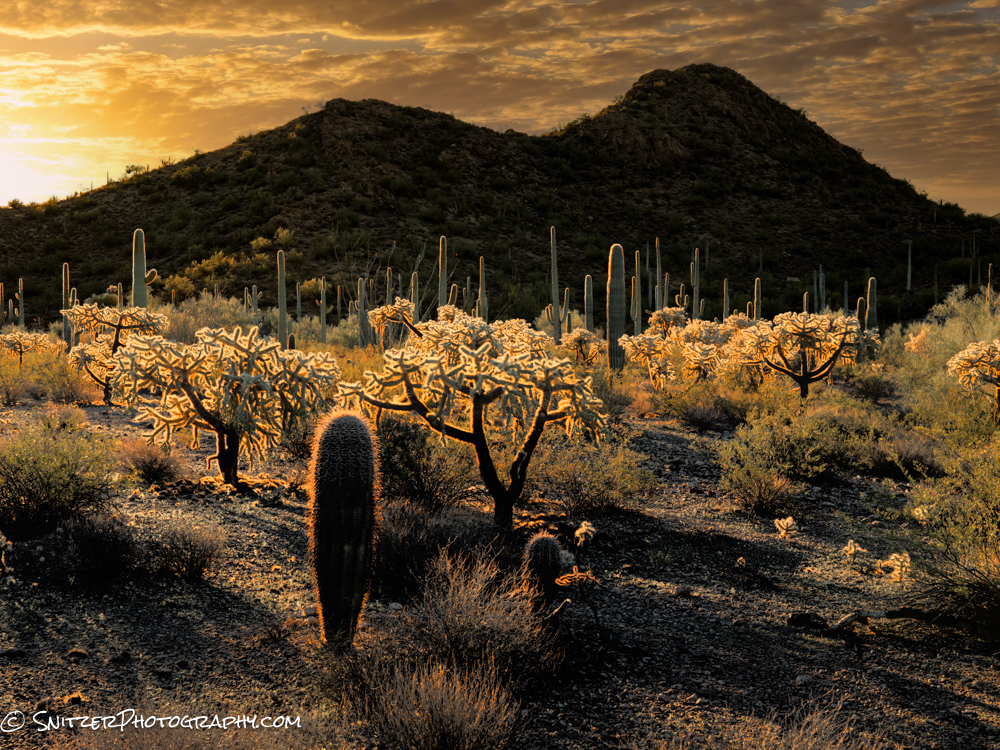
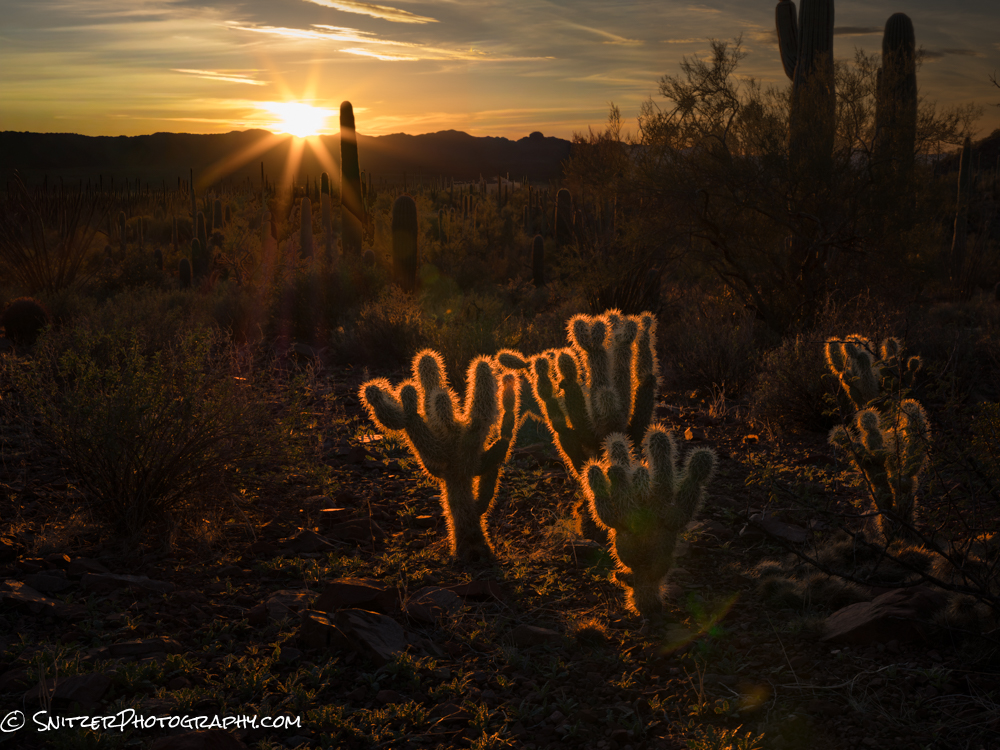
Next stop is Saguaro National Park. In addition to the tall Saguaro variety, there are plenty of Chollas that look amazing when backlit (as below).
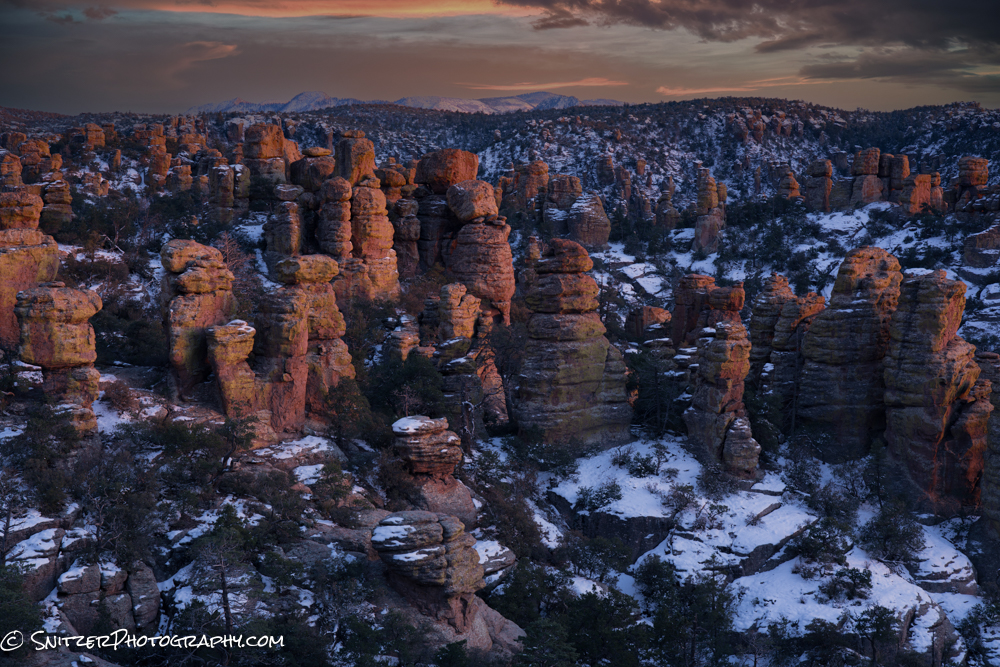
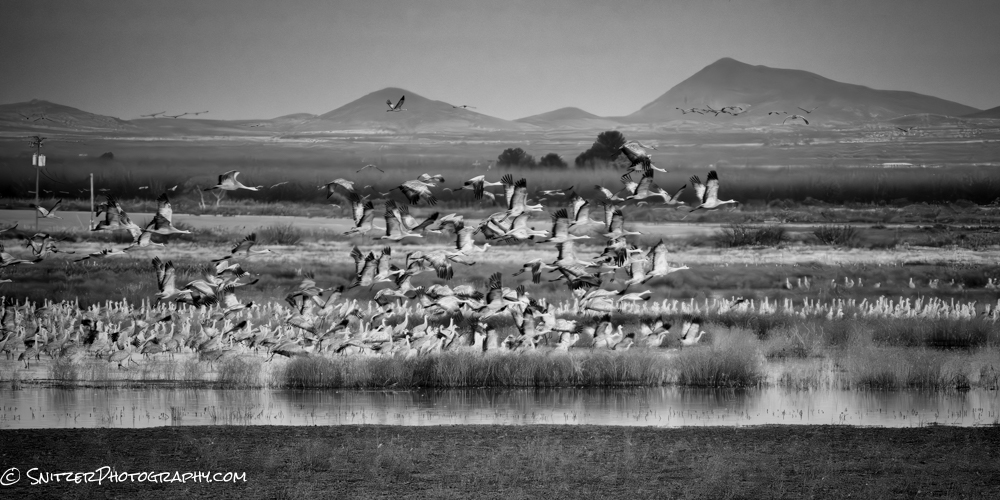
Next stop is Chiricahua National Monument, a little-visited gem in Eastern Ariz. The rock pinacles really show off at sunset.

BTW, during the winter thousands of Sandhill Cranes pitstop at the Whitewater Draw Wildlife area a few hours from the Park. Pictured below is a typical morning launch.
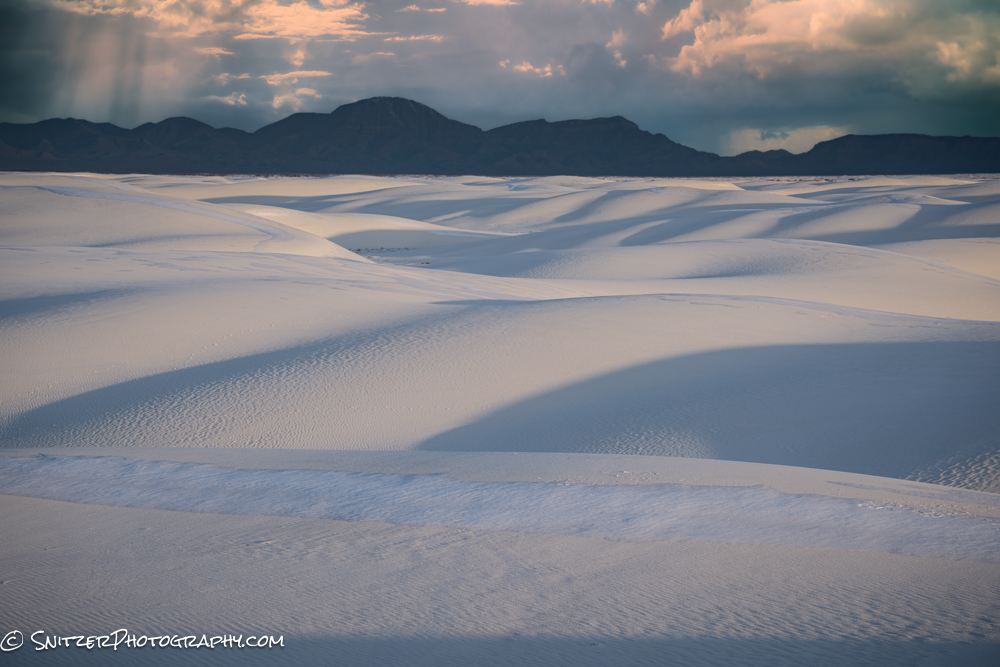
Final stop: White Sands National Monument. Unlike most dune areas, this landscape is formed out of gypsum, providing a stark white landscape which contrasts with the dramatic skies!

Click here to see my full gallery! link to photos
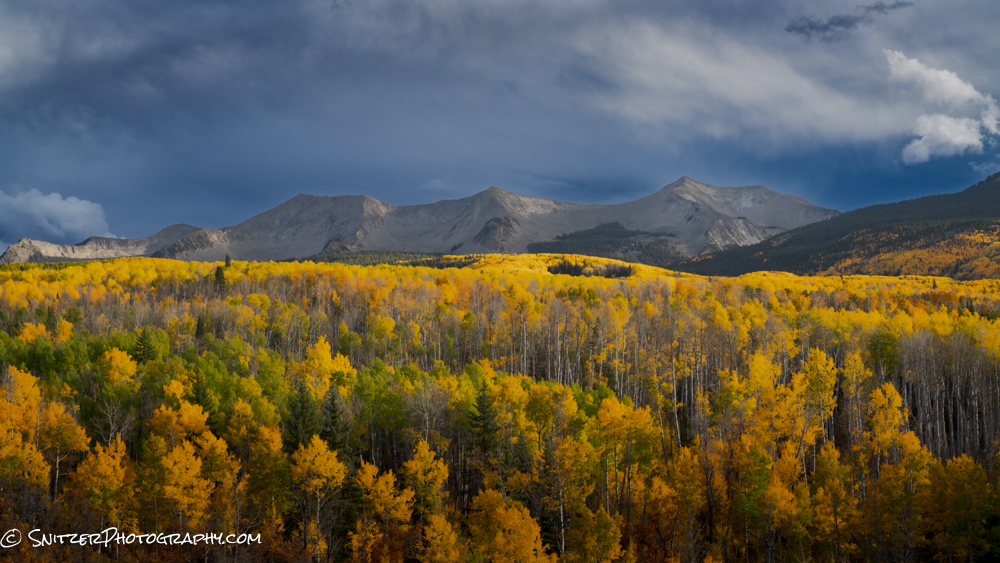
Crested Butte is king for fall leaf peeping?
Colorado’s Rockies provide a literal triple crown for bomber landscapes each fall.
• Huge fields of Aspens turn brilliant yellow.
• Punctuated by majestic mountain peaks.
• Crazy skies providing optimal lighting as fall storms pass over the landscape.
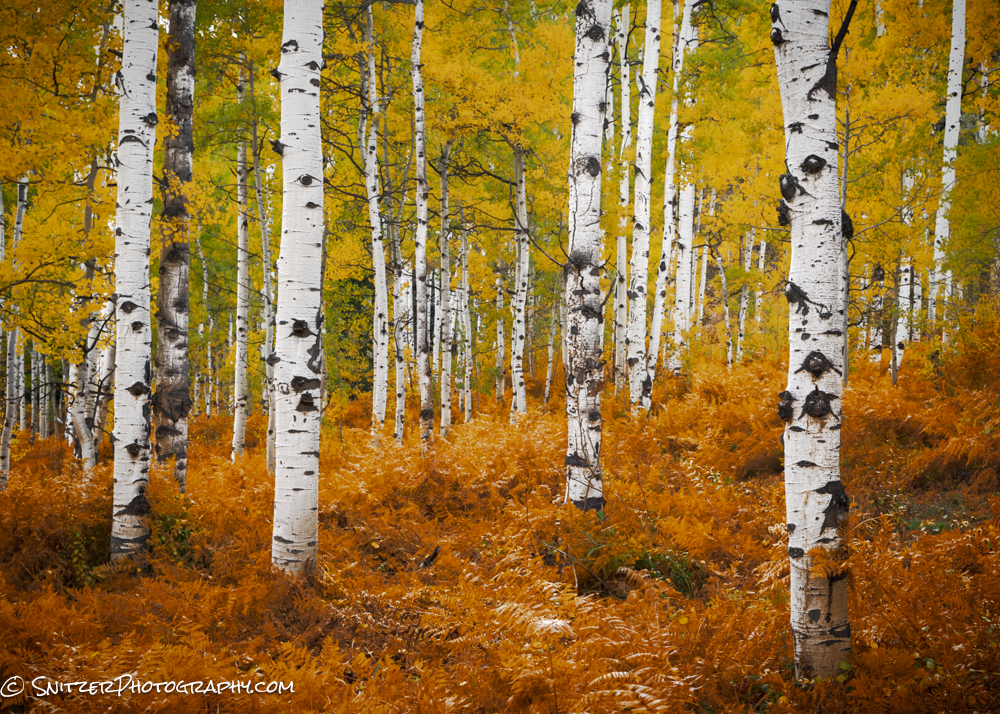
As you’ve read in the past, we spend half the year in Steamboat, Colorado. The ferns along the mountain floor create a great-looking carpet to frame the aspens trees. Pictured below is Steamboat’s the Spring Creek Trail.
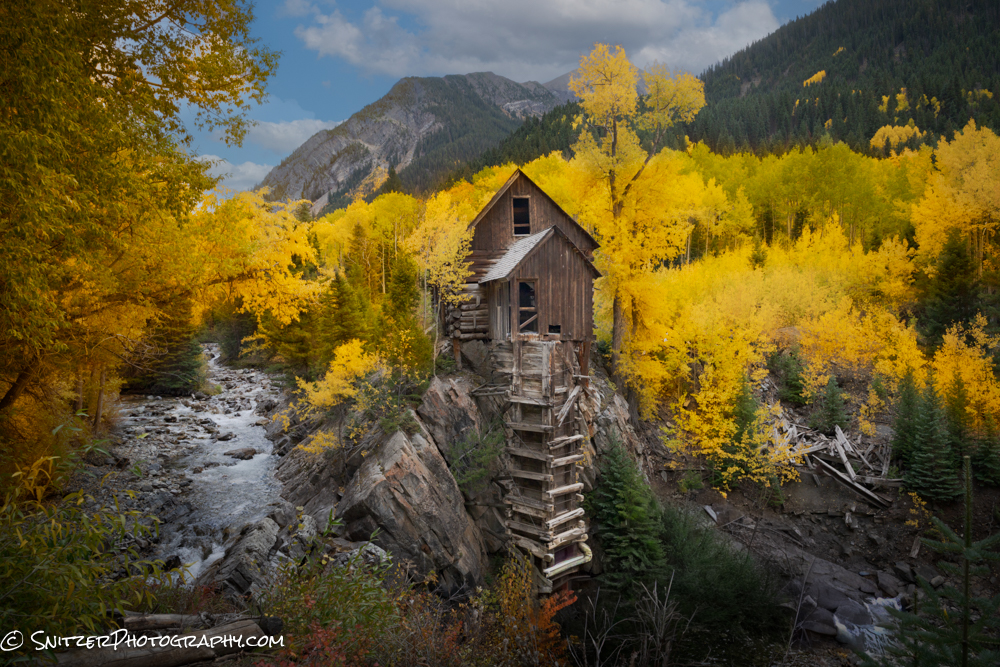
But if you want to see the really good stuff, it’s worth making the journey South. I stopped in the old mining town of Marble, home to the abandoned Crystal Mill accessible by a highly technical 4WD road (40 mins out of town), The Mill was built the late 1800s and was used to create high pressure water used in strip mining for Silver.
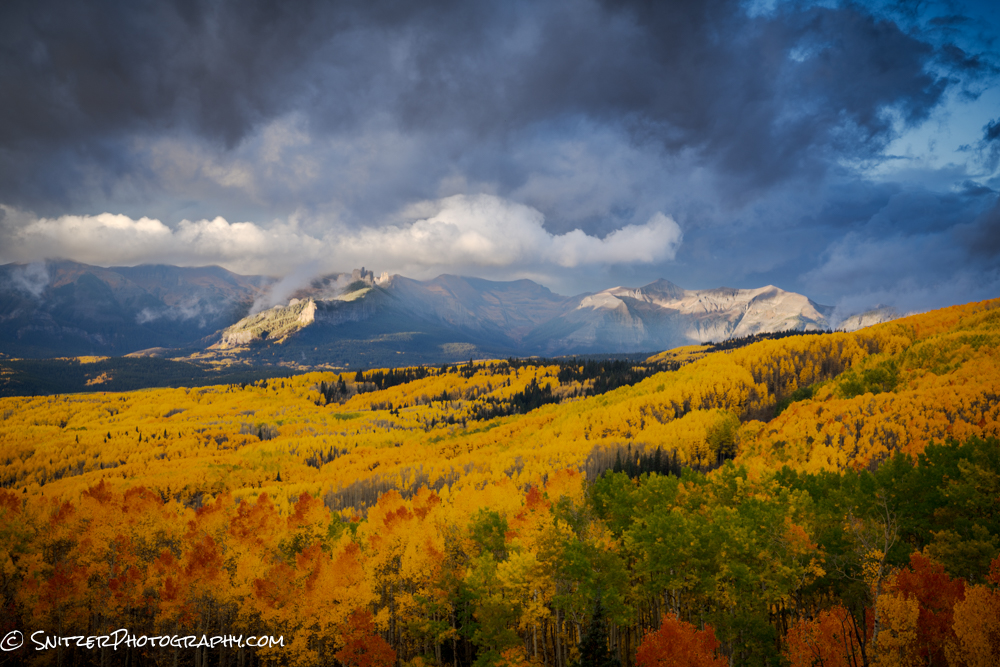
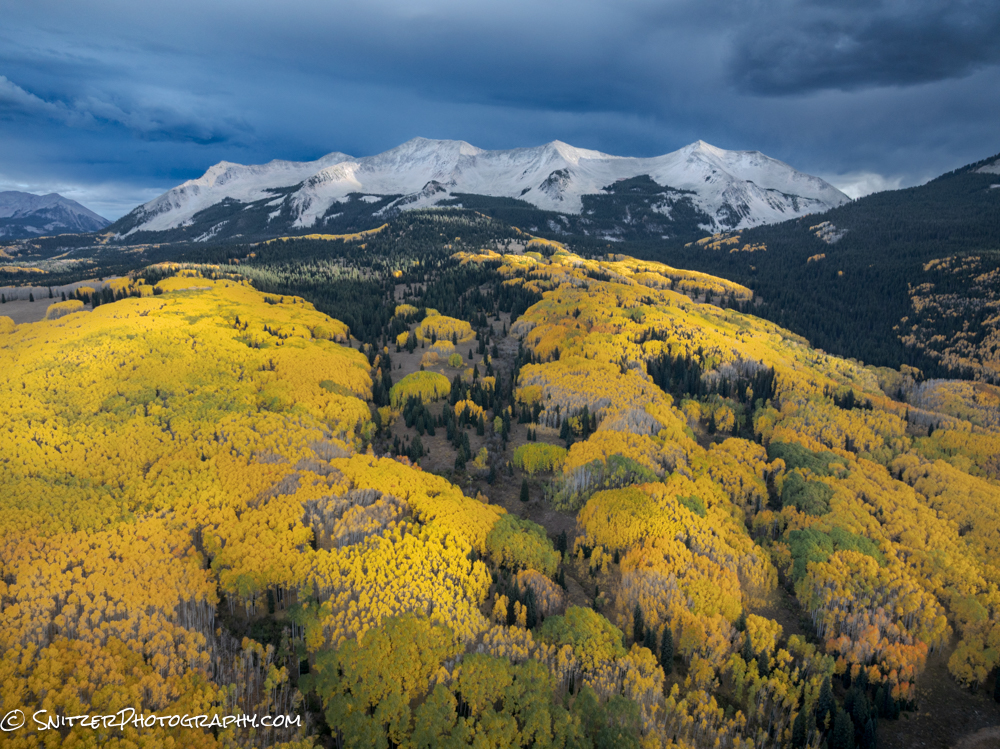
My next base of operation is the ski town of Crested Butte. While America’s national parks are packed with tourists each fall, most ski towns are very chill with plenty of room for outdoor enthusiasts. What makes this ski town amazing is it’s close proximity to Kebler and Ohio Passes which contain the two largest Aspen groves in North America. Ergo, the most amazing color I’ve seen anywhere!
Generally speaking, Ohio Pass shows off it’s best views at Sunrise!
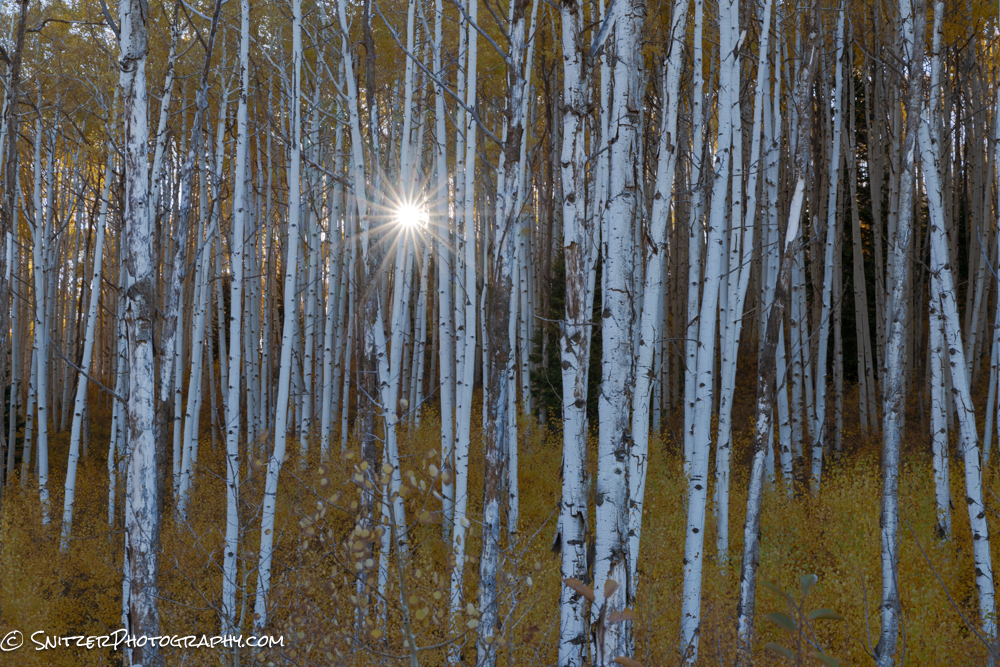
The morning light peaks through the Aspen Groves creating some unique wooded landscapes!
After a rain, the leafs on the mountain floor collecting moisture!
While Kebler tends to be an optimal place to watch sunset.
This shot was taken several miles from the road using my trusty Mavic III drone.
default
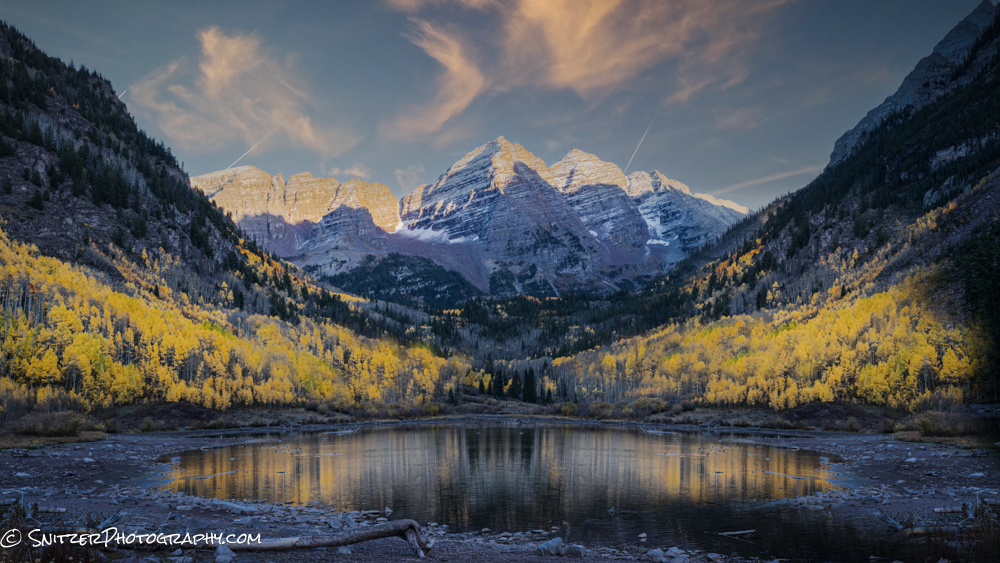
On route back I was lucky enough to get a morning parking pass the view the Maroon Bells (outside of Aspen, Co). There are few parking spaces to view this iconic setting at sunrise. I needed to reserve 8 months in advance!
Hiking: For those of you wanting to trace my routes, there are some great places to explore. All Trails links below
Steamboat: Spring Creek Trail https://www.alltrails.com/trail/us/colorado/spring-creek
Kebler: Three Lakes https://www.alltrails.com/trail/us/colorado/three-lakes-trail Dark Canyon https://www.alltrails.com/trail/us/colorado/dark-canyon-irwin-and-dyke-trail-loop
Ohio Pass: Beaver Ponds https://www.alltrails.com/trail/us/colorado/beaver-ponds-trail-2
Link to view the entire gallery https://www.snitzerphotos.com/Other/Galleries/Crested-butte-2025/n-QfXBXm
Is the new Mavic 4 Pro worth it?
Unless you’ve been hiding under a rock, you know there’s a sexy new drone in town. So is this thing worth your upgrade $$$?
Well first off, you probably can’t buy one (yet). Mavic is skipping the US for it’s launch (I guess they don’t love Donald’s tariff wars). B&H and Adorama claim to have the ability to pre-order. Don’t hold your breath.
Fortunately, Tony Northrup has tested and reviewed this new machinery. I’ll summarize this findings and include the link to his full review.
DJI claims that are BS (sort of)
- It’s claimed to have greater battery life. In real-world testing, it doesn’t (compared to the Mavic 3 Pro).
- Likewise, the claim that it’s “faster” appears to be hogwash.
- Oh yes, the new drone has a gimbal that can rotate and provide vertical shots. Woooo! Ooops, that’s sort of misleading. The gimble, when rotated, can’t really be adjusted to point up or down. So your great vertical shot is 50% sky. A waste of time.
What does appear to be better?
- The dynamic range, low light performance and resolving power of all three cameras is greatly improved. A win!
- He hasn’t tested the range of the new controller and communication software, but it’s rumored to be twice that of it’s predecessor.
What’s the darn thing cost? If you opt for the fly more kit and the upgrade controller is $5,000ish. Ergo almost $3,000 more than a similarly equipment Mavic 3 Pro. Is it worth the upcharge to get a better camera and more flight range? I’m still thinking!
Snitz hits NZ
It’s been a lifelong dream to visit the Kiwi’s. Quick reaction: the most eco-diverse place I’ve ever seen…drive a few hours find yourself in a different biosphere. Mountains, then tropical rainforest, then rolling pastoral landscapes. Plus the sheep! Wall to wall sheep, it’s silly.
And the happy/friendly New Zealanders. People who are willing to stop what their doing and chat it’s err…creepy. Jesus, it’s fricken Shangi La down there. What am I doing living in Illinois?
Having flown into Auckland the normal international starting point (easiest point of entry), we began working our way South. On route, we ran into some paragliders at Muriwai on the North Island and a local doing a fly by.


The real action however is on the South Island which is the place I’d encourage travelers to concentrate their time. The Ocean village of Kaikoura is a great place amazing sunrises and whale watching.
As you work your way around the island you quickly realize that this country survives on ranching (sheep, cattle and ekkk deer) and tourism. I’ve been through Scotland and Wales…they don’t match the mutton per square meter.
Plus, there are mushrooms. A lot of mushrooms. It’s so lush and rainy in many areas (Spring is their rainy season) that these guys go nuts.
Back to our trip. New Zealand sports over 9,000 miles of coast. Incredible views everywhere you look. This shot was taken with a Mavic III drone in Punakaiki. For our photo geeks, I was able to cause the water to look blurred by merging multiple photos together in Photoshop.

Pictured below is a famous NZ view at Lake Matheson in the Franz Joseph region. My ducks are soon to be famous.

This barren moonscape with the lone house is located in the high country just outside of Wedderburn, a very (& I mean very) small town on the South Island. A pretty good fishing spot I’m told.

Ok, you’ve probably heard about NZ’s most famous landmark, Milford Sound (in addition to Mt Cook). Well after a big storm it looks like…err…the gates of hell?

As we continue to the Southernmost part of NZ, we burn our legs climbing the famous Ben Loman, 3,400 ft straight up just outside of Queenstown. The view about 20 minutes from the top.
What kind of birds are these? Hell if I know. They like to hang out at Hayes Lake and don’t move much.

Speaking of which, the lake looks pretty impressive at sunrise.

With all the rain NZ gets (especially the West Coast) moss and other grassy “stuff” grows like crazy…on everything!

Finally, my trusty travel partner Mrs Snitz navigating the 5 bridges trail outside of Arrowtown.

Want to see the full gallery? Click the link. https://www.snitzerphotos.com/Other/Galleries/New-zealand/n-cn4zmz
Comparing Sony’s flagships
With the launch of the new Sony A1 II, there are now three bomber options including the A7r V and the A9 III. Here’s how they stack up (big picture):
The 61MP A7r V ($3,400) is the most affordable option which is perfect for the serious nature shooter who occasionally photographs sports or birds in flight. The camera has very impressive focus tracking abilities, a great sensor plus features 7-stop image stabilization and a full articulating back screen (horiz and vert). The big problem with this camera is a slow burst rate of 5 shots per second when shooting uncompressed Raw images. When shooting in the 25MP APS (crop) mode this rate jumps to 15 shots per second which is certainly acceptable (& saves memory). Ergo, this camera likes crop mode for fast-moving objects!
The New 50MP A1 ($6,500) has a few important upgrades over its predecessor. First, it’s already great object tracking is even better & it can automatically recognize and track people or animals. Plus it’s prescapture feature allows you to record images 1 full second before you fully depress the shutter. Ergo, never miss the critical action. The camera now has a fully articulating screen (horiz and vertical) and sports 8.5 stops of in-body image stabilization (up from 5.5 stops). The 50MP camera can shoot an impressive 30 shots/sec in compressed Raw mode (or 20 shots in full uncompressed RAW). Ergo, it’s a jack of all trades that can be used literally in any setting and crush it. Obviously, that comes at price.
The 25MP A9 III ($6,000) is a purpose-built ninja designed for capturing moving objects. Its object tracking is top of class and can capture a whopping 120 frames per second. As with the A1 The camera has a precapture option & you can program a button on the camera to increase the burst rate on the fly when the action gets critical. The camera can also sync with flash at crazy fast shutter speeds (1/80,000). The camera has the same articulating screen as the A1 and 8 stops of image stabilization. The big rub here is the camera’s dynamic range: only 13 stops compared to A1 & A7r’s 14.8. Ergo, this camera isn’t a great choice for nature photography. Sports only.


Note: How the Sony cameras above compare to the new Sony A7 4 ($2,100). This new camera has a smaller 33MP sensor and is only capable of firing off 10 shots per second in compressed RAW mode (6 in uncompressed mode). It’s object tracking is improved but doesn’t have the AI features of the A7r V, A9 III or A1 II. Ergo the camera isn’t great for sports. It also has 5.5 stops of in body image stabliization vs 7+ for the others.
Fall leaf peeping VT & NH
Vermont and New Hampshire are spectacular viewing platforms for fall leaf peeping. The combination of Beech, Maple, Oak & Birch trees create a bomber variety of color (red, orange and yellow)!
What really kicks things over the top however is the fall weather combined with a heavy dose of reflecting ponds. How so? First off, you have an environment with a lot of humidity and cold evenings. That causes the ground to cool off and produce low-lying morning fog…which is very photogenic. You also have some great cloud cover which can be reflected in these ponds.
The problem is how to view these? Until 7 years ago, you needed to get in a plane or chopper to really get the visual impact of the sky reflected in these bodies of water. Not any longer! With sophisticated drone tech, you can photograph this imagery from above. Pretty groundbreaking.


BTW in case you’re wondering where I was finding these cool scenes, the trip was based out of Montpelier, Vt and the area close to Conway, NH. BTW…there are some pretty cool things to view back on the ground!


Want to see the full gallery of images! Click the link! https://www.snitzerphotos.com/Other/Galleries/VermontNew-Hampshire-24/n-WHRGDB
Dolomites by mountain bike
I’ve been lucky enough to visit some great places, usually off a hiking or jeep trail. This summer I was invited to explore the Italian Dolomites with a small group of avid photographers (& riders) by mountain bike. We could access places that were too far to reach on foot and inaccessible by jeep. Talk about getting remote (seeing very few other humans)!
Plus, late-season rains had left the mountains full of wildflowers. Most days were partially stormy. Yes, we got dumped on a lot, but we also had amazing skies as the breaking squalls created bomber clouds. Wooo!
Our trip started after landing in Venice. My first time…pretty colorful.

Plus they have glassblowing! Who doesn’t love glassblowing?

Ok, time to fire up the map. The area we explored was approx 4.5 hours North by car. Most mornings started in a small village with a steep climb (2,000-4,000 ft) to a mountain plateau (ending at an elevation of between 6,000-7,000 ft). Ouch…my acking legs.

Those wildflowers I mentioned. Who’s the ugly bastard in the photo?

Ah, much better!

They have horses up here!

That are friendly and want a Snickers Bar.

And strange looking cows.

Biking on top of the world!

I also brought my trusty Mavic III drone. The low lying morning fog created some amazing ops for aerial photos.

What’s that green stuff down there!

Click the link for the full image gallery : https://www.snitzerphotos.com/Other/Galleries/Dolomites-2024/n-7SZCDc
Saving your Mavic III from sudden death!
I came close to losing my drone last week in Bravaria of all places. Some last-minute thinking in the heat of battle saved the day.
The specifics: I was flying the Mavic immediately after a breaking storm. It was dry where I was standing, but there was some moisture and drizzle on route home (I’d flown several miles to get the shot). About 2,000 feet from home the drone suddenly started rising fast. I disabled the “go home” command and tried to lower the drone but each time I tried it started climbing again. I had only about 10% battery left and had visions of my aircraft losing juice and falling like a rock to an untimely death
Then it occurred to me that perhaps the object avoidance sensors had fogged up with all the moisture and the drone thought it was going to hit something if it descended. I recalled that if I moved the drone from its “normal” mode to “sport mode” the sensors would be disabled. Once I did that, the drone obeyed my commands and I was able to manually bring the drone to a safe landing with little battery to spare.
Talk about a close call.
Utah Badlands-Death Valley-Alabama Hills
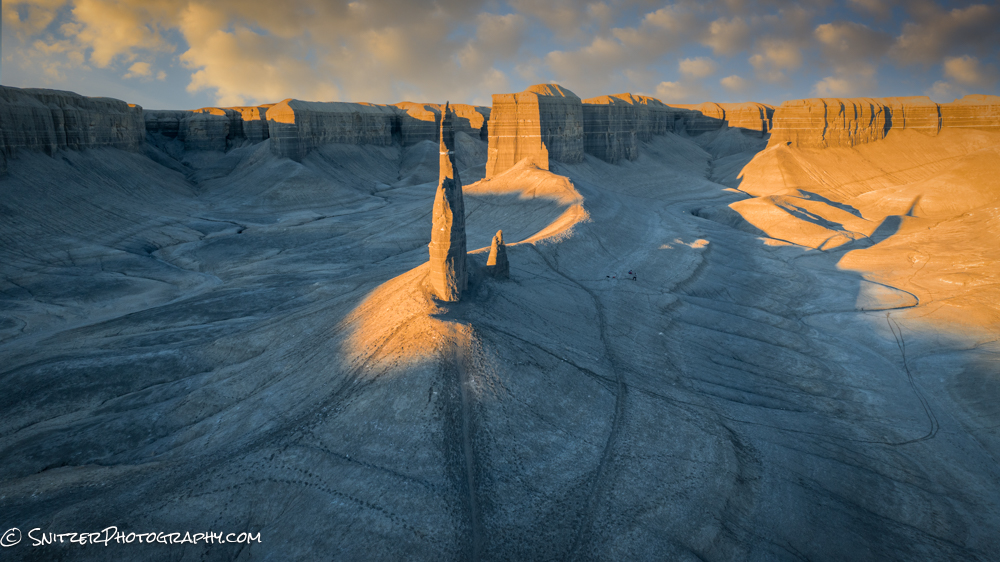
It’s tax season (Ap 15th) and time to explore America’s West! The Utah Badlands (Located near the town of Hanksville about 1 hour Southwest of Moab) offers some of America’s most badass ops for drone photography.
The spire shown below is hilariously known to locals at Long Dong Silver (Shot about 30 minutes before sunset).
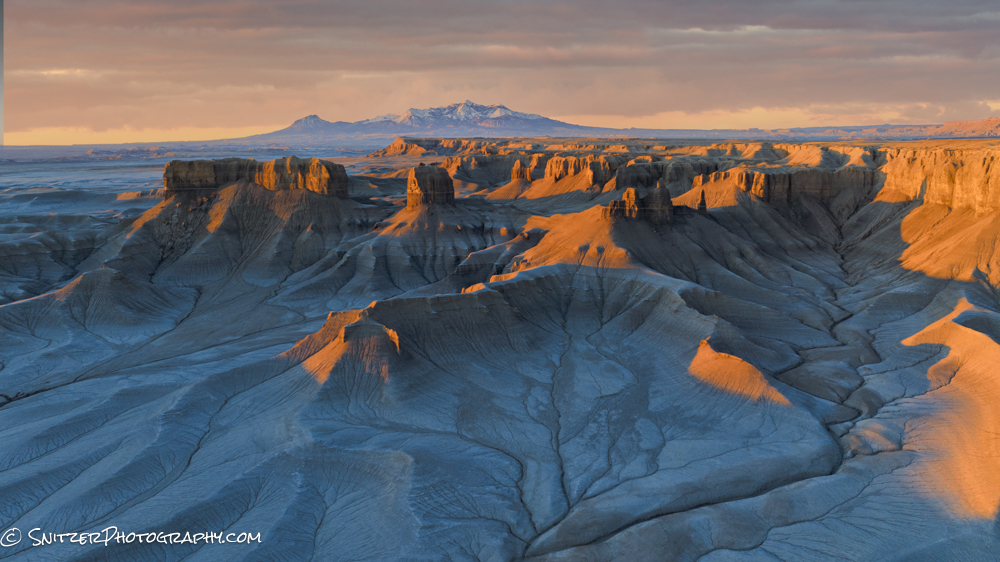
Sunrise a great time to view the “Moon Overlook”. Honestly, it looks more like Mars to me.
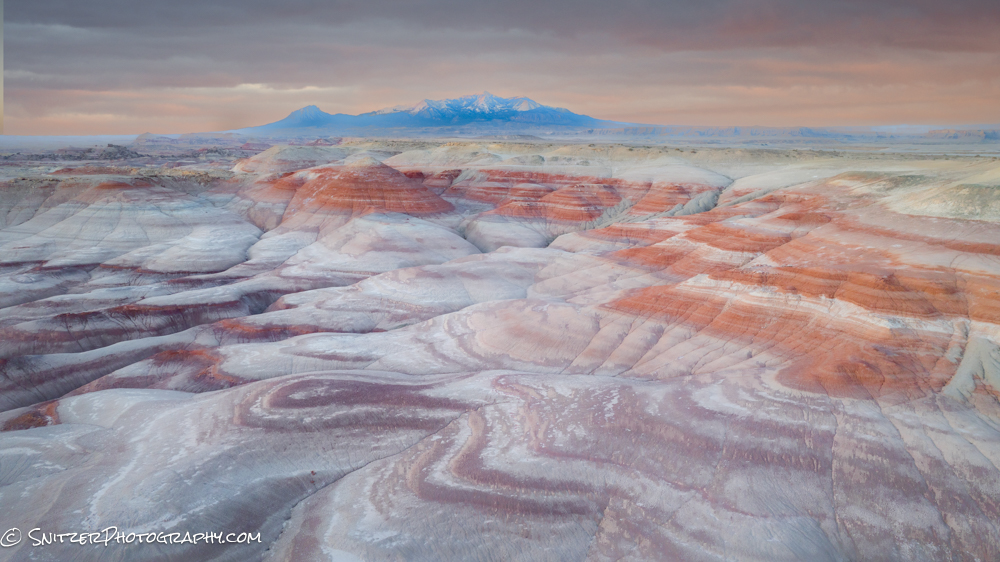
About 7 miles away are the Bentonite Hills, formed from mud, sand and volcanic ash and created over 140 million years ago during the Jurassic period.
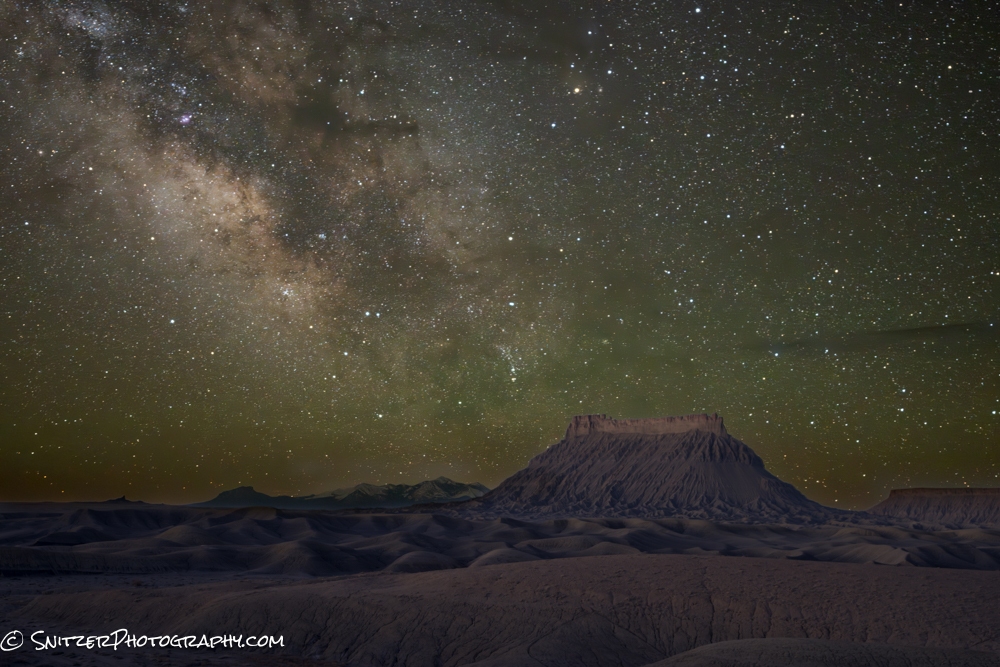
Another prominent feature of the area is Factory Butte shown under the Milky Way at 5am. I waited around till dawn to get the soft blue light that illuminated the foreground in the image below.
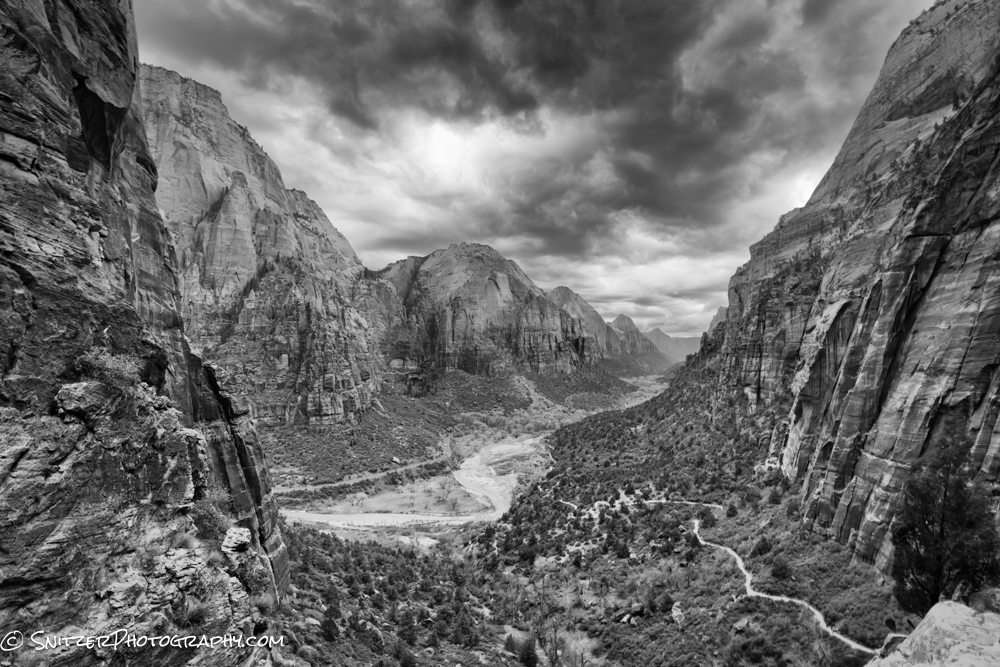
Ok, I need to keep moving. No rest for the weary. Next stop; Zion National Park and a view on route to my fav hike there, Angels Landing.
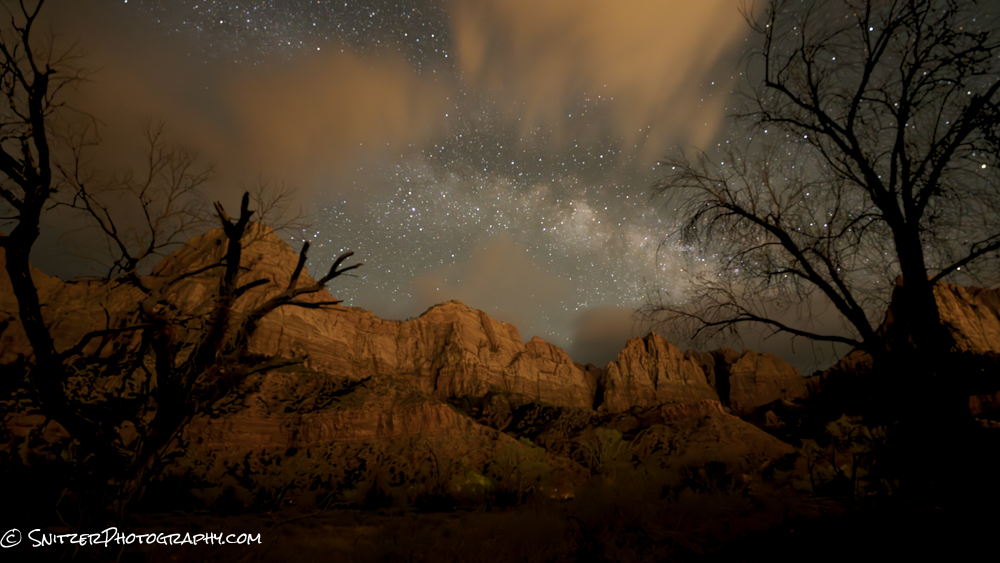
Shown below is the Milky Way arching across Zion’s night sky (4:30am). The rock walls are illuminated by the dim light of nearby Springdale, Utah.
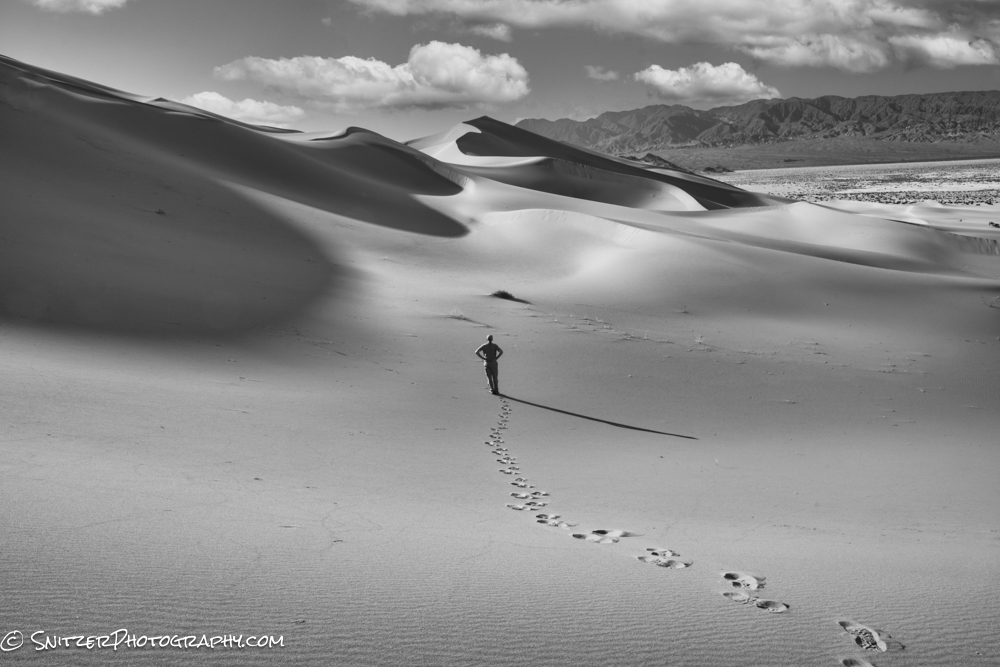
Several days later I arrive in Death Valley which lies about 90 minutes West of Las Vegas. Yup that’s me disappearing into the sand dunes. Goodby cruel world.
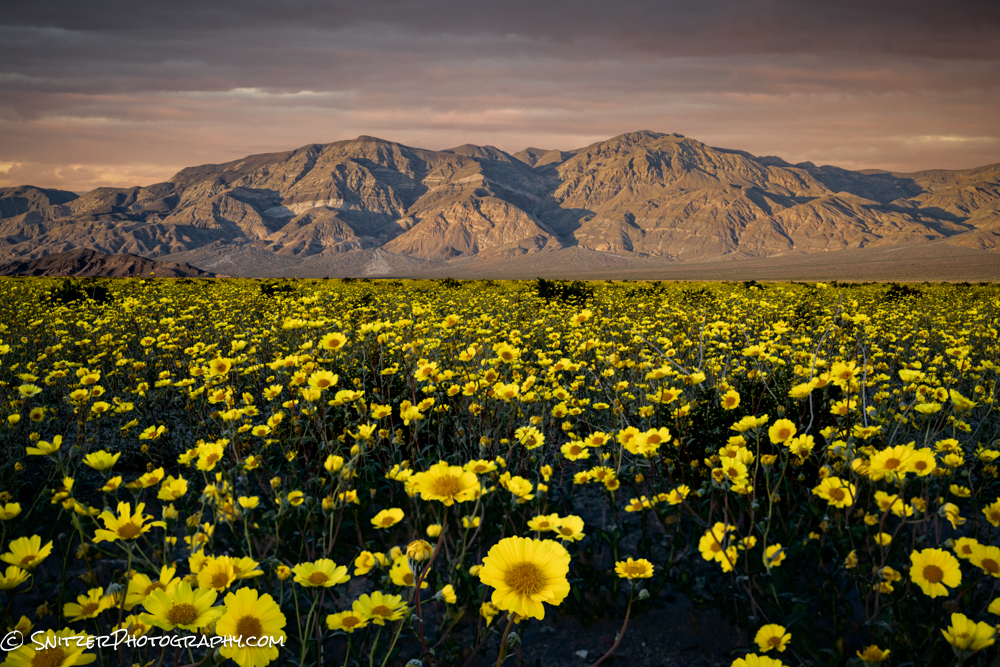
This year the National Park was hit with unusual torrential rains, a once in a decade event. The result? Parts of the park which are normally dried clay now are carpeted with yellow Sunflowers.
In fact some areas have received so much water that they are now shallow lakes. Badwater Basin, normally looks like this!
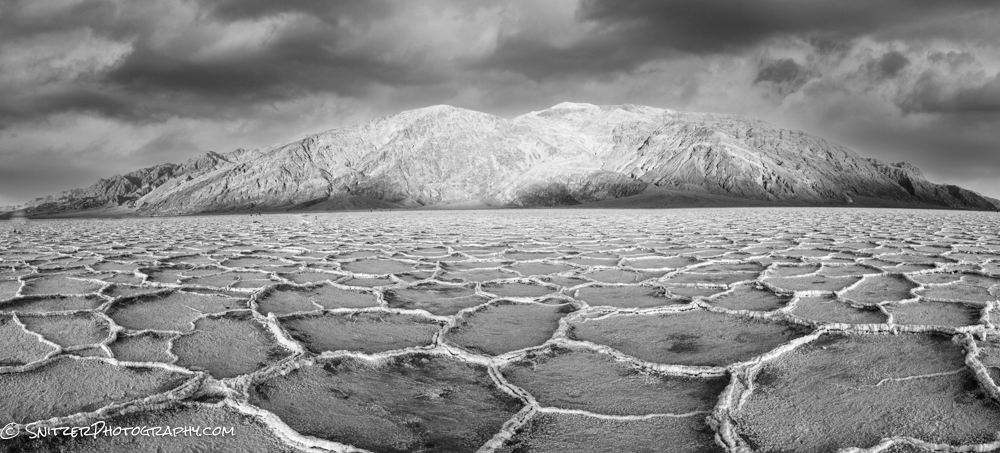
Check out the difference now that it’s full of water. This pano shot taken at 2:30am features the Milky Way reflected in the mirror like water, now called Lake Manly.
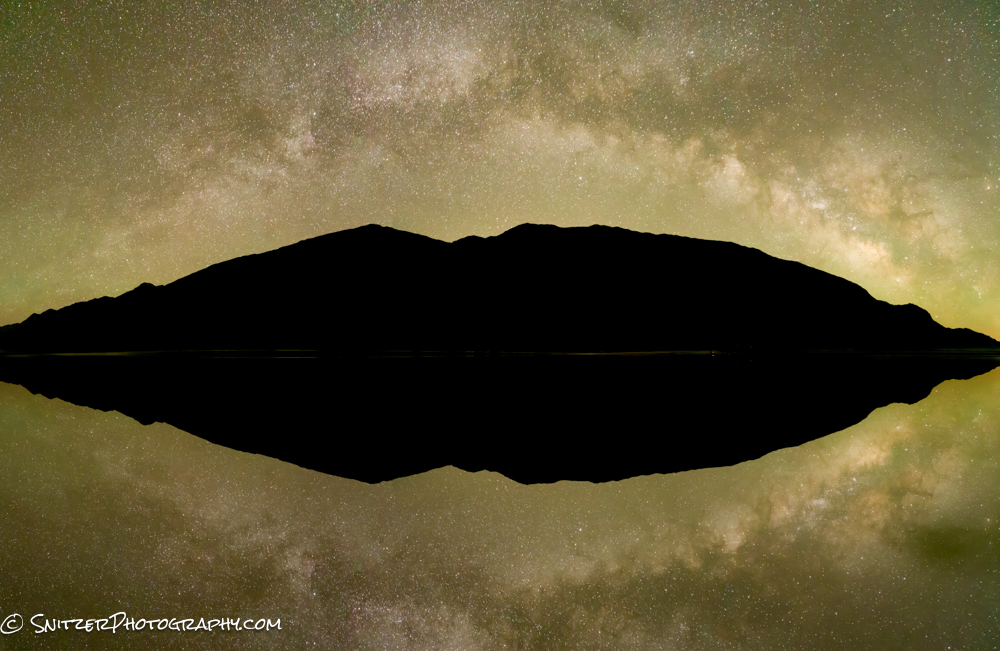
Speaking of the Milky Way, nothing beats exploring a sand dune in the dark when you can’t see where you’re going. I have a few screws loose.

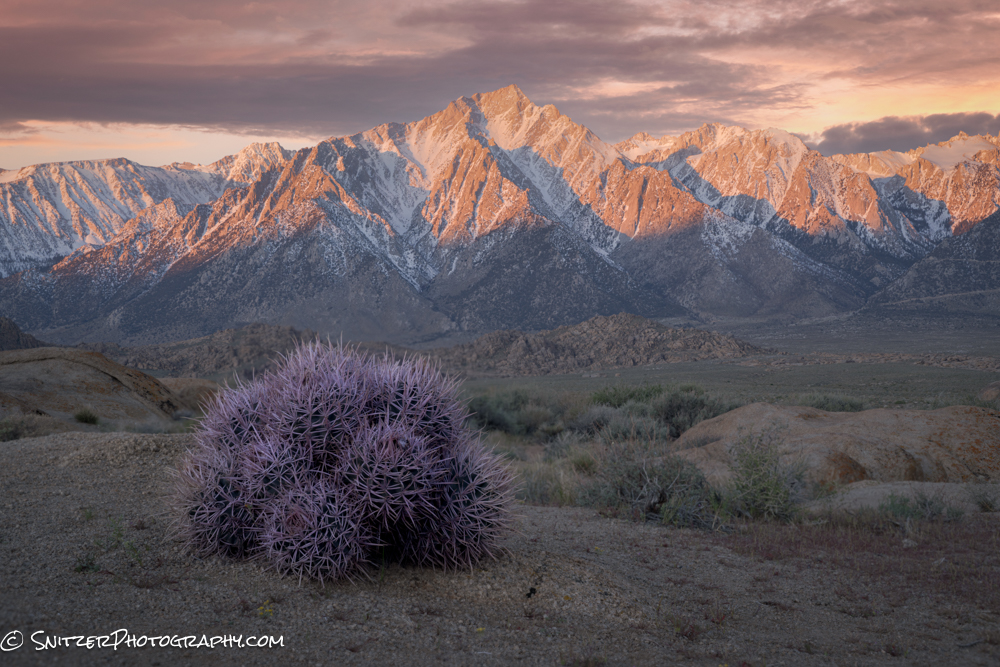
Final stop is the Alabama Hills, home to hundreds of Westerns that were filmed on location in eras past (located at the foot of Mt Whitney-shown below).
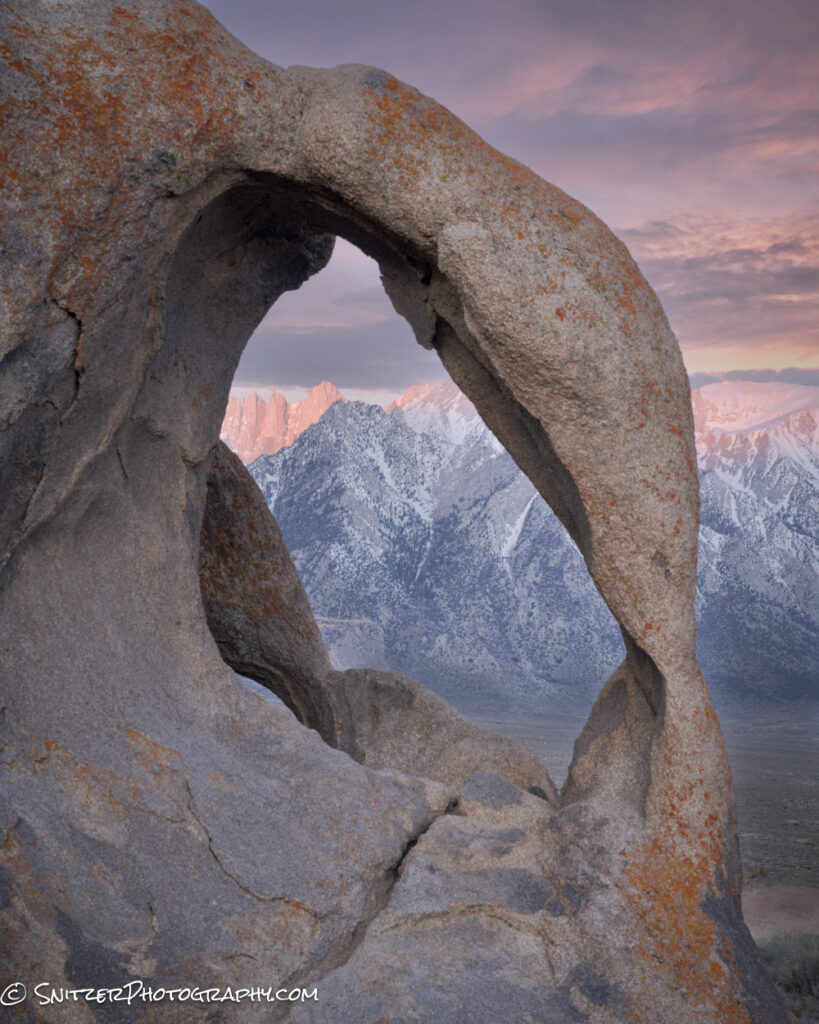
Below is the Cyclops Skull Arch framing the same Mt Whitney.
If you’d like to see my entire gallery of photos click the link below!
https://www.snitzerphotos.com/Other/Galleries/Death-valley-hanksville-alabama-hills/n-r9dm5M
Your Sony sensor has two “best” ISO points? 100 and 320?
Generally speaking, as you increase the ISO of your camera you lose dynamic range (DR), rather significantly I might add. For example, most full-frame mirrorless cameras can lose up to 3 stops of DR when increasing the ISO from 100-800. But here’s the rub, that’s not exactly right. Huh?
Your sensor has two native points which produce the best results. Long story short (for Sony A7r IV and V): 100 is your best ISO for low noise and DR. But 320 is the next best choice, better than 160 or 250? So generally speaking, if 100 doesn’t do the trick, crank things up to 320.