Olympus vs Sony: Lighter? Better?
OMG, the Olympus camera is so fricken light! A game changer! Right? Err, not exactly.
The Olympus OM 1 (their flagship) outfitted with the pro 12-100mm F4 lens (4.59″ long) weighs a total of 2.5 lbs. The Sony A7Rr V paired with a Sony 24-105mm lens (4.46″ long) weighs 2.9 lbs.
Both brands generally weigh the same and are similarly compact.
Do they perform the same?
- Sony provides 15 stops of dynamic range (DR) and can recover approx five stops of underexposed content. The Olympus has only 12.7 stops of dynamic range and 2.5 of recovery. The DR of the Sony is four times that of the Olympus (each stop doubles the range).
- Sony delivers over three times the resolution. 62 MP vs. 20MP. Sharper photos, easier to crop, blow up large.
- Sony has vastly superior low-light performance (given its full-frame sensor) and color rendition.
Cost comparison:
- Olympus OM-1 $2,200, 12-100mm F4 lens $1,200
- Sony A7R V $3,900, Sony A7 IV $2,500, 24-105mm F4 lens $1,300
Note: If the Sony A7R V is too expensive for your tastes, the Sony A7 IV (33MP) is a great lower-cost choice.
Ozarks vs Smokies for fall color?
About 700 miles separate the Ozark and Smoky Mountains. Both are spectacular places to leaf peep, bike and hike. Two differences:
- The Smokies are a little more vertical & perhaps contain a slight edge on iconic trails/views.
- Smoky Mntn NP is the most visited park in the US! It’s more crowded. Don’t even think about staying in the popular park destinations of Pigeon Forge or Gatlinburg. They’re grossly, overbuilt resort towns. Townsend, Tn, is the place to be (quiet, gorgeous).
My time in the Ozarks centered around Buffalo River River NP. The park was the first national river to be designated by the Park Service and flows for over 135 miles. With that extended shoreline the possibilities seem endless.
The river is also home to a sh-t ton of spider webs. They literally glow when warmed by the morning sun.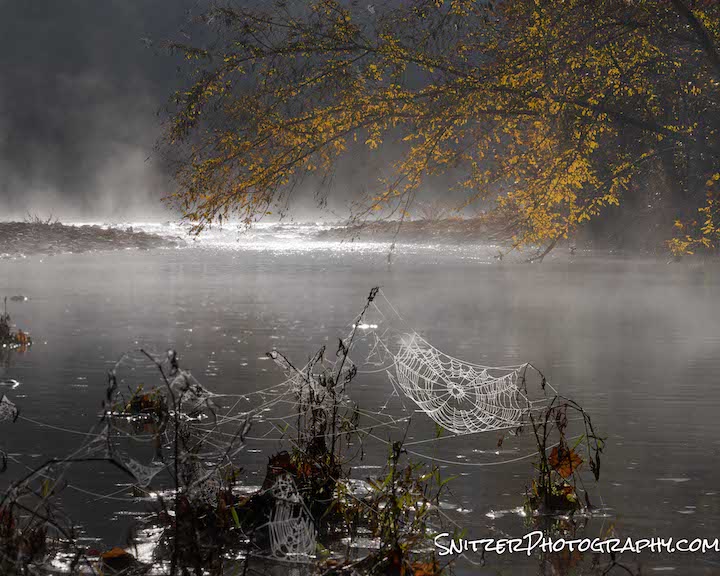
The cold fall nights and humid air allow for fog to frequently roll in each morning. Makes for some moody photog ops!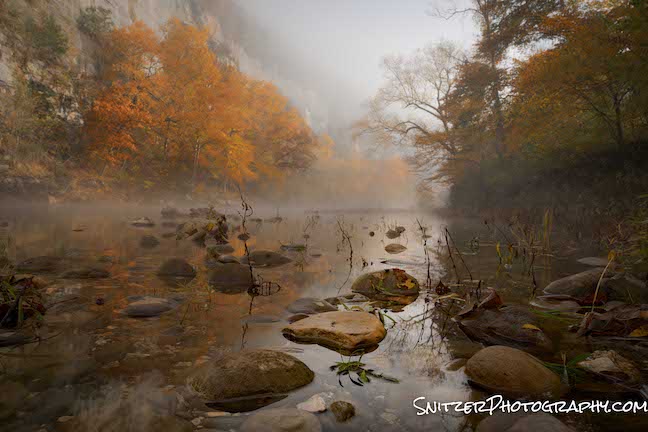
My Drone provided the means to capture the fog from above.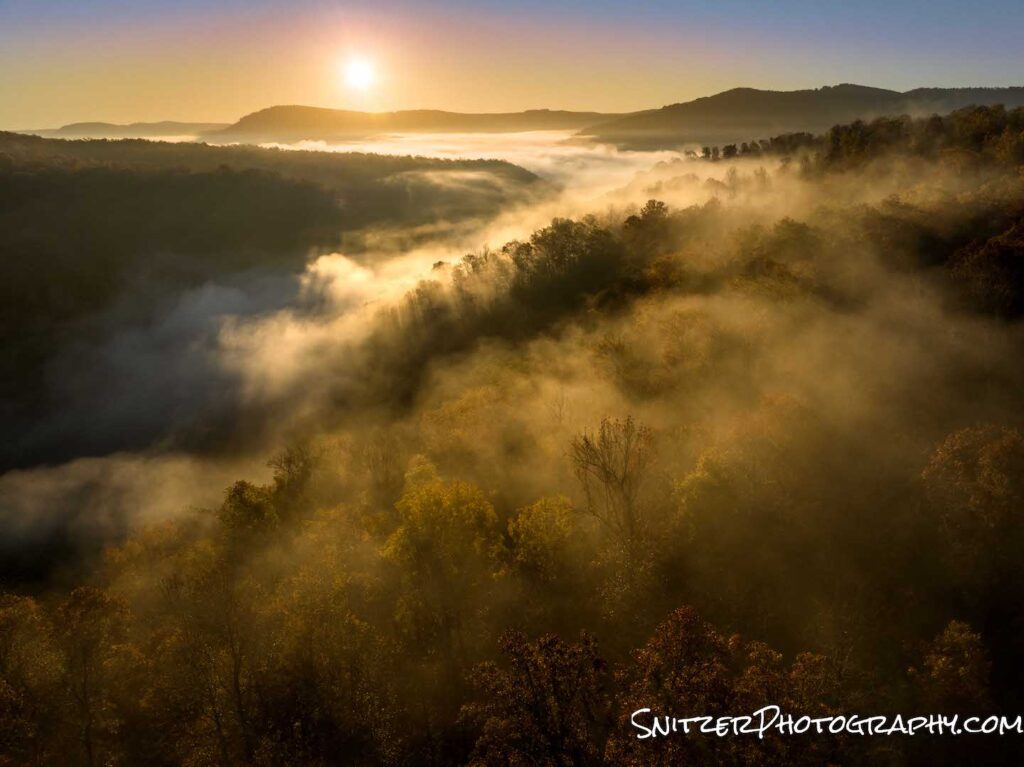
There are also a host of great hikes just outside the park. Pictured below is your fearless leader doing a self portrait atop Whitaker Point. Yep, that red backpack is my trusty camera bag.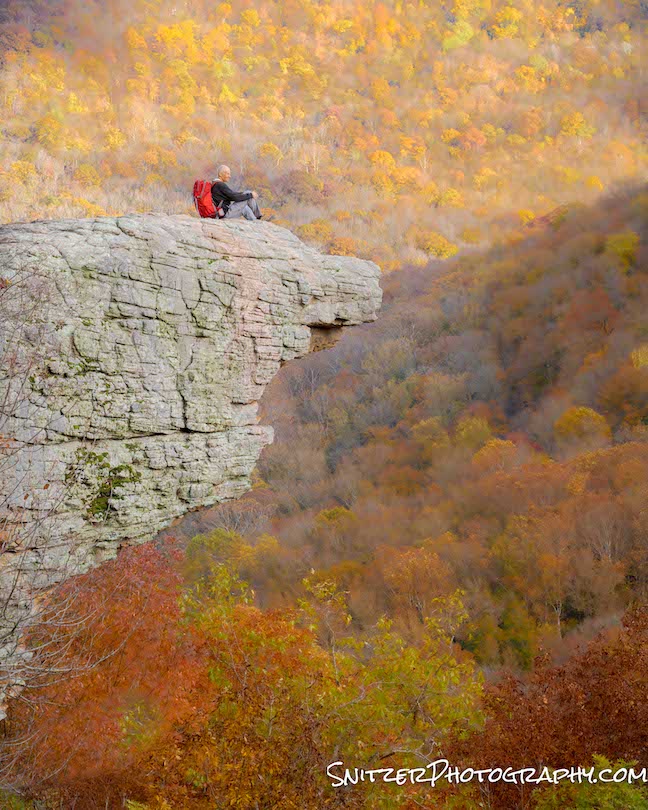
After several days exploring the Ozarks, I started the 10 hour drive to the Smokies, stopping along the way to hike out to Machine Falls, just outside of Tullahoma, Tn. Yep, out in the boonies. Zero crowds!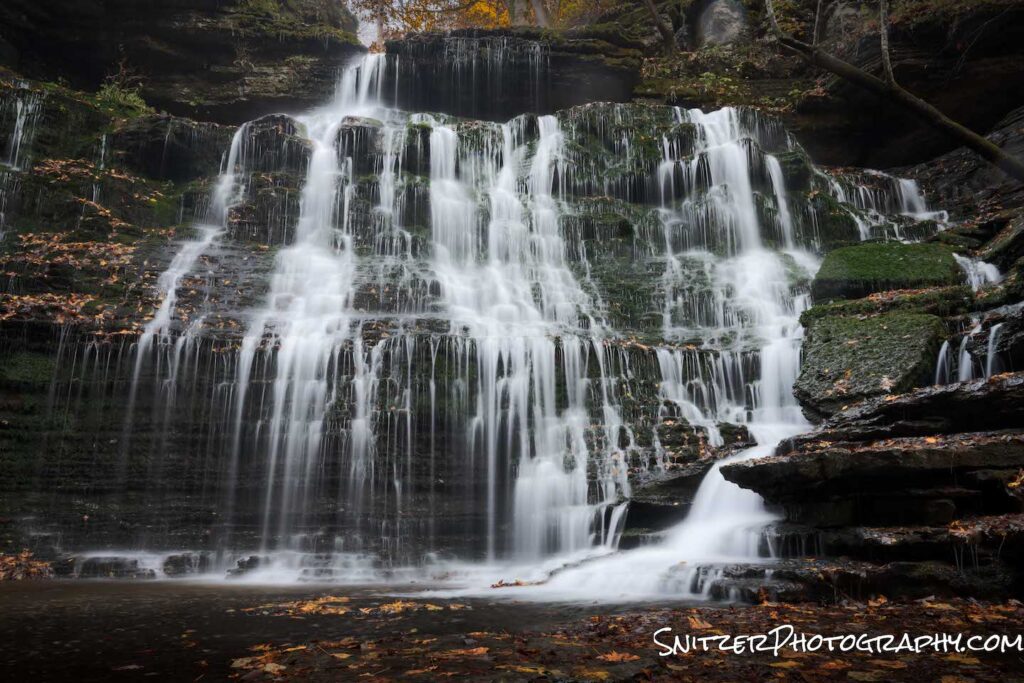
Drone shot above a nearby lake. The white cottonballs in the blue water are actually the sky being reflected. Wooo!
Day one in the Smokies and I’m treated once again to fog blanketing the valley & beams of light breaking through! 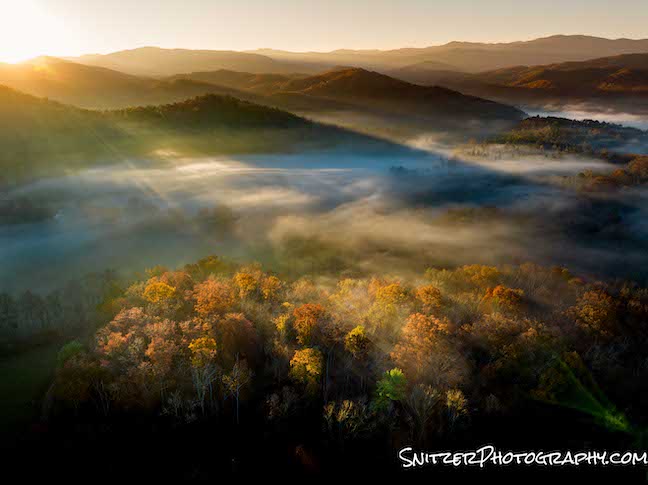
The area is also full great rivers to explore. BTW, the spiral brown formation in the lower right section of the photo actually consists of leafs stuck in a whirlpool. I took a long 10 second exposure which blurred those bad boys.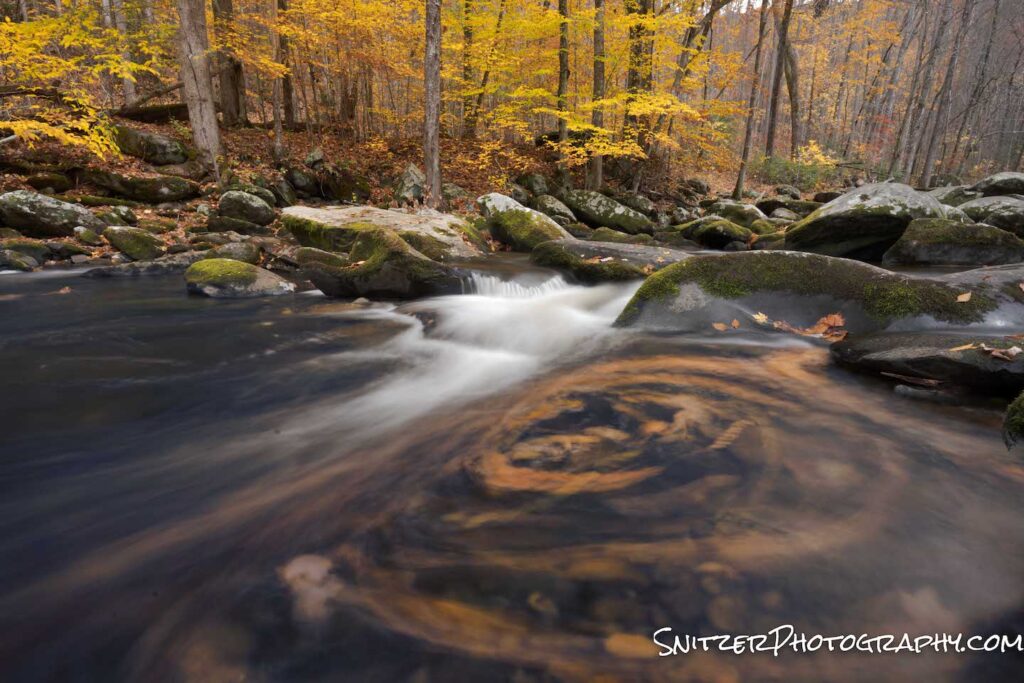
Lots more fun photos to see. Click the link: Click for more!
Your sunrises/sunsets stink? I can fix that! HDR Ninja to the rescue.
Frustrated by HDR lighting? The sky looks incredible in person but your photos suck? Don’t worry, read this and you’ll never miss a big shot again?
The camera vs your eyes. We can see 20 stops of dynamic range( DR). DR meaning the difference between the lightest and darkest parts of an image. Ergo you can detect something 500,000 times brighter than something else. Cameras can’t do that (at least without a few tricks).
Low-hanging fruit:
- Shoot in RAW. This provides 3 more stops than a typical JPEG image. Note: each stop represents of doubling of DR (exponential function. 3 stops means 8 times the range)!
- Lower your ISO. For example, turning ISO down from 800 to 100 provides a whooping 2-3 stops of additional DR depending on the camera.
Camera brands do matter.
- Most Nikon, Sony and Medium format cameras (Hasselblad X2D, Fuji GFX 100) currently offer 15 stops of DR. They can also recover almost five stops of under-exposed data (ISO invariance), meaning even if you underexpose, you can save in post-processing.
- Canons, on the other hand, generally offer only about 12 stops (except the 5d Mk IV & R6 at 13 and their R5 and R3 at 15). BUMMER! Except for the latter two cameras, Canons can only recover about 2.5 stops of under-exposed data.
- Olympus? Not much better; their current mirrorless model offer about 12.8 stops and 2.5 stops of ISO invariance. (Source DXO Mark)
How ISO invariance REALLY works.
The first image is taken at an iso of 3,200.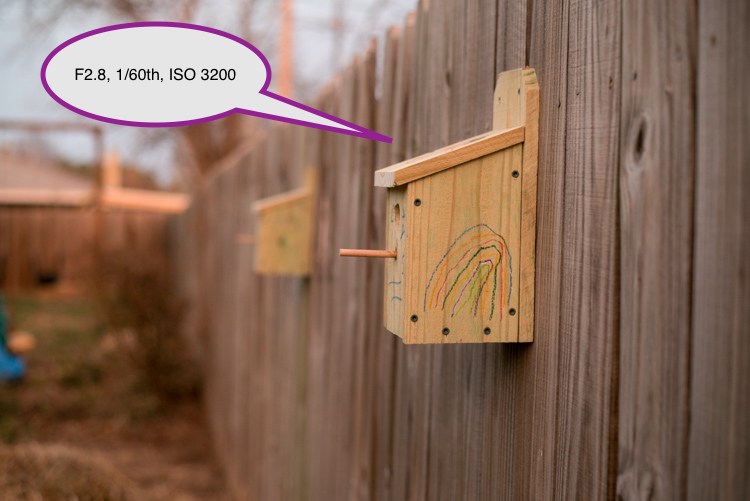
We under expose (ISO 100) by 5 stops and it’s practically black.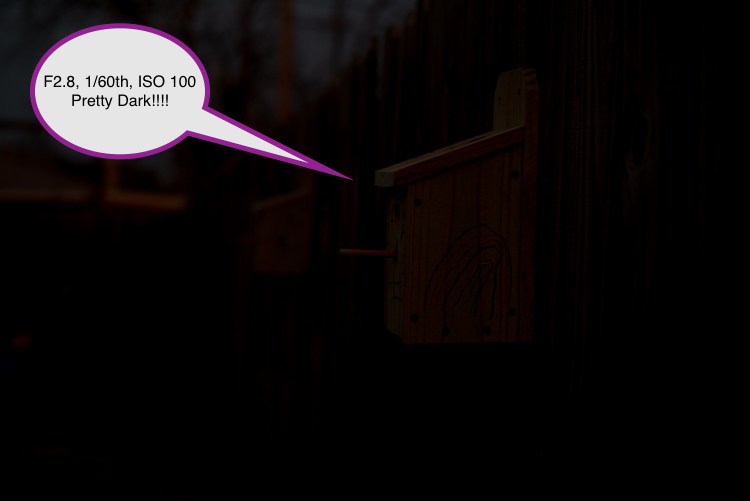
The miracle. We take that underexposed photo into Photoshop and boost the exposure by 5 stops. Image fixed! Sharp, no noise or loss of detail.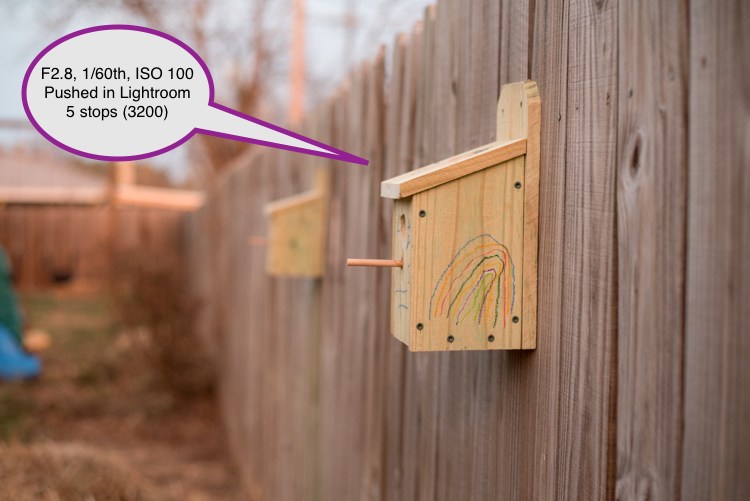
One thing to remember: Better to underexpose, NEVER overexpose (even 1 stop renders your image area white with no chance of recovery).
How to get the exposure right:
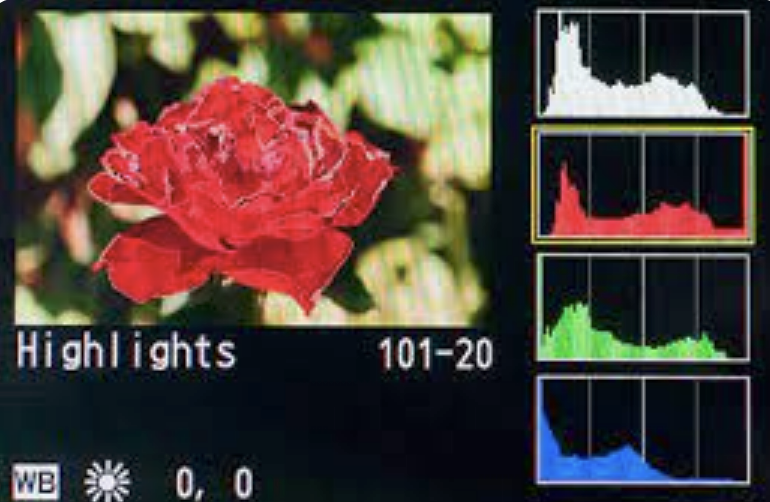
- Shoot in manual made. Use your histogram and highlight warning indicator. Turn up your exposure till you first see the highlight warning come on. Note: Your camera’s histogram is reading a Jpeg image. The RAW image you’ll be processing will have 1.5 additional stops of higher range. Meaning you can turn up the exposure 1.5 stops after you see the warning come on.

- For red/orange skies be careful. Your black & white histogram and warning indicator will typically not show clipping of your red channel. Make sure to watch this (using your red, blue green histogram) and reduce your exposure if the red channel is pushing up against it’s upper limit.
Bring back highlights in post: Ex.
First photo is set to maximize exposure without losing the bright elements of the sky.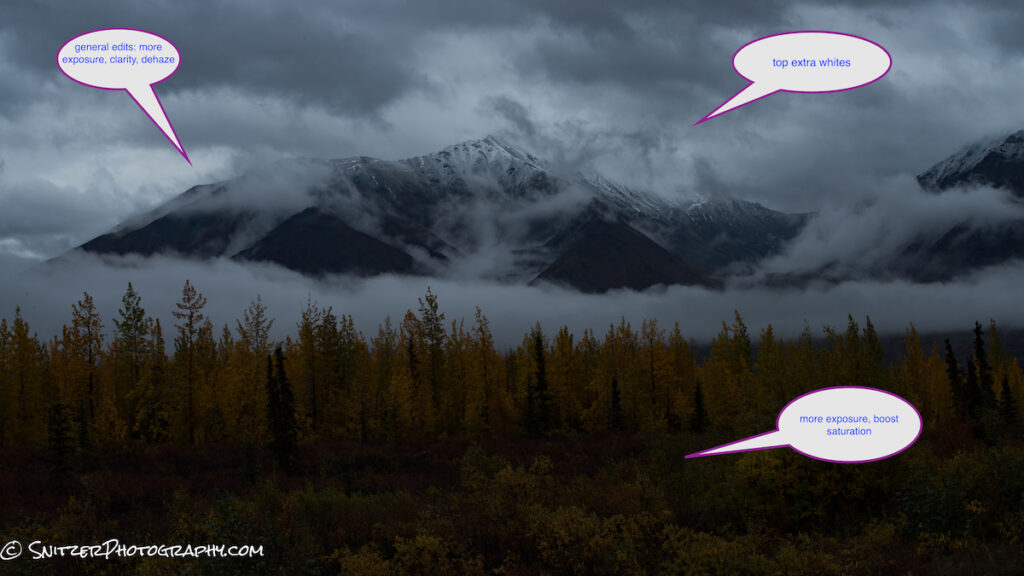
Then I use the “shadows” slider and a selective brush to add exposure to the foreground area and recover under exposed areas. Mission accomplished.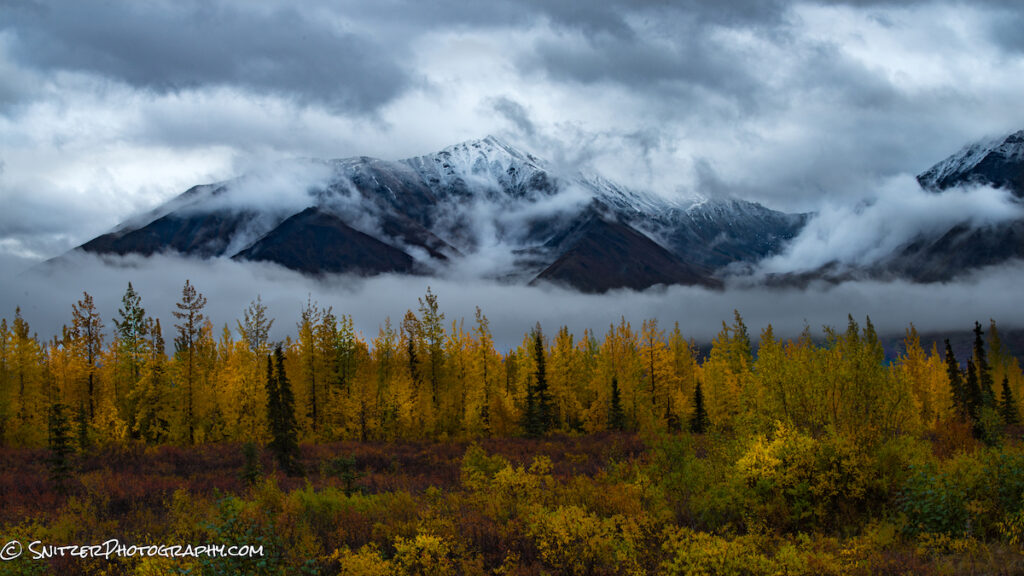
What if I can’t get the exposure right in one shot? Occasionally (a super bright sky) you will shoot at the optimal exposure and still see your histogram slammed up against the left side. That means there is additional data you’re losing in the dark areas. You have three basic options to get this data back.
Old School (Grads): Essentially a tinted windshield for your camera. These rectangular filters (graduated neutral density-Grads) slid up/down on a holder that screws onto your lens. You adjust the darkened portion of the filter to line up with the horizon of your shot.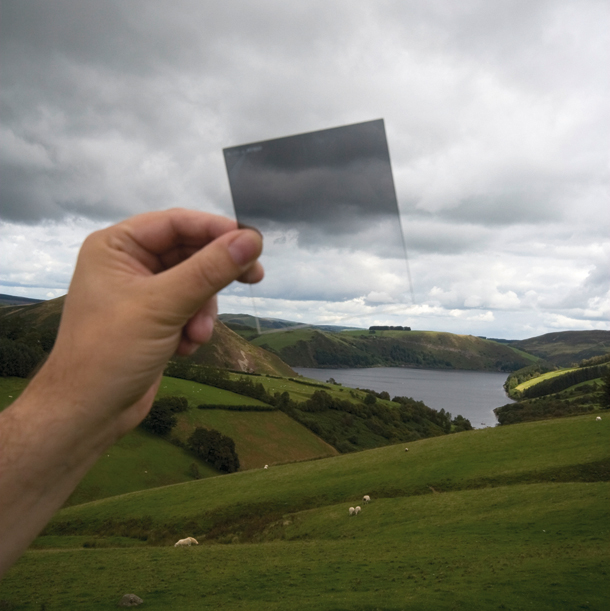
Pictured left no grad, pictured right with grad.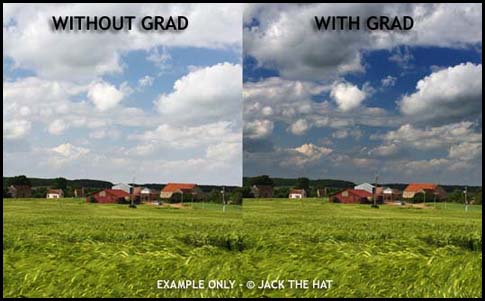
How you set up on your camera.

- Filters come in various strengths. I own a 2 and 3 stop Grad.
- They have either soft or hard transition areas(dark to clear). I usually use a hard filter.
- They can be combined in the holder with a solid grad (6 or 10 stop) to create very long exposures (good for coastal shots).
- Cost: Lots of good manufs (Lee being a popular choice). Cost for 2 Grads, 1 solid ND, holder and 2 lense attachment rings is about $500-600. Note: Stay away from Cokin (cheap but with a terrible color cast).
Photoshop exposure blending:
- Take one shot exposed for the sky. Take a second one exposed for the dark foreground.
- Combine using layer masks in Photoshop. https://www.youtube.com/watch?v=msIOb7Sg_Gc
HDR software: Take between 3 and 5 (in extreme DR situations) photos bracketing 2 stops apart. Photo below 2 stops under exposed. Sky is perfect, but the foreground is much too dark.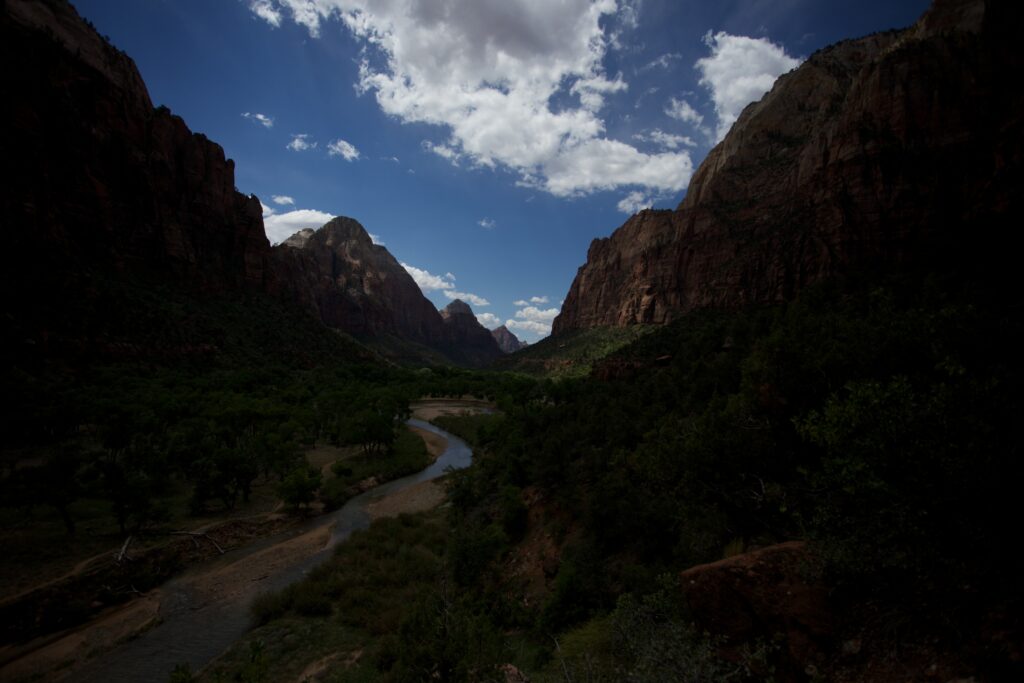
Next shot neutral exposure. Sky is a bit overexposed, foregrounds still too dark.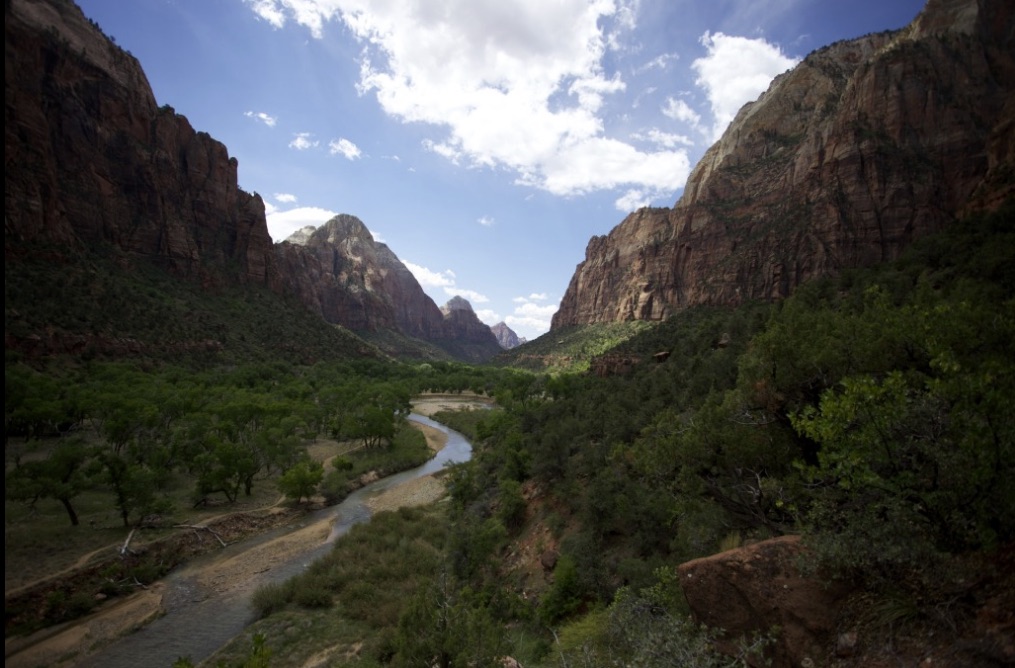
Final shot 2 stops over exposed. Sky completely blown out, foreground perfect!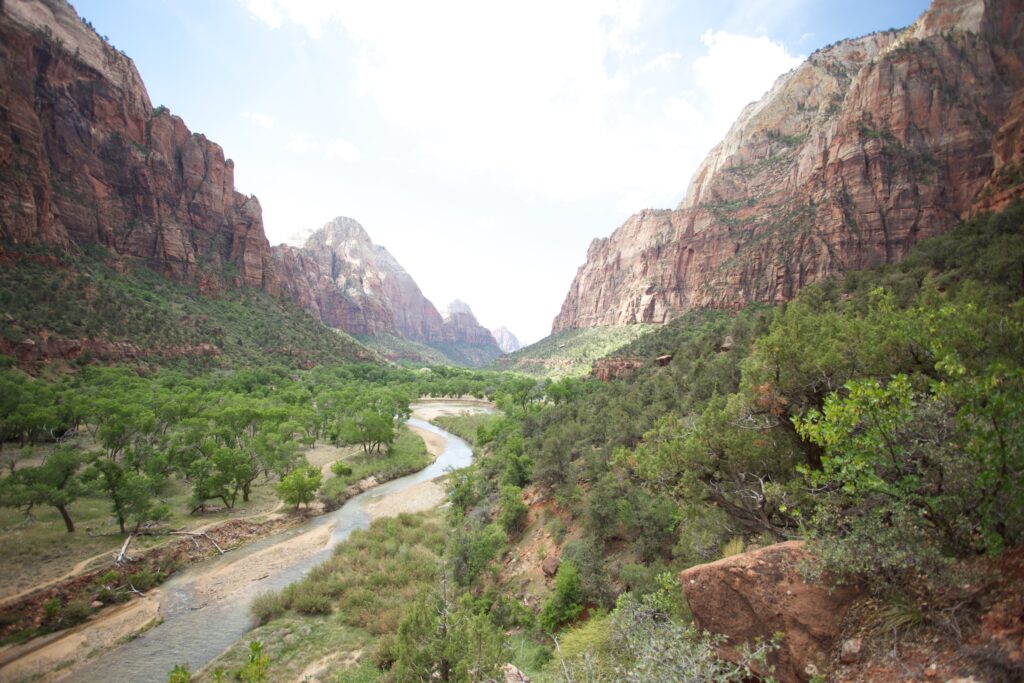
Then combine using HDR software to produce an image with huge DR! Many choices available (Photomatix, Aurora HDR). They’re all similar in quality. The best choice ironically is free, Lightroom(use auto-align feature, turn off auto settings). It keeps the resulting image in RAW format (the others return an inferior TIFF image). You’ll need to use clarity, dehaze, clarity black point and other sliders to tweak the final image.
Lightroom HDR photo. Needs additional tweaking.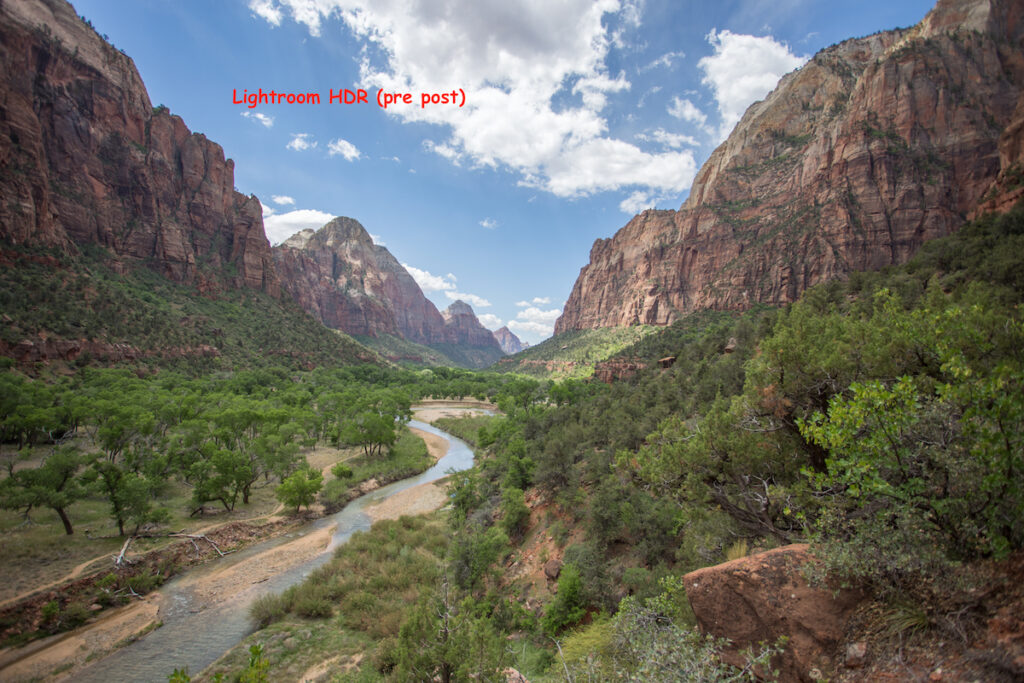
After edits. looking awesome!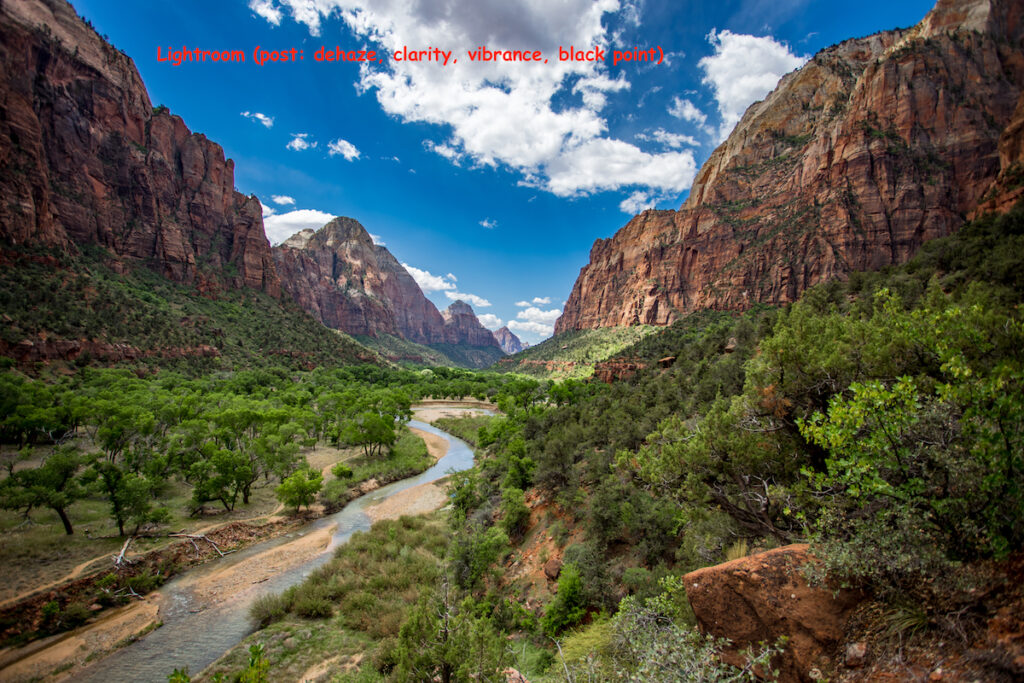
Which method best?
- Grads require almost no work in post processing. They are expensive however, a pain to set up and don’t work well with complex site lines (like mountains). Great option for beginners who aren’t yet comfortable behind a computer.
- HDR software. Works great in most situations, except brilliantly colored sunrises/sunsets (tends to get wonky look skies).
- Exposure blending in Photoshop. The only way to go for red skies. Also a great option for coastal shots with exploding waves. Take on shot for the sky another to capture the perfect wave explding over a rock.
Now go out there and get some bomber images! Wooooooo.
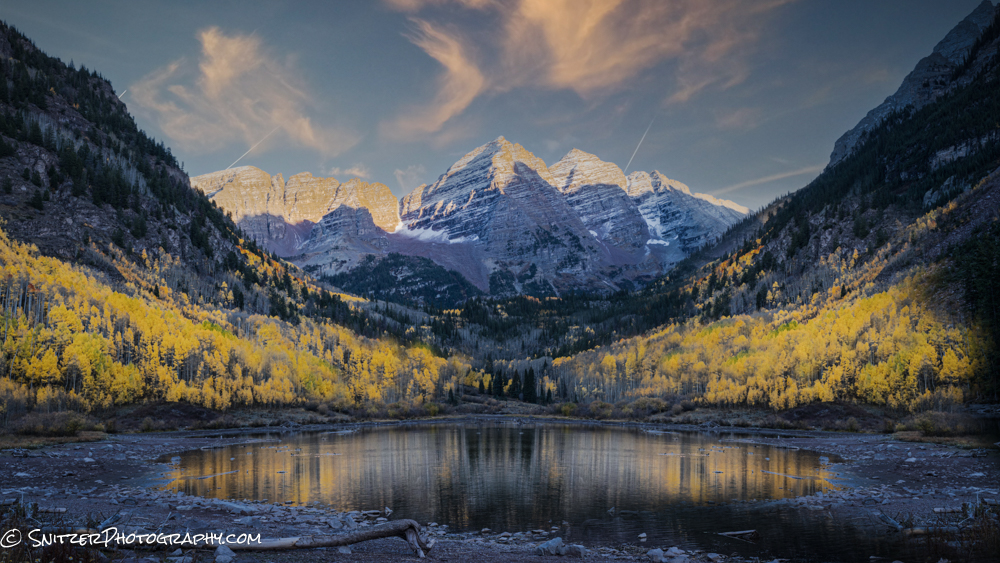
Fall foliage in the Rockies!
People frequently ask me “how” do I get “those shots.” Some inside scoop, specifically for leaf peeping, follows.
Basically, to get good fall color, you first gotta get there “at the right time.” Unfortunately, in the Rockies, it’s almost impossible to predict when the fall color will explode. You’re typically looking for that crazy 7-day period when the lights go “on.”
Unfortunately, the variability of summer rain, fall temps, and big wind storms (that can strip the trees bare) all make predicting pretty much impossible. Meaning I plan very last minute and start driving in when it’s “just right”.
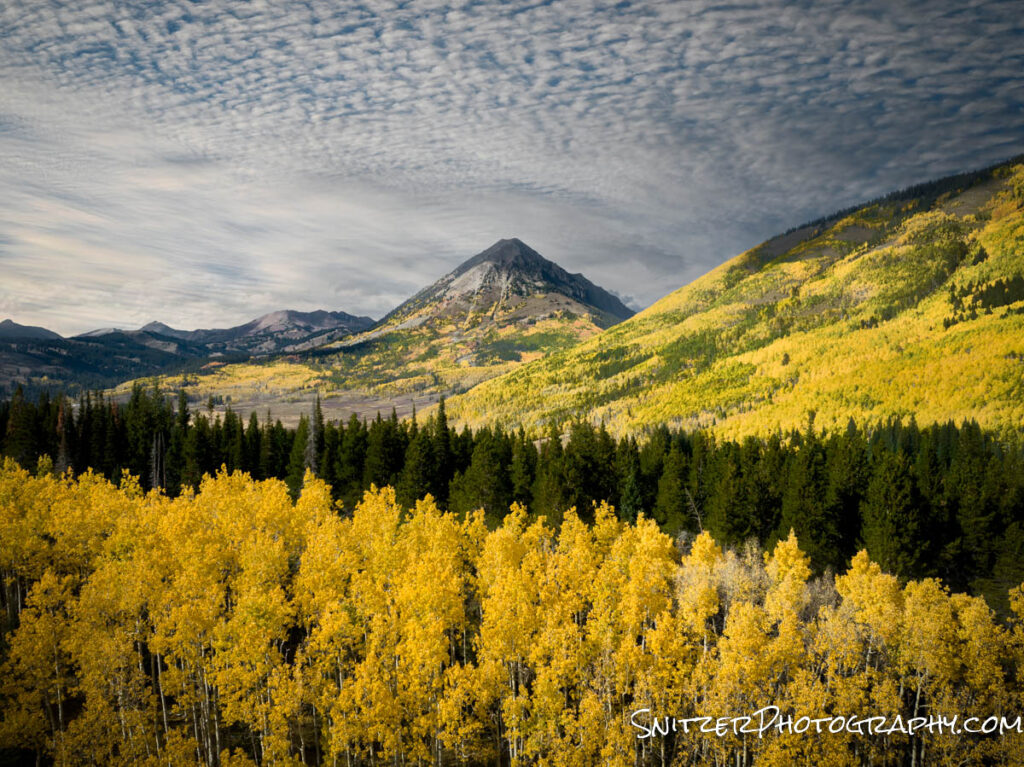
So getting there is half the battle. The other half is catching great light and even better, an overnight snowstorm before the leaves disappear. You want just the right amount of clouds to catch the early morning rays or sunset. Clear blue skies suck!
Every once in a while, I get lucky. Got up early to catch this shot after it snowed all nite. Was this view visible from the road? Nope. That’s where the drone comes in.
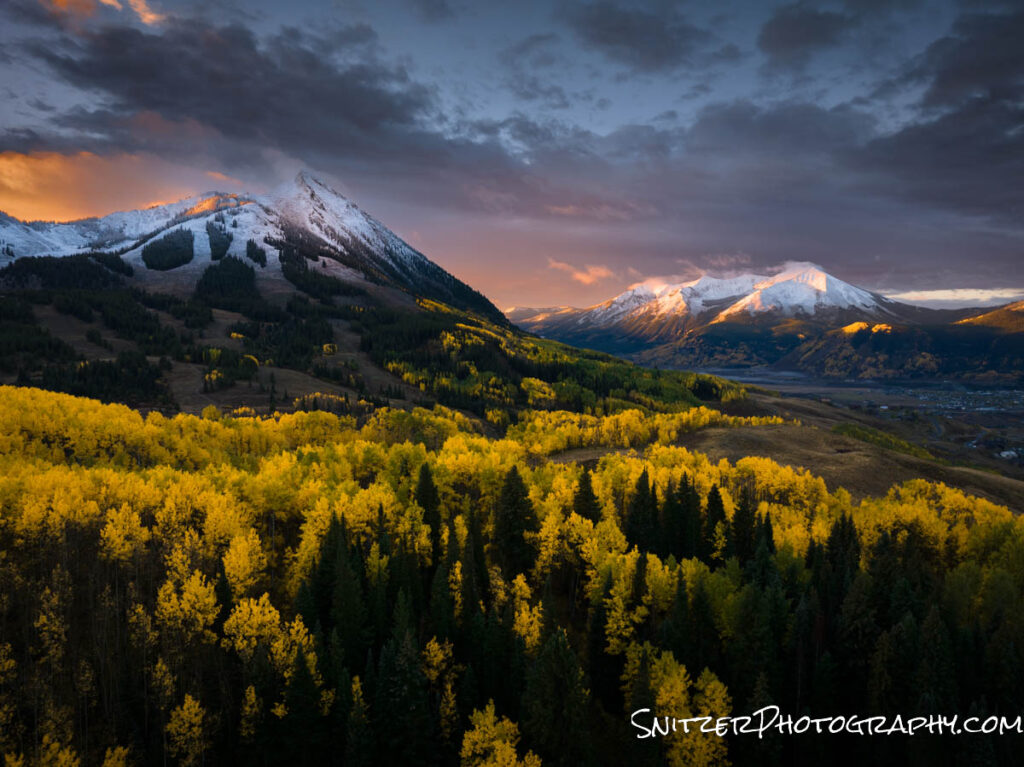
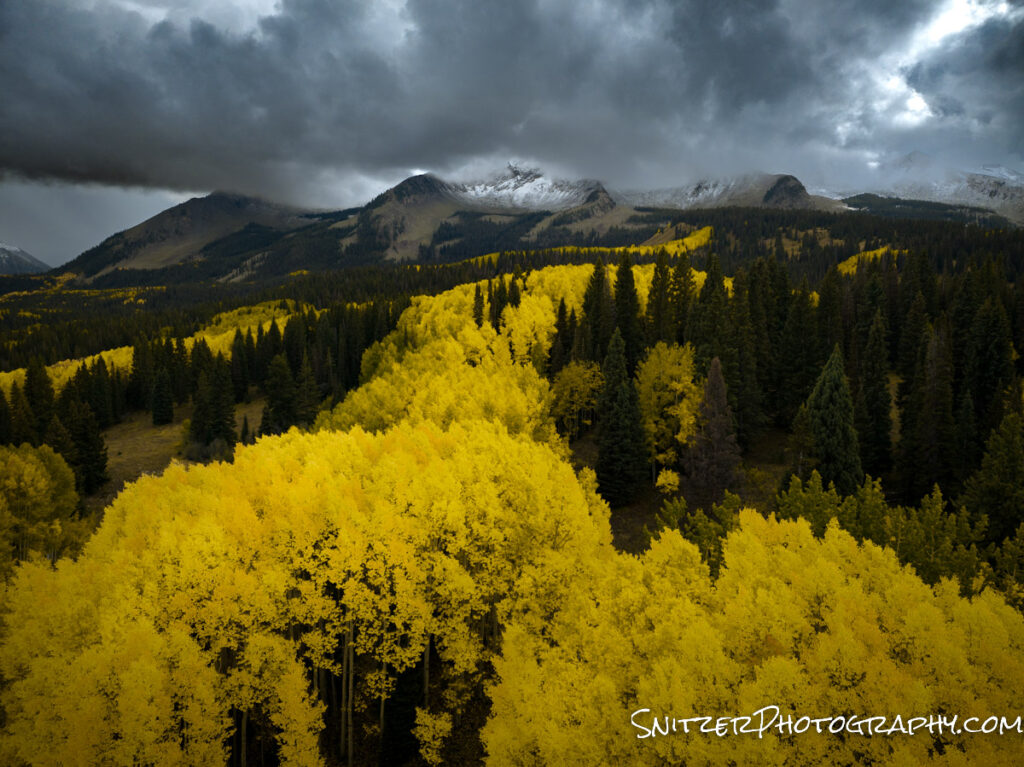
Drones have become a leading edge tool to grab unique shots from vantage points previously requiring a helicopter. Kind of the new frontier for adventure photography.
Some other shots taken in flight. BTW, I use a DJI Mavic 3 Cine as my UFO.
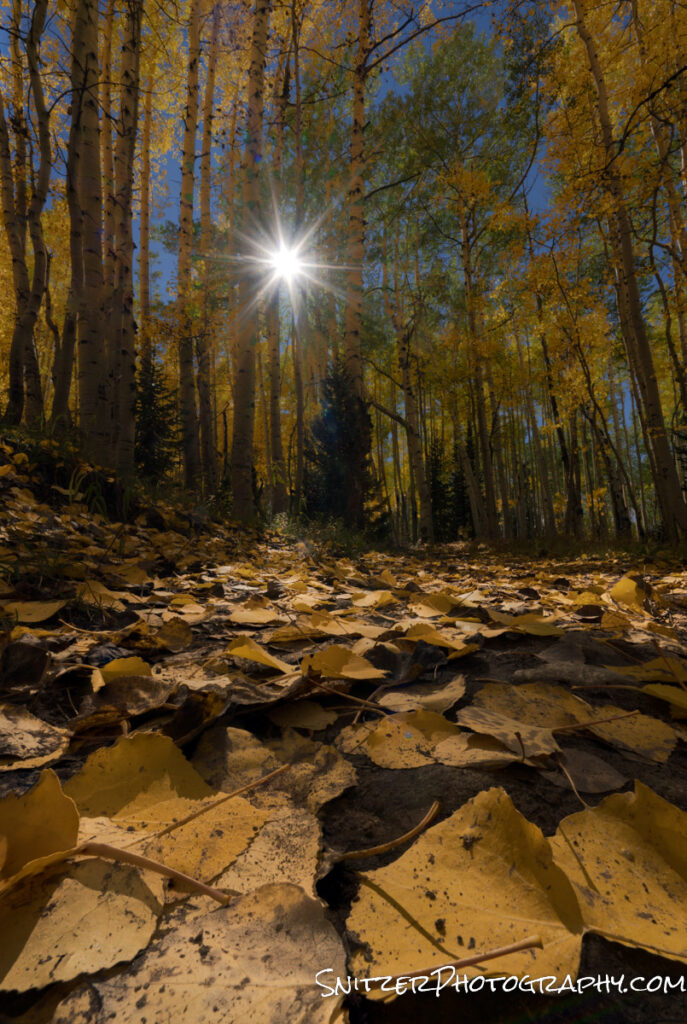
That’s not to say, I’m not willing to go low. This photo was taken about 2 inches off the ground. For our photobugs out there, it’s actually two images blending together. One focused in on the nearby leaves, the other focused on the further away trees. I used a small aperture (F22) to create the Sunstar.
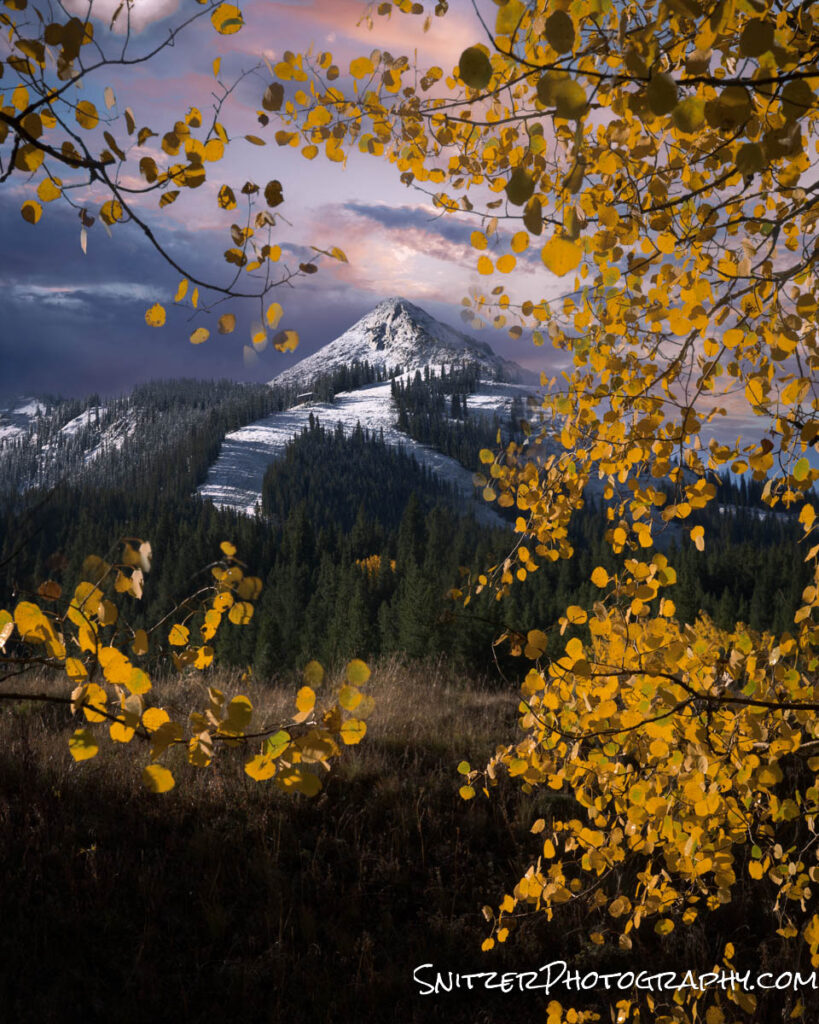
I used the same technique below (focus stacking) to get the nearby leaves in sharp focus (shot 1) and then focus out long for the mountain (shot 2).
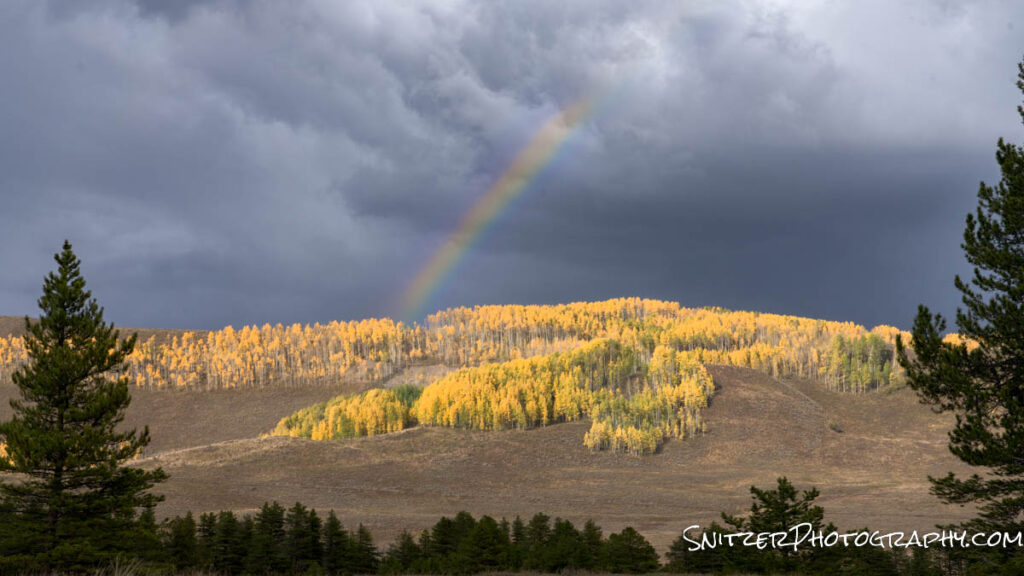
Ok, now for getting rainbows. When I see it raining, but there’s a clear sun sky behind me, I start looking around!
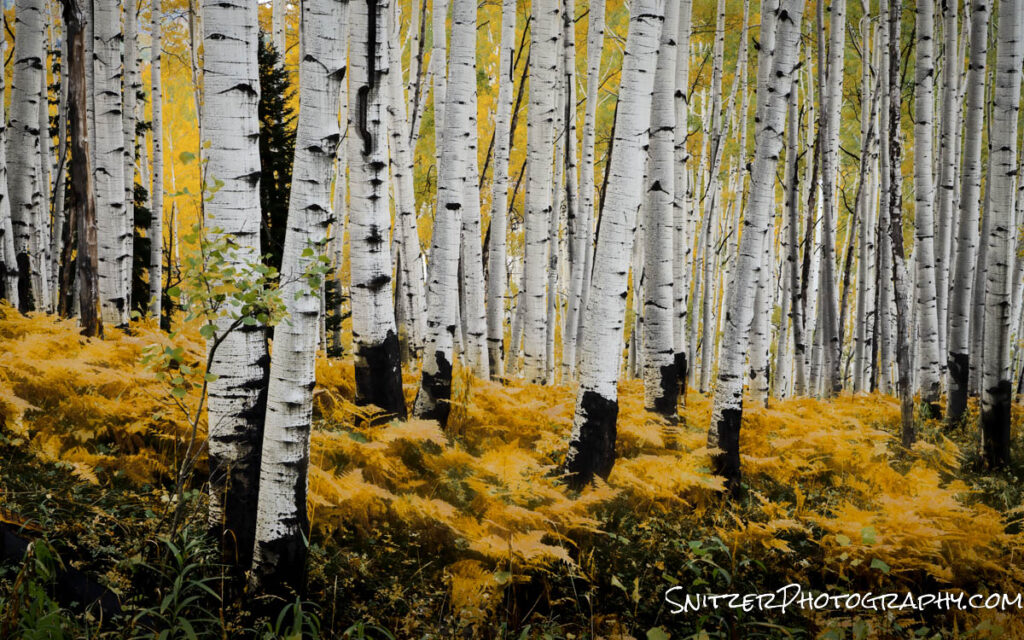
What makes a great woodland shot? Occasionally, you chance upon some very white, large-diameter Aspens with the foreground covered in ferns. Yellow fever!
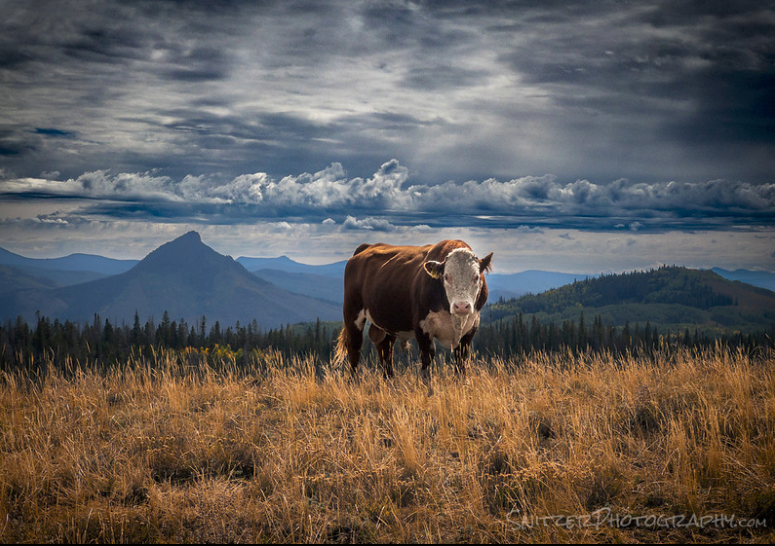
Let’s not forget the wildlife!

No, not the moose, the Holstein(or whatever). I was standing about 8 ft from that girl. Actually taken with my iPhone. BTW, I was not close to the moose. Don’t have a death wish. Taken with a big telephone lens.
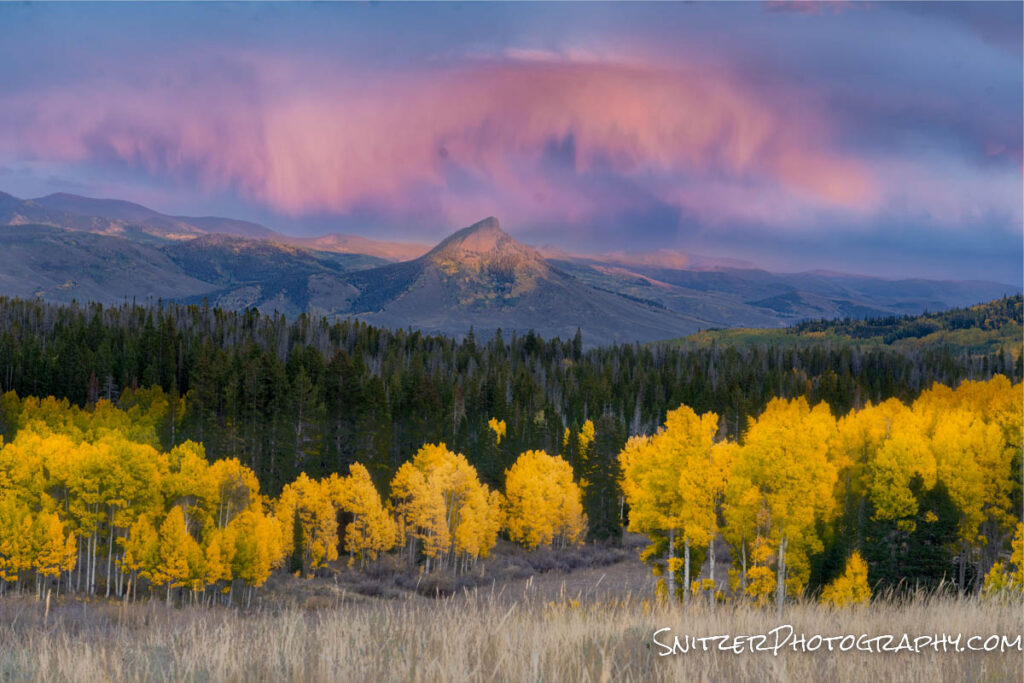
Finally, it doesn’t hurt to be tenacious. I’ve been trying to get a great shot of Mount Crumpet (Rabbit Ears) for years. Some Steamboat buddies, helped me find the right vantage point (thanks to the Clarks!). Finally got all the elements together. Great sky, changing trees & hint of sunlight on the mountain.
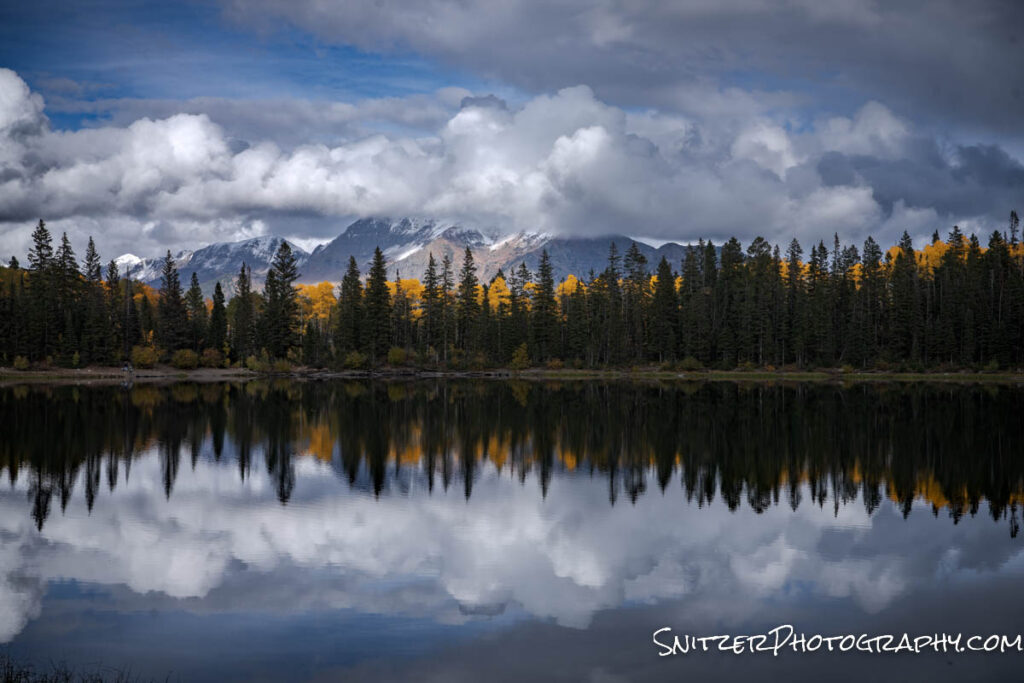
Oh, yes…how to get a good photo of a lake? Two things really help. Go when it’s dead still, so the lake becomes a mirror. II: Have a great sky. The sky becomes the main event!
Check out the link below to see the full gallery. https://www.snitzerphotos.com/Other/Galleries/Fall-in-the-west-2022/n-rrc2QX/
Norway: Snitz in the land of the Midnight Sun
“What’s the best location you’ve ever photographed?”. I get asked that a lot! Usually, I look stumped and can’t answer. Now I can; the Western Coast of Norway.
Part of my attraction is the scenery. You have vertical peaks jutting out of an endless supply of lakes. You find yourself driving from one fjord to another, through an amazing system of tunnels as you pass under mountains to successive bomber views. Nuts! Along the way, every 5-10 minutes, you pass a quaint fishing village.
BTW there are zero billboards and practically no stop lights. Just unspoiled postcard views.
But that’s not the most compelling part.
It’s the light! Located very far North (further than most of Alaska) in late summer, it never gets dark. The sun sets around 11 pm and comes up again around 3 am. During that time the sky can stay red for hours. Sunsets and sunrises never seem to end. Magic for a photographer.
And amazing hiking? Try treking up a 2,500-foot mountain at 930pm, arriving as the sun sets and seeing nobody. No crowds! Pretty surreal.
Ok, what’s the catch? Well, it typically rains every 3rd or 4th day. You can get slammed by weather. And as you may have guessed, to take advantage of this great “light” you’re staying up through the Norweigan nights (basically remaining on Central Standard Time). And yes, the food is crazy expensive (however the fish is top-notch).
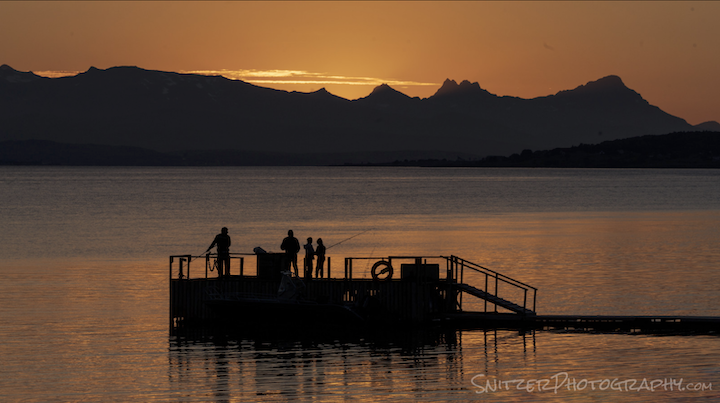
My trip started in the Village of Senja, a quiet fishing village.

11 pm and families are out enjoying the great color!
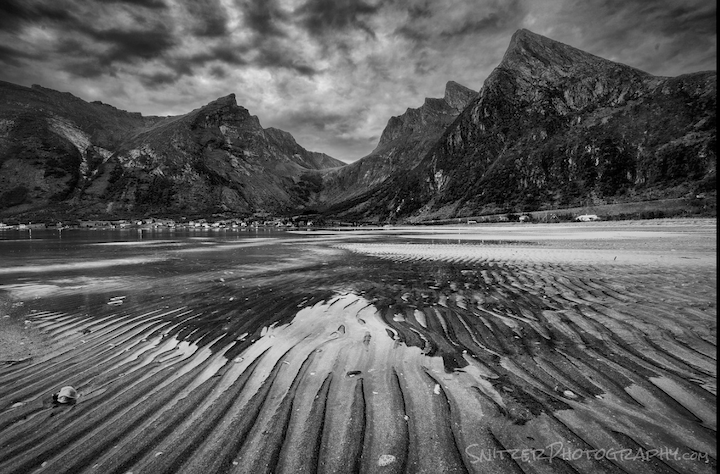
A few hours later it’s still red out there, and the tide is out, creating this great river effect. Normally the entire foreground would be underwater.
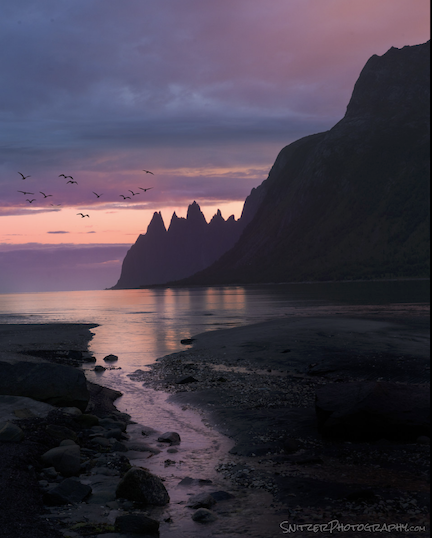
The tidal action creates these cool lines along the beach.
Taken with a drone over 1,000 feet up. A perspective you seldom see from the road.
Talk about getting a different perspective! Here’s the view atop Mt. Husfjellet. The climb up takes about 90 minutes (& can be pretty muddy after a rain)!

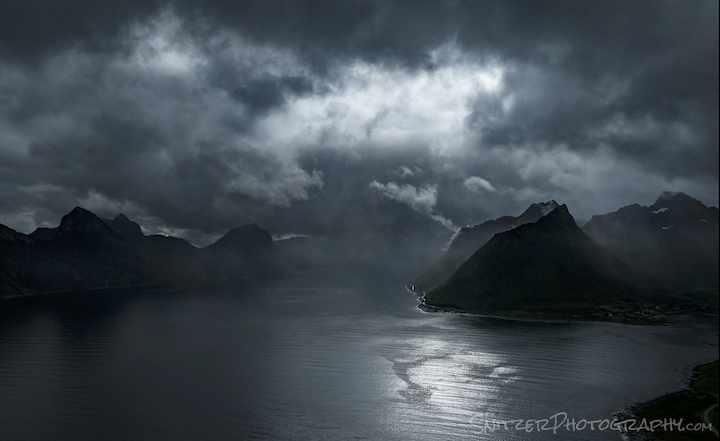
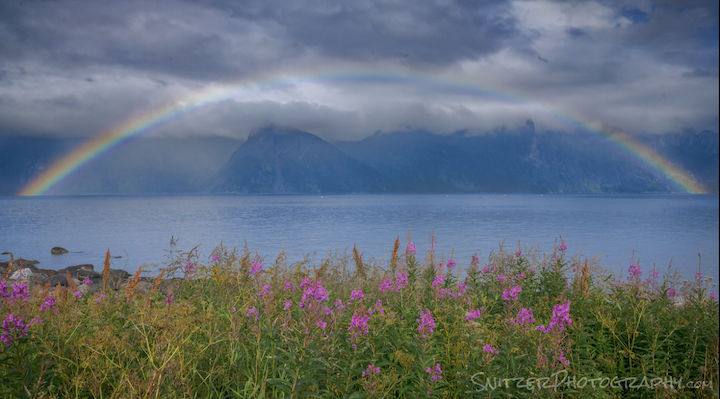
With the frequency of rain and cool lighting it’s pretty common to see rainbows. Lot’s of rapidly changing weather.
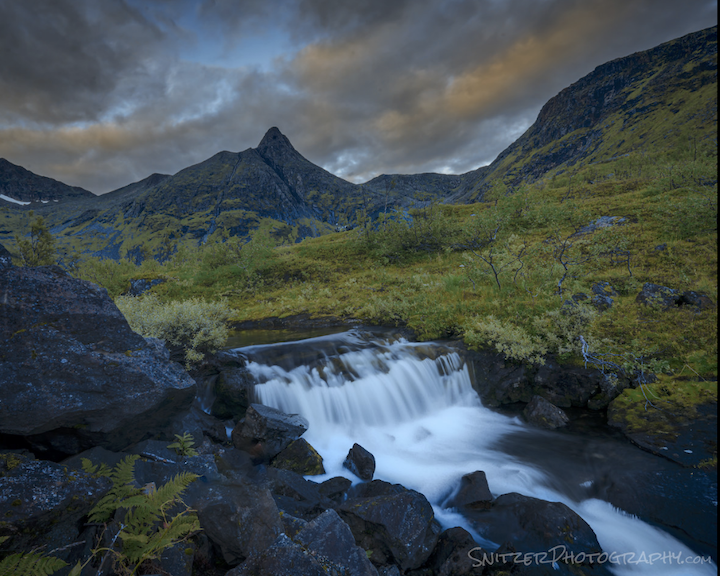
Plus a good share of hidden waterfalls.
My family joined me mid trip and we proceeded South to the Lofoten Islands.
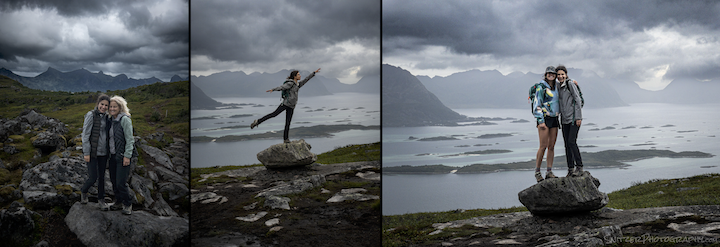
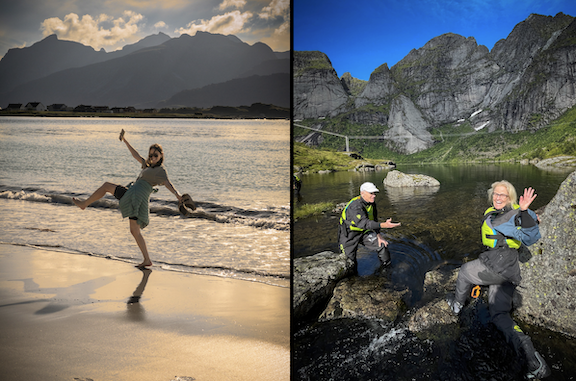
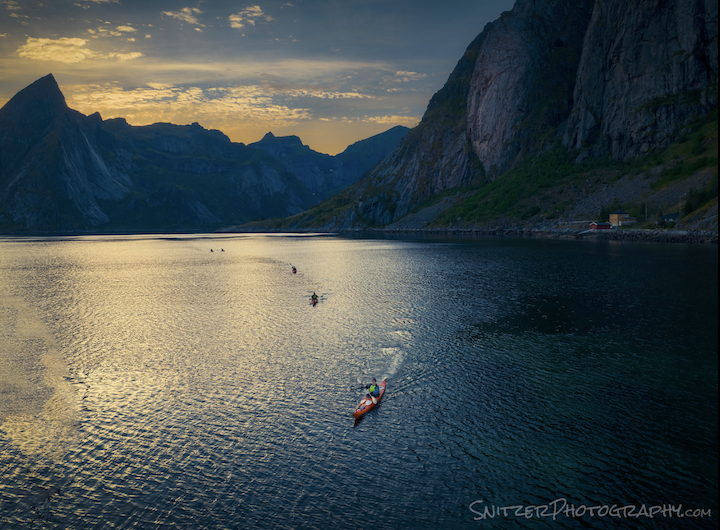
Great to see kayakers out exploring the fjords. We spent a half day doing the same!
Lots more to see. Click the gallery link. https://www.snitzerphotos.com/Other/Galleries/Norway-2022/n-FX5WwV/
Snitz flies the Mavic 3
New revised post!
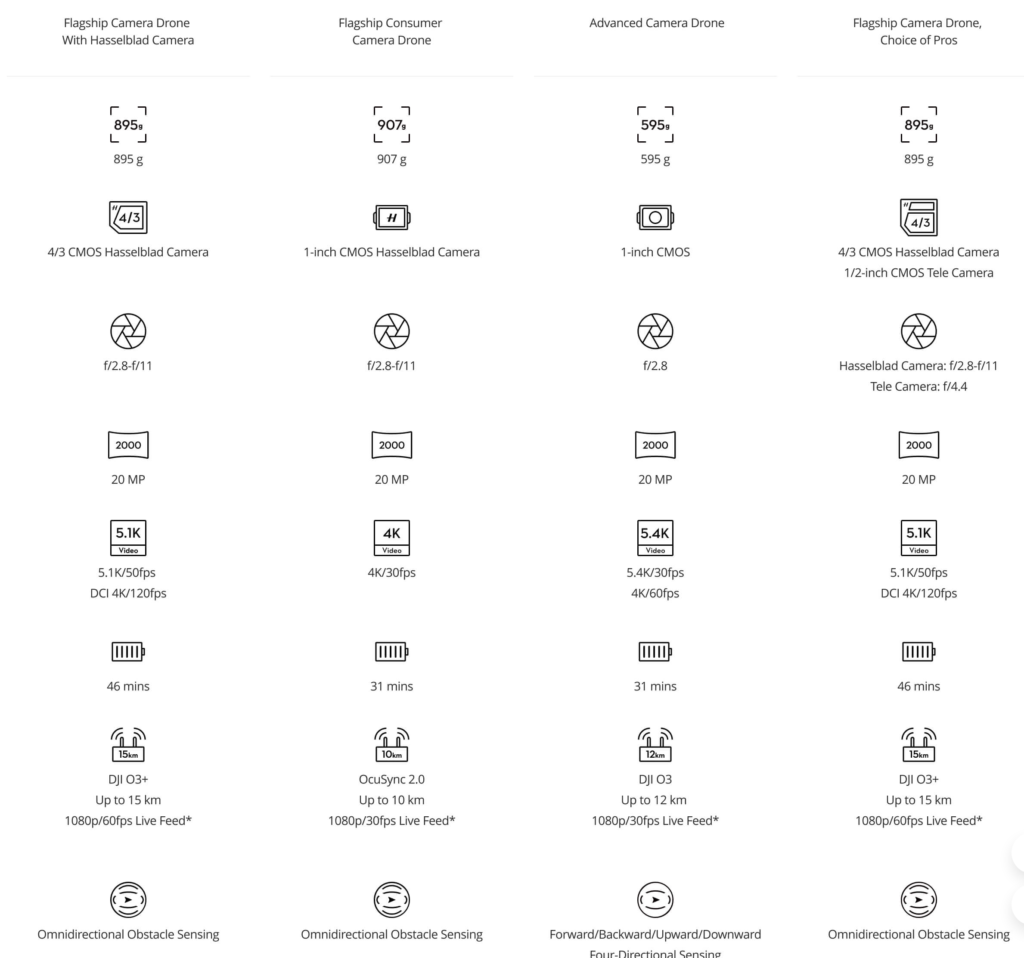
The new Mavic III Classic is the more affordable version of the Mavic III (which I own).
A bit of history. It’s been four years since the Mavic II Pro was released. At the time, this drone was priced around $1,300 and could top out at $2,000 with additional batteries, accessories, and a smart controller. In 2020 the company introduced the Mavic Air II, a similar but less expensive drone that started at around $1,000 (since being improved with the Air2s model). Similar photo/video quality range. Ergo a great value. See update at bottom (new DJI Mini 3 Pro)*
So is the Mavic III Classic worth it? Is the latest and greatest worth your hard-earned $? In short, YES!
What I really like about the Mavic 3 Classic.
1. Much better sensor: While the same resolution (20MP) as the Mavic II and Air 2s this drone has a Micro 4/3rds sensor. Ergo the more modern sensor is twice the size. This drastically reduces noise and improves dynamic range (by about 1 stop)*. It’s also much more ISO invariant and produces superior images in low light. In the past, to get clean reproducible images, I’d need to shoot a burst of 5 shots and noise stack*. Now I can get good quality from one image.
2. While the drone’s forward/backward travel speed hasn’t improved, it’s ascending/descending speed has doubled (8meters/sec vs 4 up, 6/3 down).
3. The Mavic 3’s flight time is improved from 31 mins to 46 minutes. This is huge. Normally it takes 5-10 minutes to get my drone in position to photograph (especially if I’m traveling to a remote location). Considering I need to leave 20-25% battery available to return home, the earlier drones usually allowed only 15 minutes of actual shooting time. The Mavic 3 allows almost 30. Twice as much is better! Plus, because I often shoot at altitudes of over 1,000 feet, the faster ascent/descent speeds save precious time.
4. Better range. 10 miles vs 6 with the smart controller. In real-world operations, I typically was able to fly the Mavic II Pro about 2.5 miles away before I’d run out of signal strength. The Mavic 3 realistically stretches that to about 4 miles. As a nature photographer who shoots in faraway places, trying to generate unique compositions, this is a significant advantage.
Bottom line: The Mavic 3 Classic is really geared for Pros or serious amateurs. It’s an expensive but great piece of hardware. For most hobbyists, the Mavic Air IIs continues to be the way to go. Note: The newly released Mavic 3 Classic is essentially the same drone as the previously released Mavic 3 Pro (without the worthless 162mm equiv telephoto lens that shots only in Jpeg and has miserable image quality). It’s literally half the price properly outfitted. The drone, with the fly more kit (extra batteries, charging hub, etc) and bomber smart controller (a must, essentially an Ipad sized screen to control your drone, beats the pants off using your phone) is $2,400.
PS. I’m typically using drones for still photography. The Mavic 3 has a number of video improvements, including superior object following that aren’t discussed here.
*Some of you may notice that the Mavic II Pro was listed as having 14 stops of dynamic range compared to 12.8 for the Mavic 3. What gives? After speaking with DJI’s tech support, they sheepishly admitted that the Mavic II only has 12 stops of range. The previously published specs were in fact wrong. Imagine that!
**Noise stacking is a technique to reduce noise by combining multiple images, typically in Photoshop. https://www.slrlounge.com/remove-reduce-noise-from-your-images/
DJI also recently announced the brandy new Mini 3 Pro. This smaller drone weighs less than 249 grams (making it legal in locals/nations that have a 250gram drone minimum). It’s super small, under $1,000 with all the goodies (smart controller as well) and easy to carry! It also has a 47 min flight time with the premium battery option. So is it a good option for serious photographers?
Err…not really. While they advertise it as having a 48 MP sensor, that’s complete BS. The actual sensor is 12MP (.77 inches) and the 48MP number only refers to their pixel shift mode which basically sucks. The Mavic 3’s sensor is 20MP (1.33 inches) has much lower noise and less chromatic distortion. Plus unlike the Mini which gets blown around in big winds, the Mavic 3 can go out on days that would ground it’s little cousin.
Bottom line: The mini is a fun toy, but not something I’d use to capture any images to keep. The Mavic Air2s is the better choice for the budget minded. Better sensor(20mp/1 inch) , better image quality, beefier & able to handle strong winds. $999 or $1,300 with the “fly more” kit (includes two extra batteries & charging hub). BTW: Avoid the older Air 2(which also has a lame 12mp sensor).
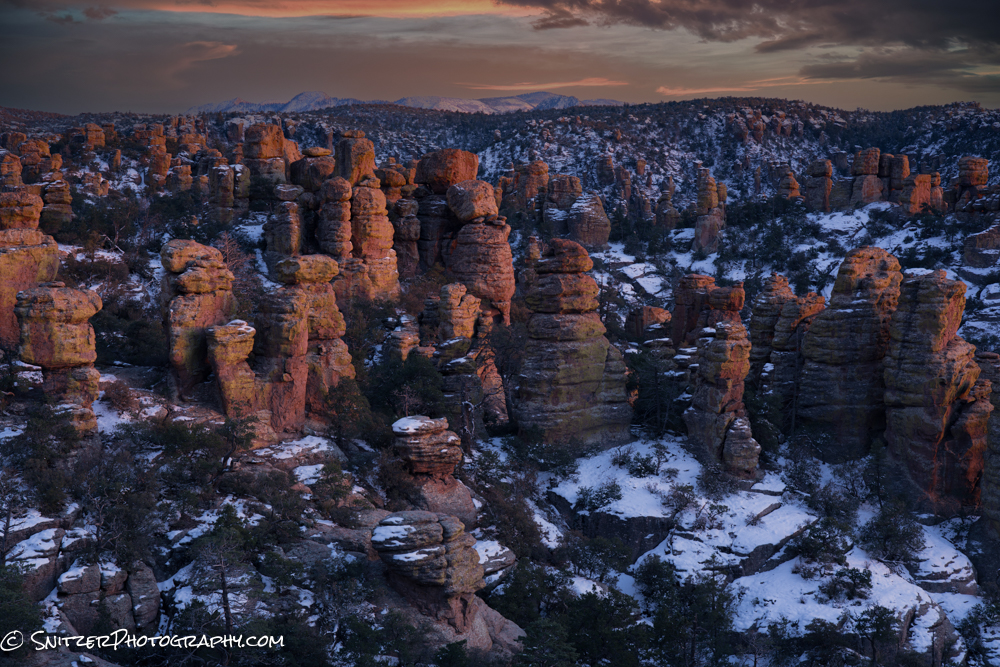
Snitz winter tours America’s Southwest
I’ve never had the chance to photograph some of my favorite Colo Mntn spots covered in snow. Ergo the San Juan Mountains located in Southwest Colo (think Telluride/Crested Butte).
For instance, I’ve shot Mount Sneffeles many times, but getting back there in the winter isn’t easy. Requires a snowcat or a Jeep with some massive tires. Worth the effort!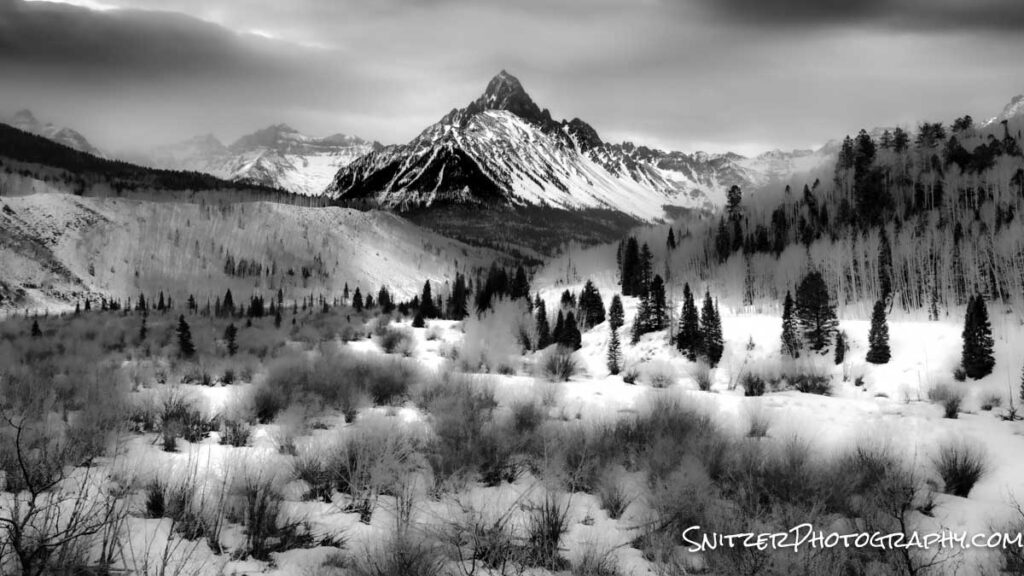
BTW there are more uncharted jeep roads (with about 2ft of untracked snow on them) to explore. The shot below was taken with a drone (about 30ft above the road).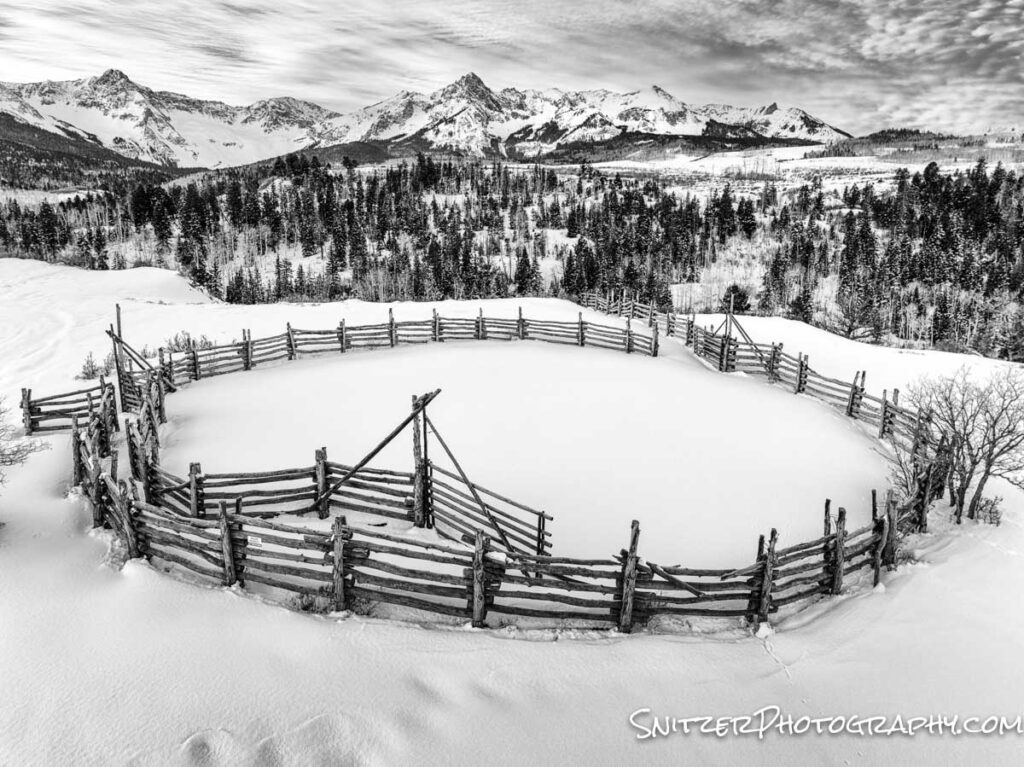
The drone provides a pretty unique perspective when the sun is about to set. Love the shadows!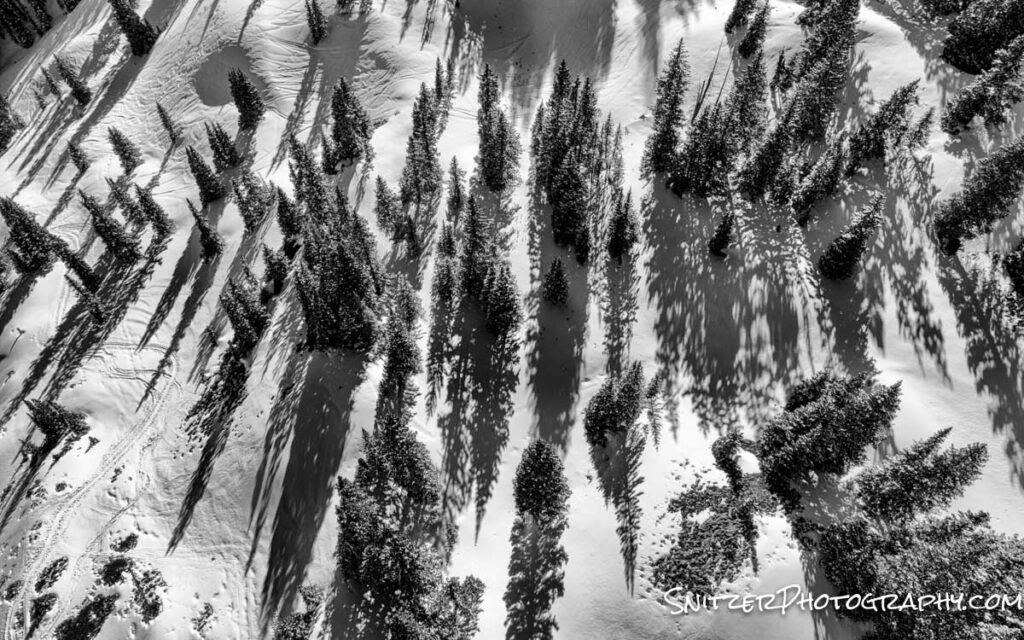
Speaking of sunset, it was full moon time on my trip. Everything lined up just right!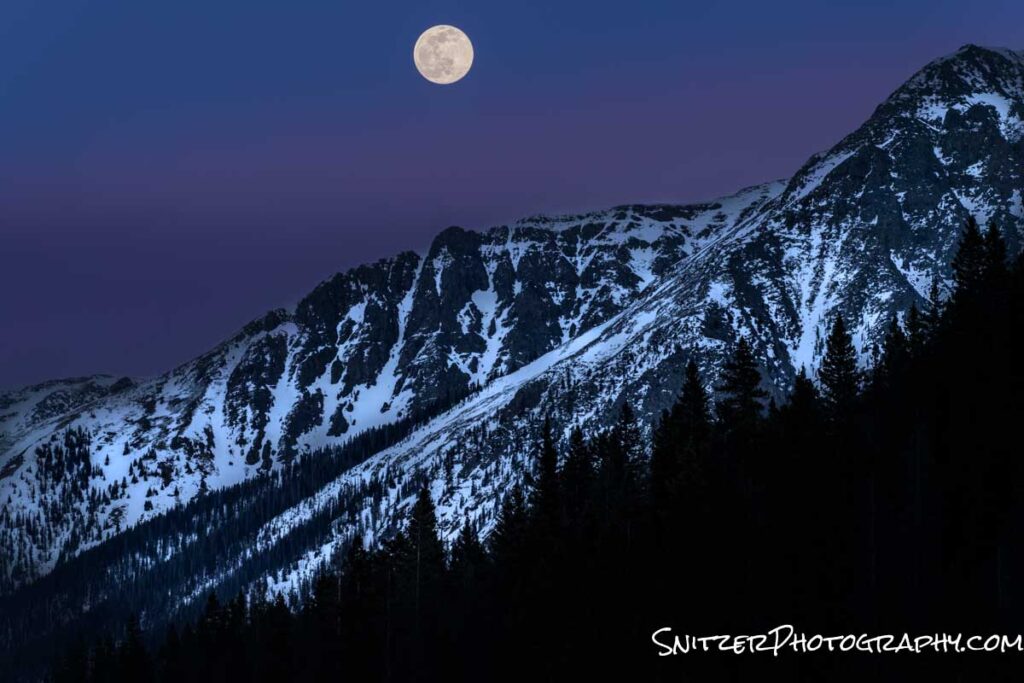
The two shots below were both taken about 35 minutes before sunrise (just outside the town of Ridgeway).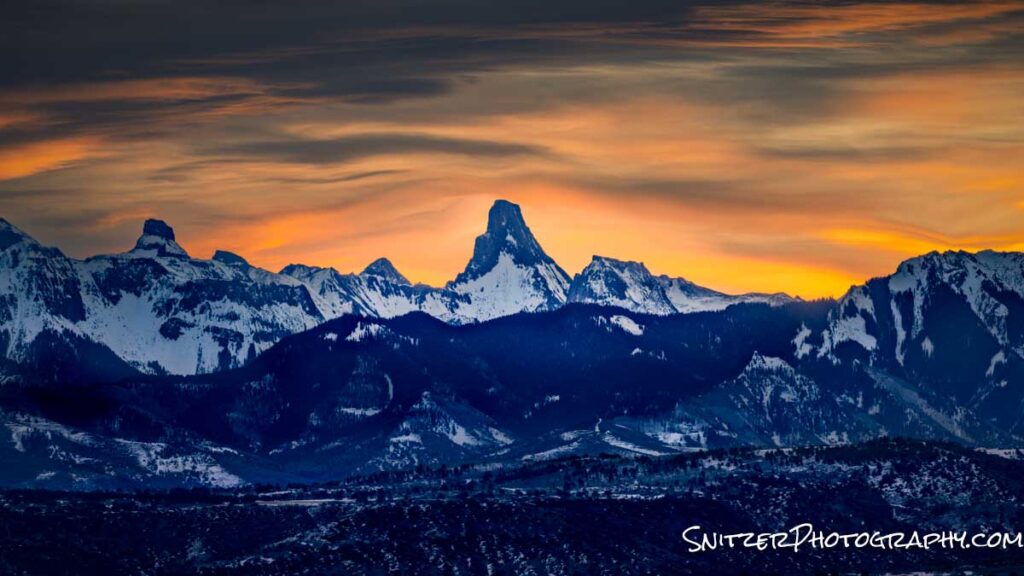
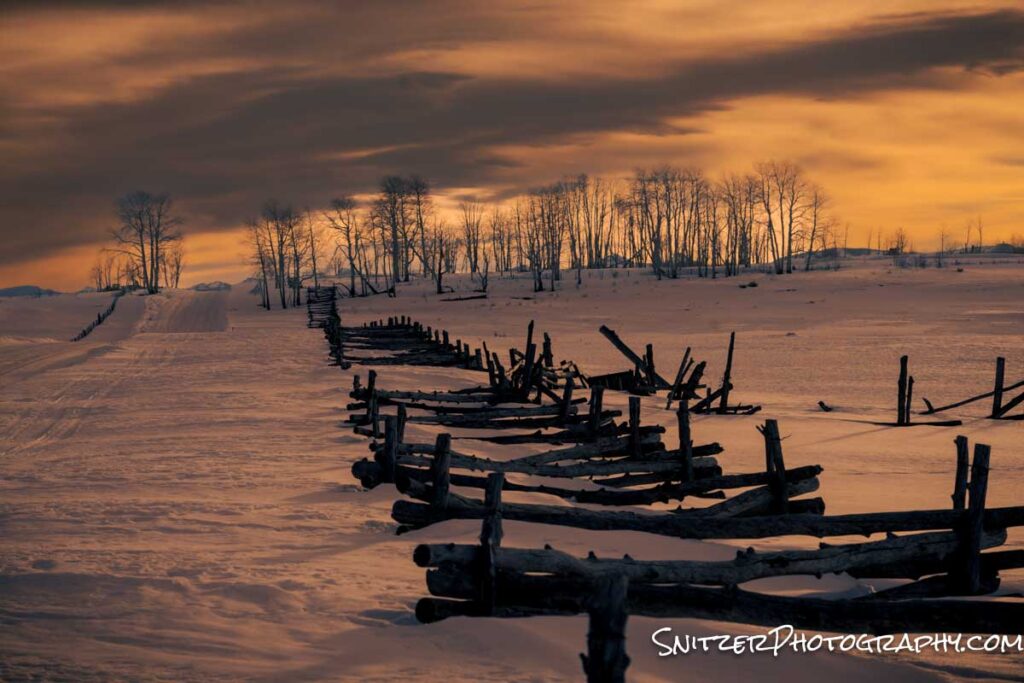
Interesting, how different some iconic views look when covered with the white stuff!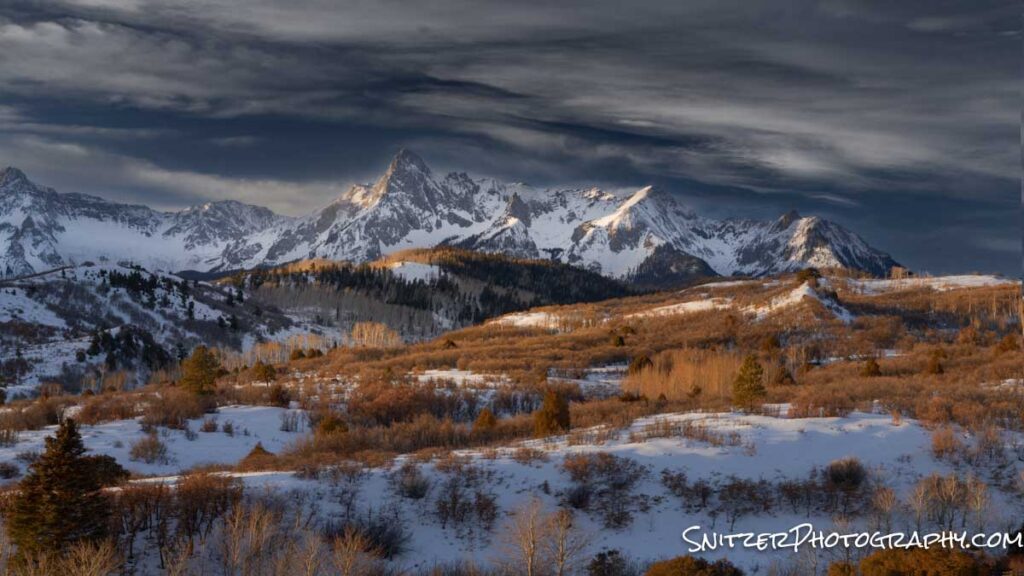
Then there are those crazy (& I do mean crazy) ice climbers. This dude was going up an 800ft high ice flow (just outside of Ouray, Colo). Any fall would be a game-changer (& not for the good).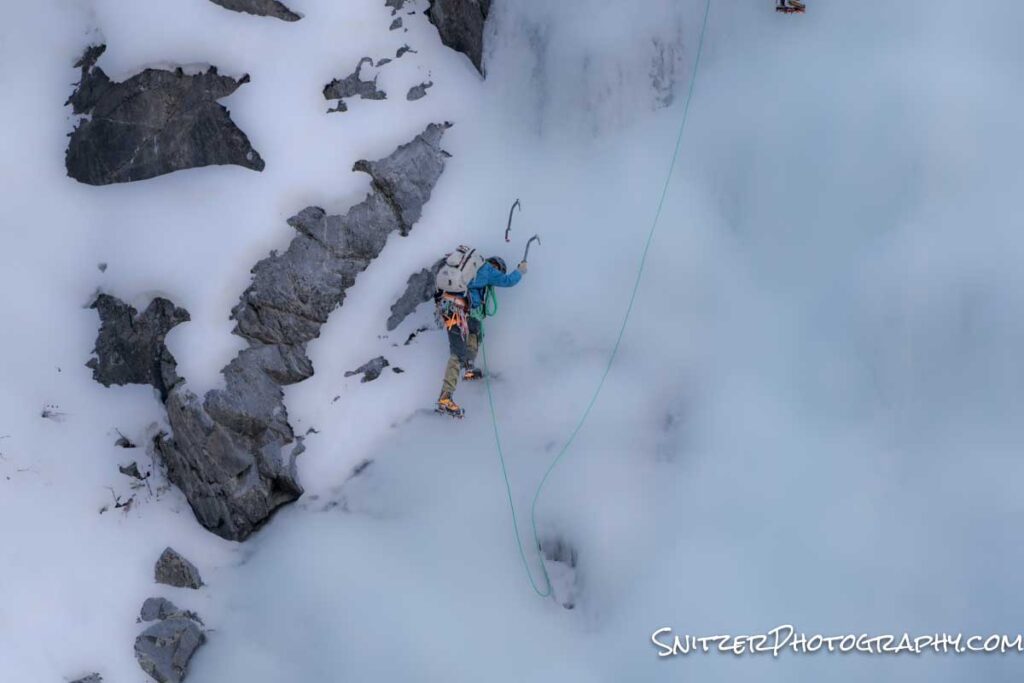
Next stop, the Moab area (which includes Arches and Canyonland NPs).
A previously hidden view I discovered while flying the drone. I had no idea what this plateau looked like till I got approx. 800 ft above the trailhead.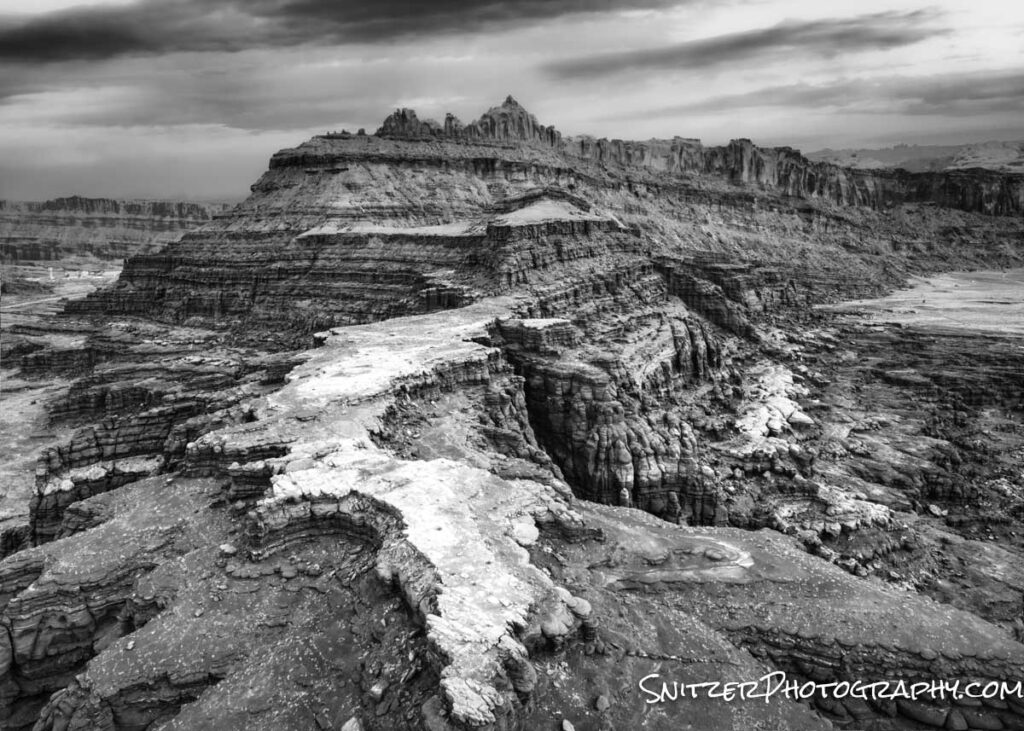
The photo below (Arches NP) looks like it’s taken at a lake. Nope, the image was created by getting down really low and photographing across a 3 x 4ft pond.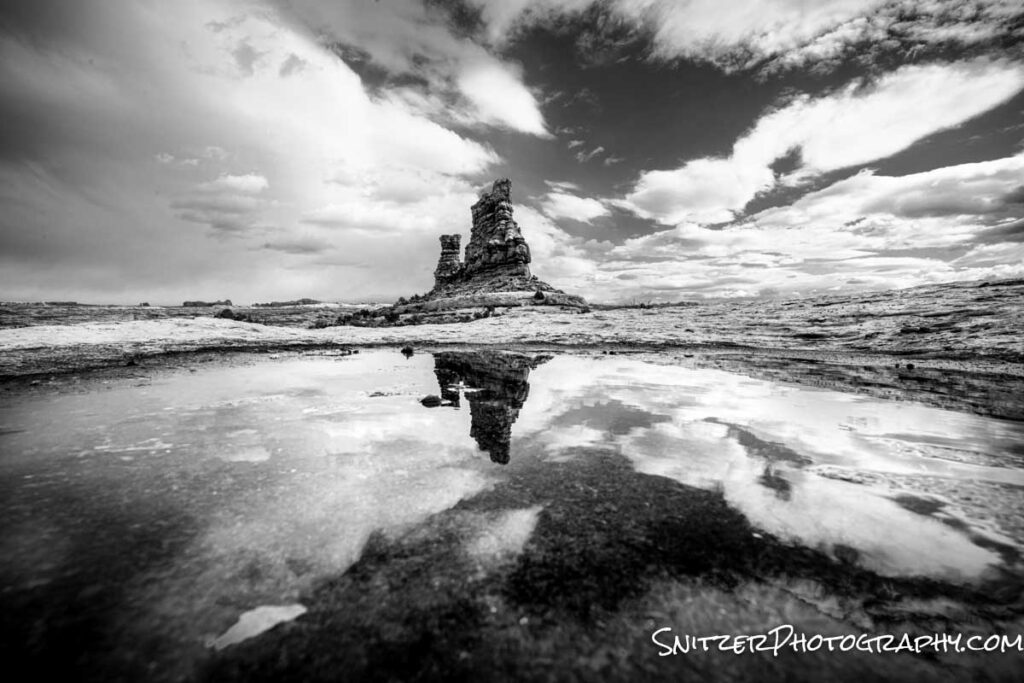
Another bomber reflecting pond.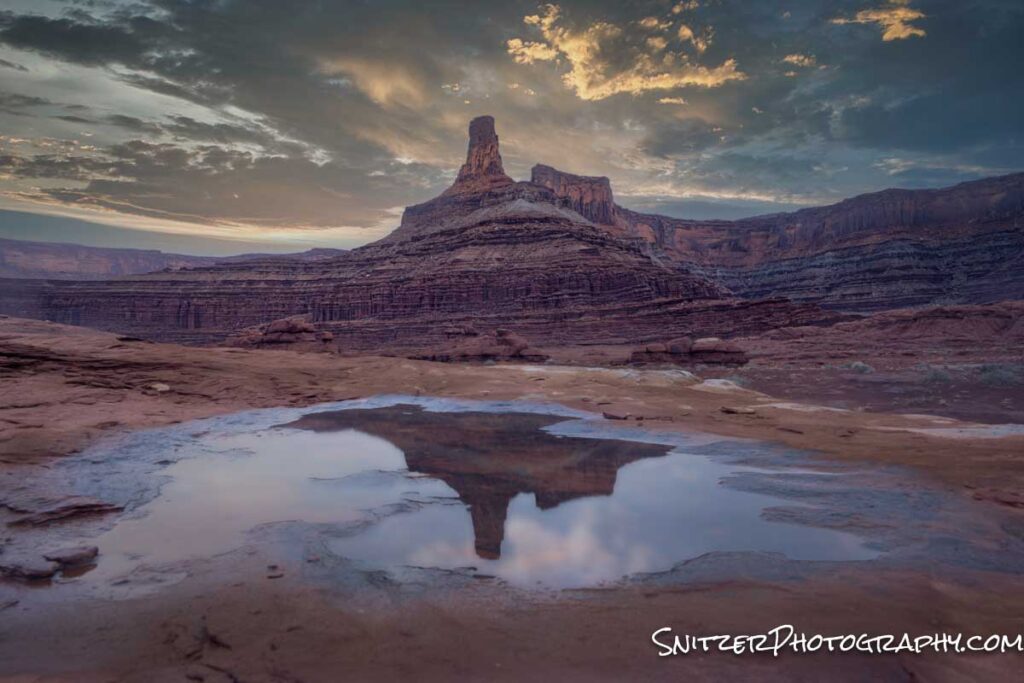
Yes, every so often you can find a waterfall in the desert!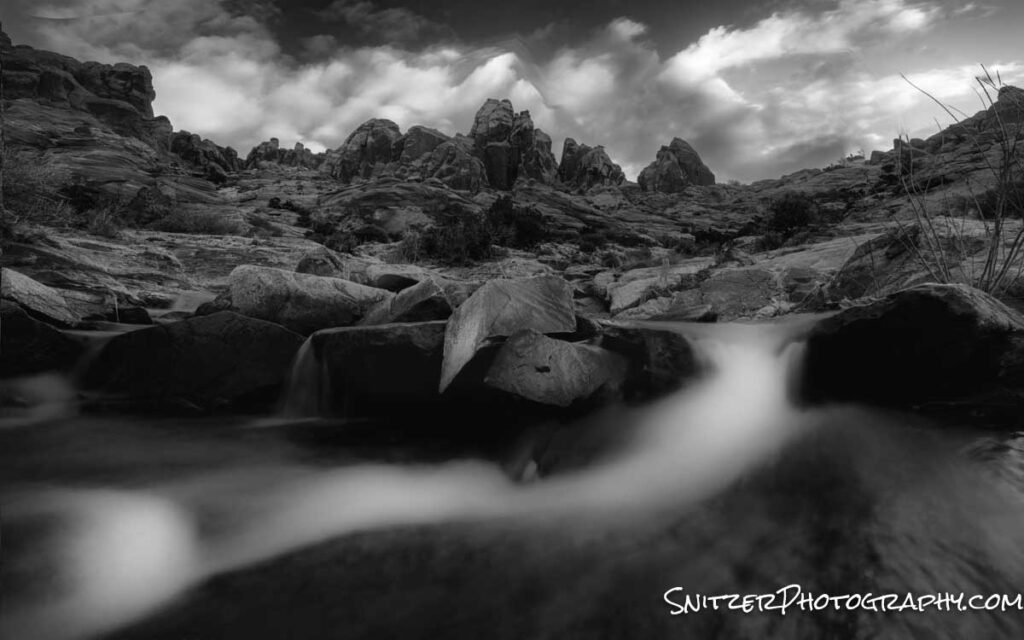
This place is aptly named Goosenecks State Park. Looks even better from above.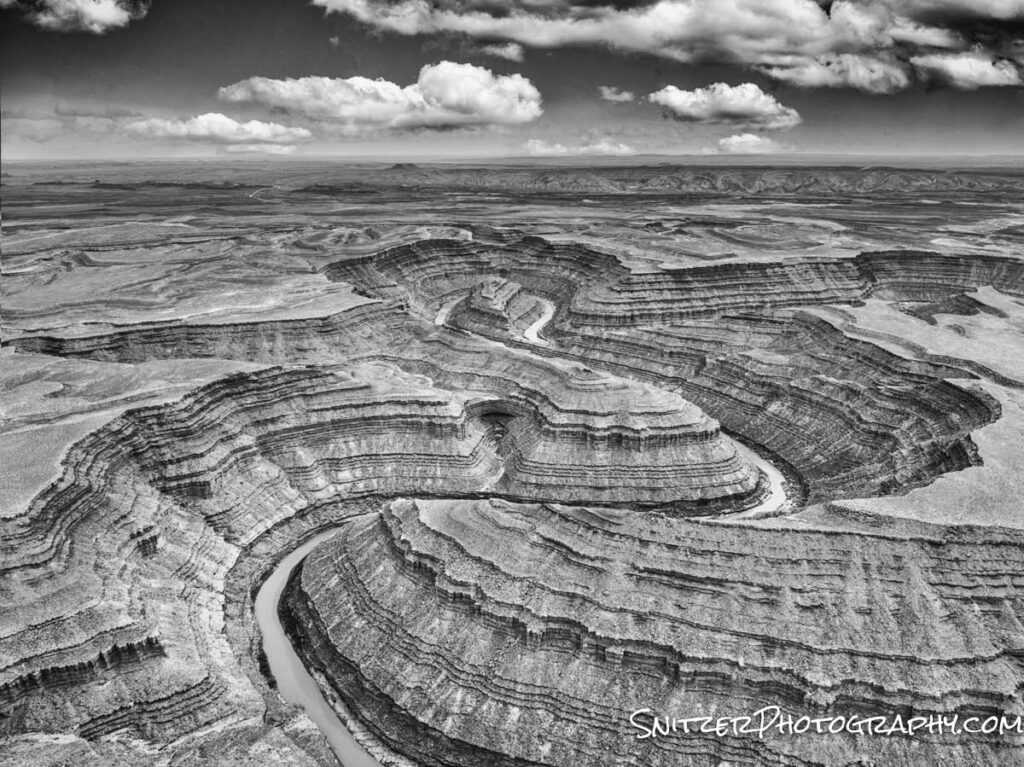
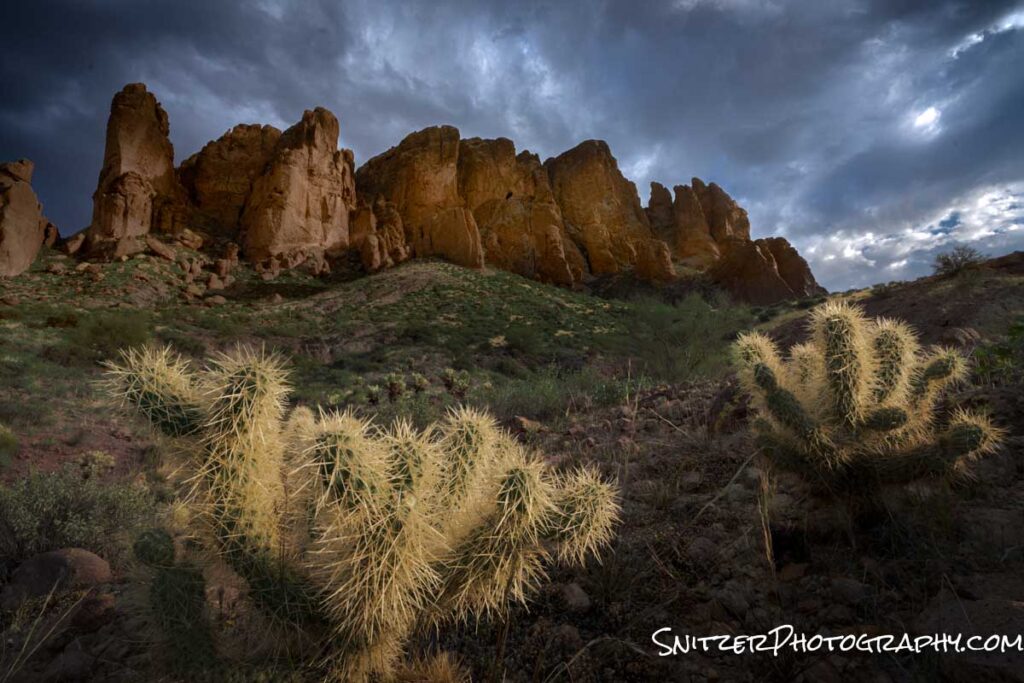
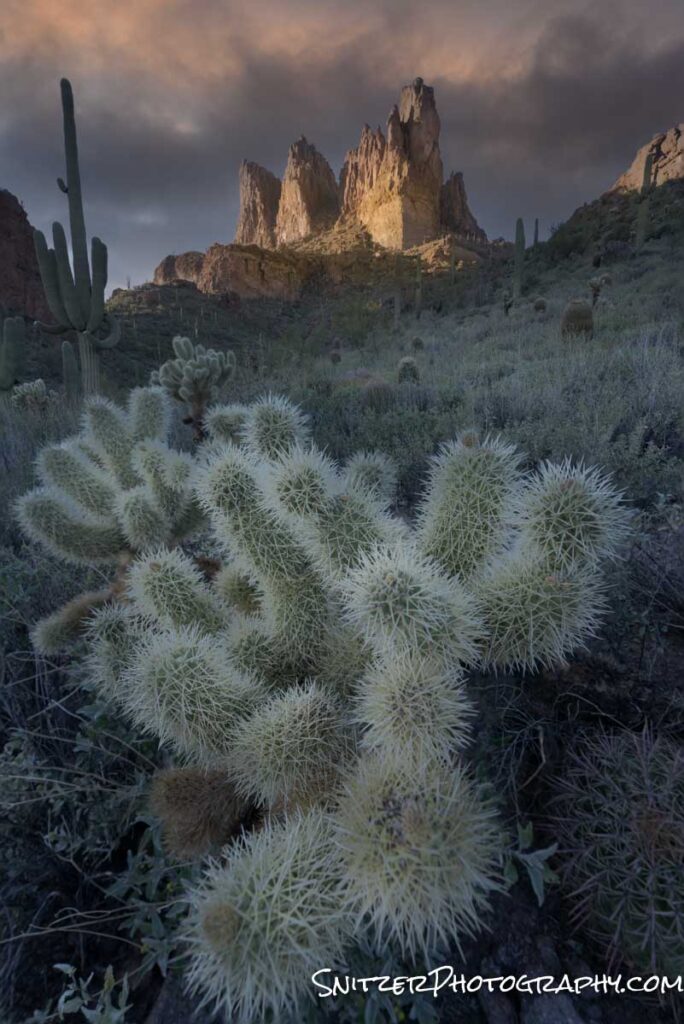
On to Arizona! My exploration focused on two areas, Lost Dutchman State Park and the Kofa National Wildlife Preserve.
This image was taken near my tent at 4 am. The cacti in the foreground are called Cholla (actually jumping Cholla). If you brush up on them, they release their barbed needles. Good luck getting them out. Incredibly nasty plants. I was darn lucky to avoid any accidents!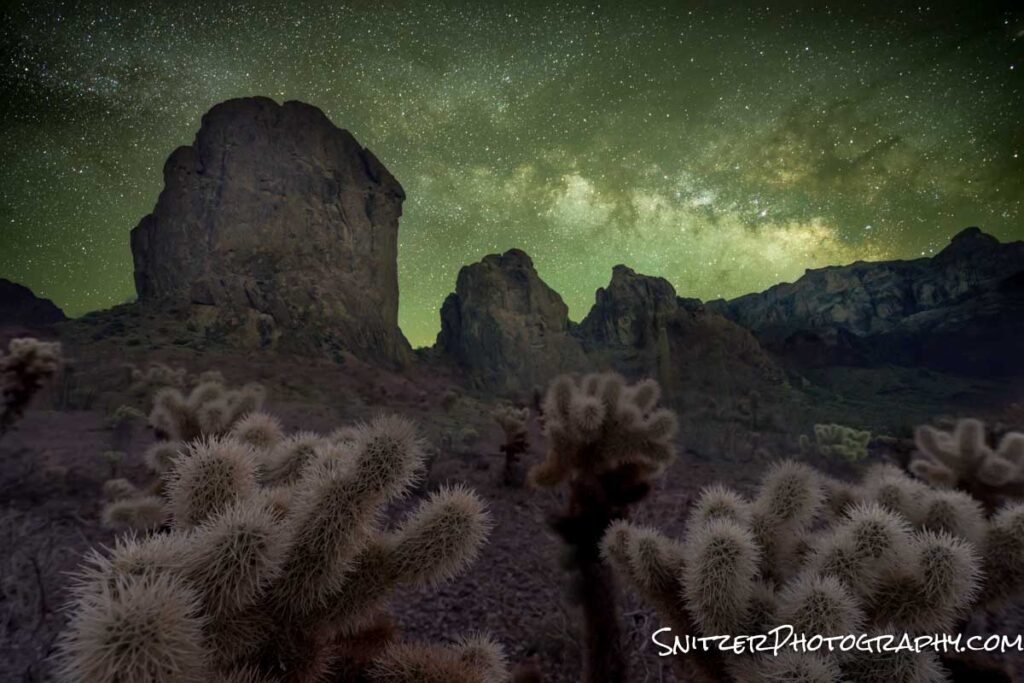
BTW, for our photo enthusiasts. The photo below was taken by shooting 13 images of the Sky (ISO 8,000, F 2.8, 17 secs) and stacking using Starry Landscaping Stacker Software. The foreground was shot 90 minutes later during twilight. The images were then merged in Photoshop.
The Cholla make great foreground objects and almost glow during sunrise or sunset!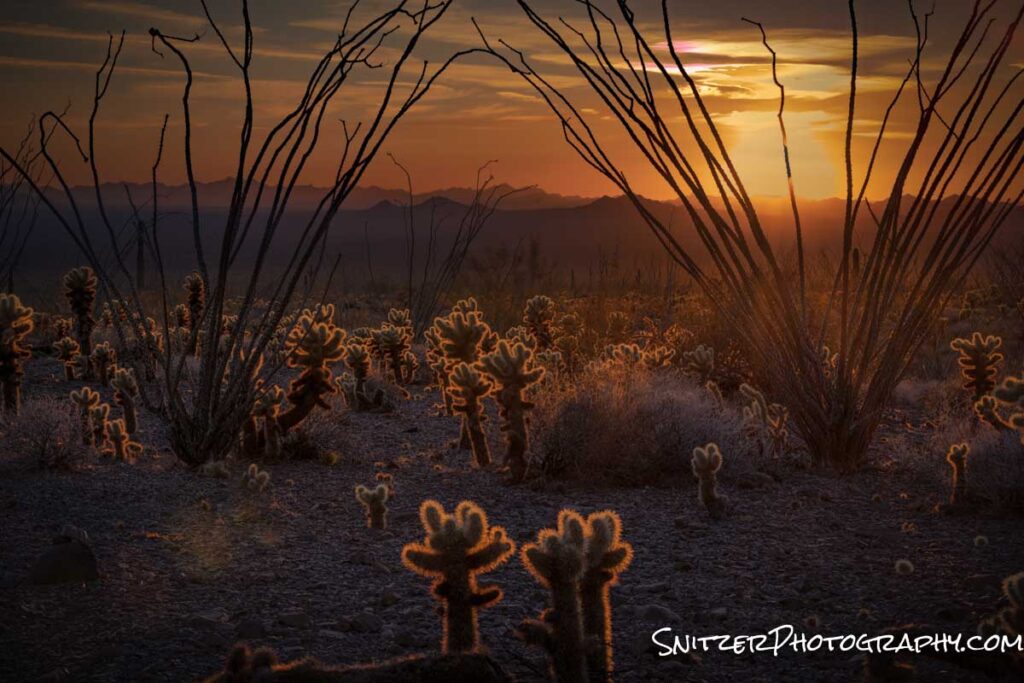
This guy is a Balloon Cactus plant.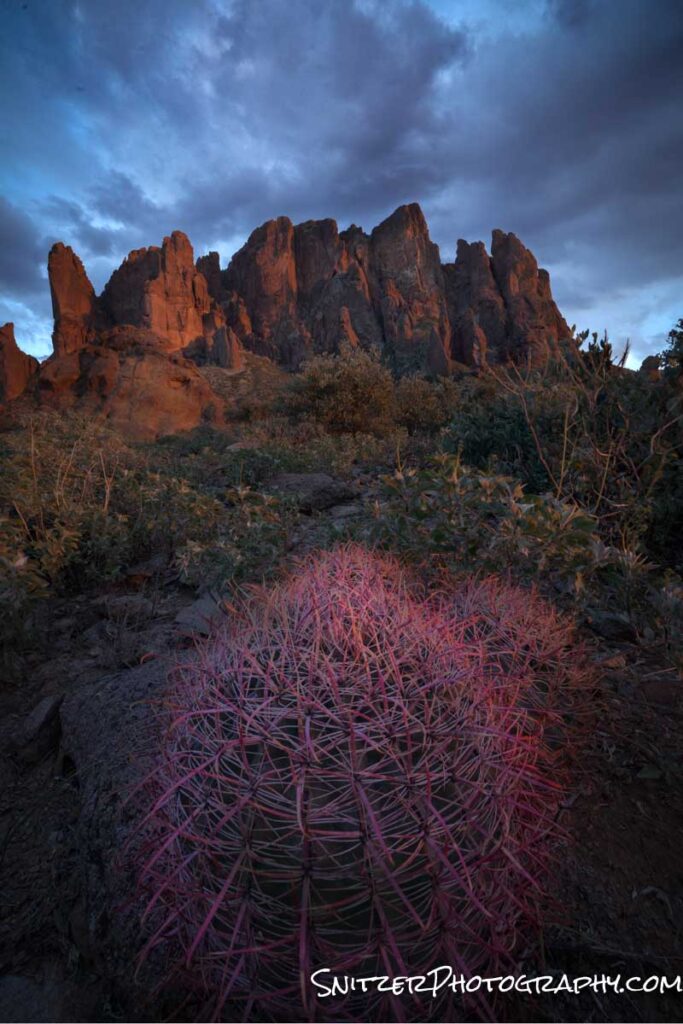
This shot features the Saguaro cactus (the really big guys).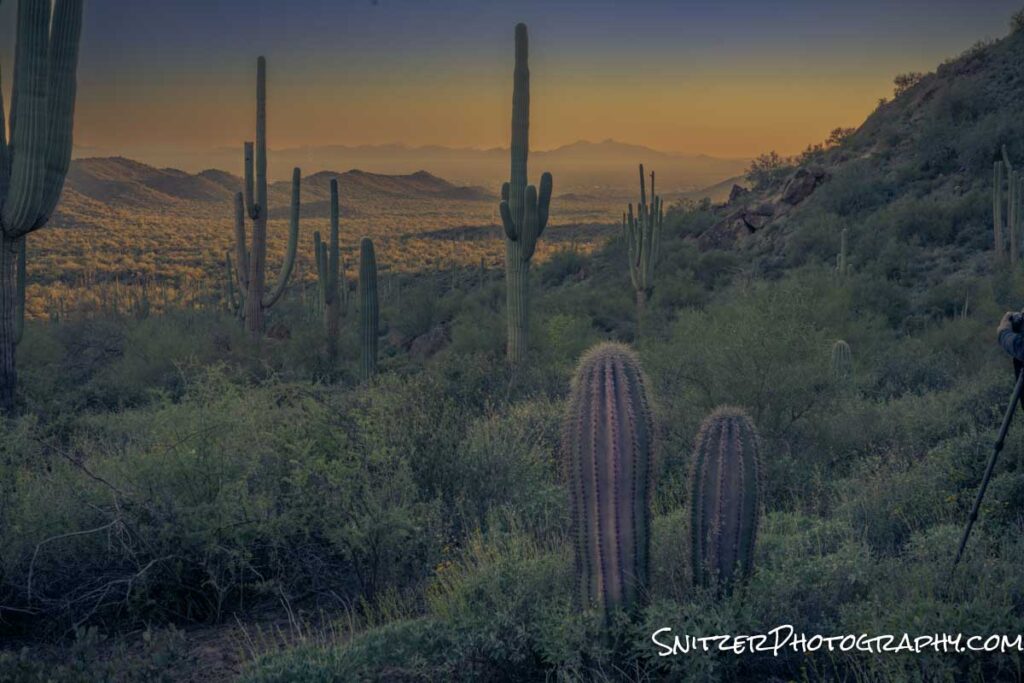
Snitz’s Sedona photo/hiking adventure
Sedona, Ariz is one of my fav places to hike. Gorgeous scenery, awesome weather (excepting summer), and little driving required (most hikes 10 mins from town). It’s also a great place for nature photog! Some of my favorite places to shoot include:
Crescent Moon Picnic Area: Great views along Oak Creek overlooking Cathedral Rock. https://www.alltrails.com/explore/trail/us/arizona/crescent-moon-ranch-at-red-rock-crossing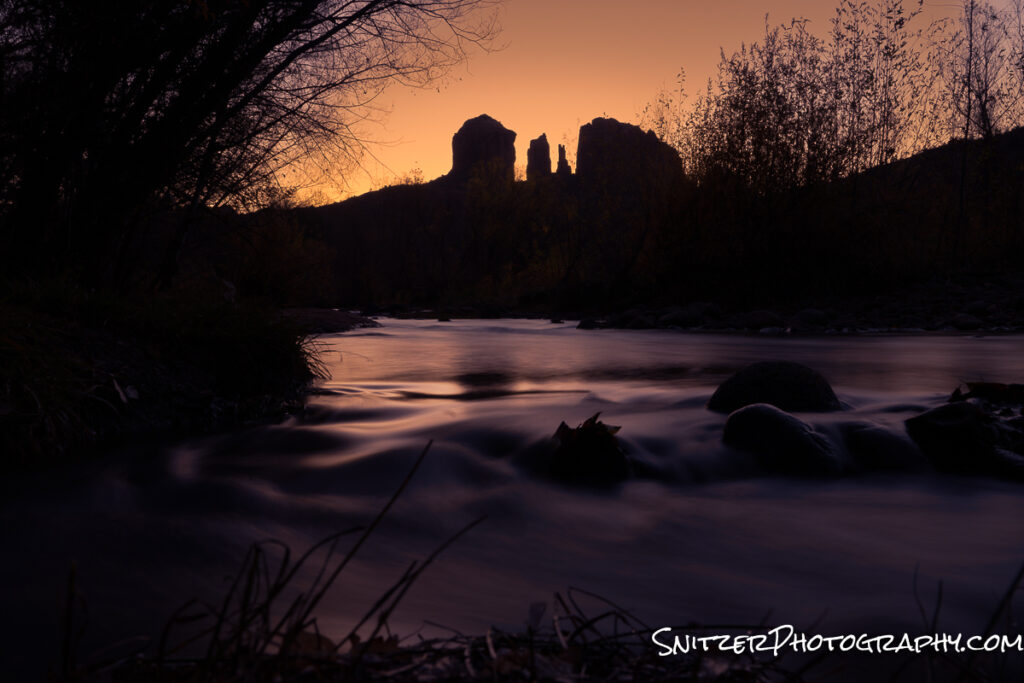
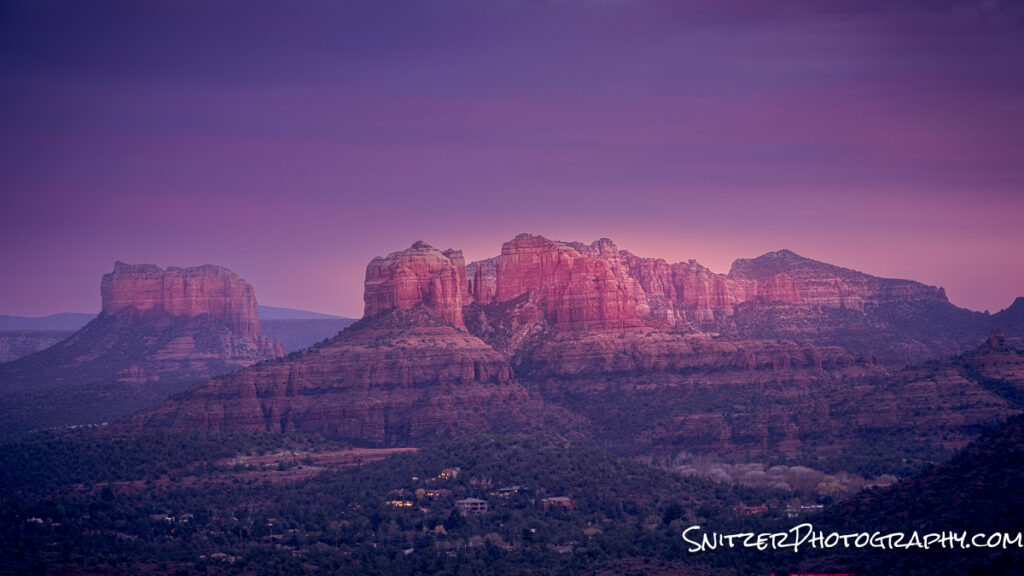
Upper Red Rock Loop: Several awesome pullouts provide a view of Cathedral and Bell Mountain.
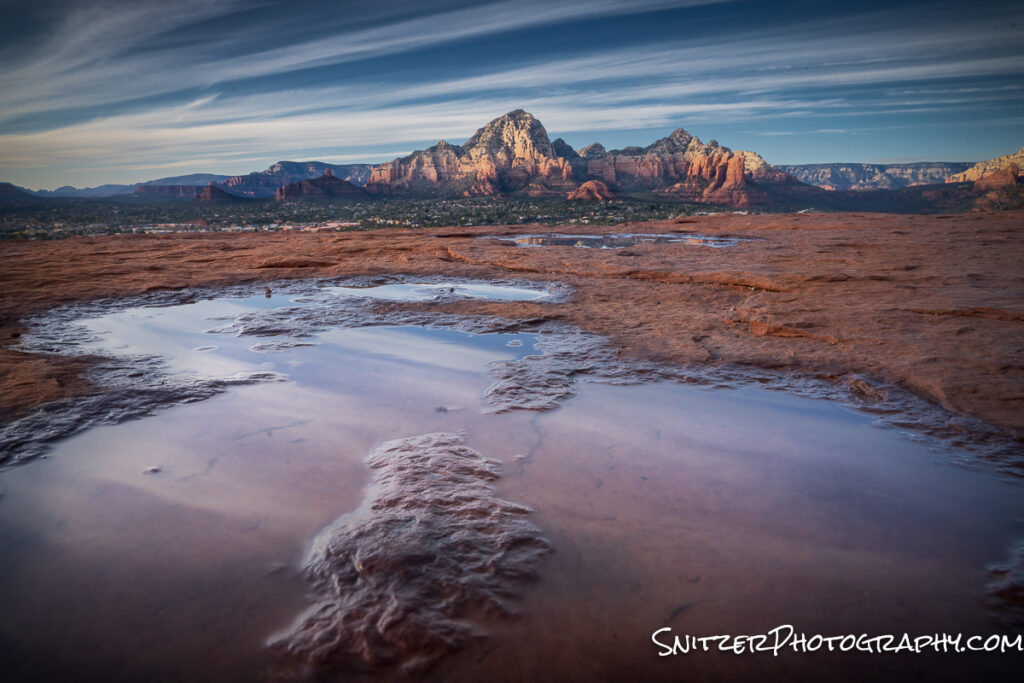
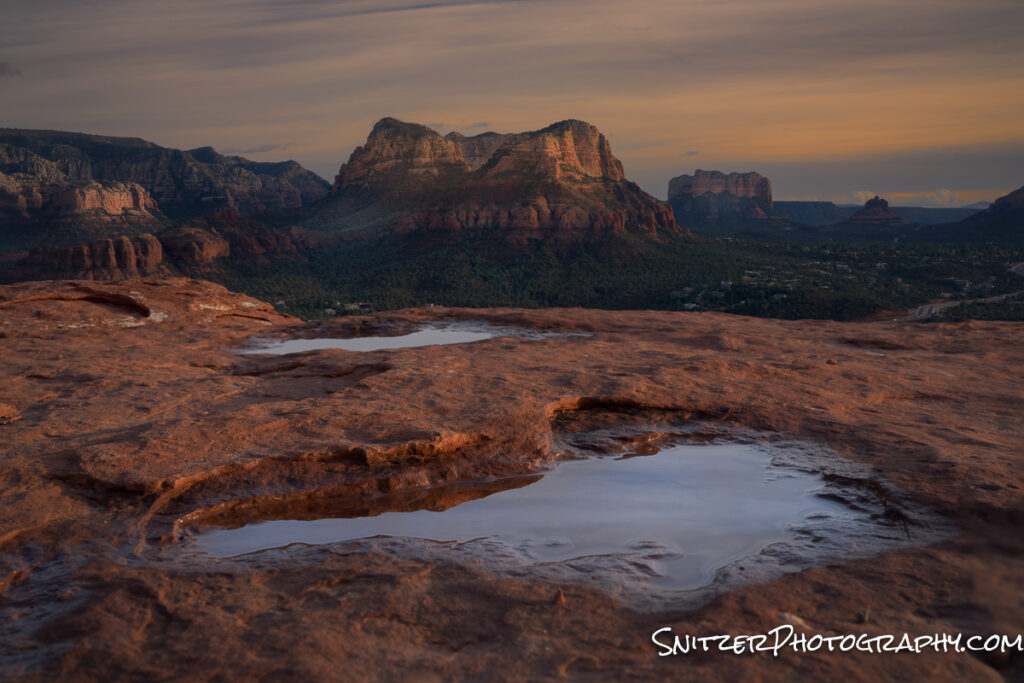
Airport Mesa Viewpoint (& attached trail): Not to be confused with the airport viewpoint above. This hiking spot has only about 8 parking spaces. It provides trails with 360-degree panoramic views of the entire valley! After a rain, reflecting pools form on the rock face providing great ops to shoot low and reflect the mountains. https://www.alltrails.com/explore/trail/us/arizona/sedona-airport-loop-trail
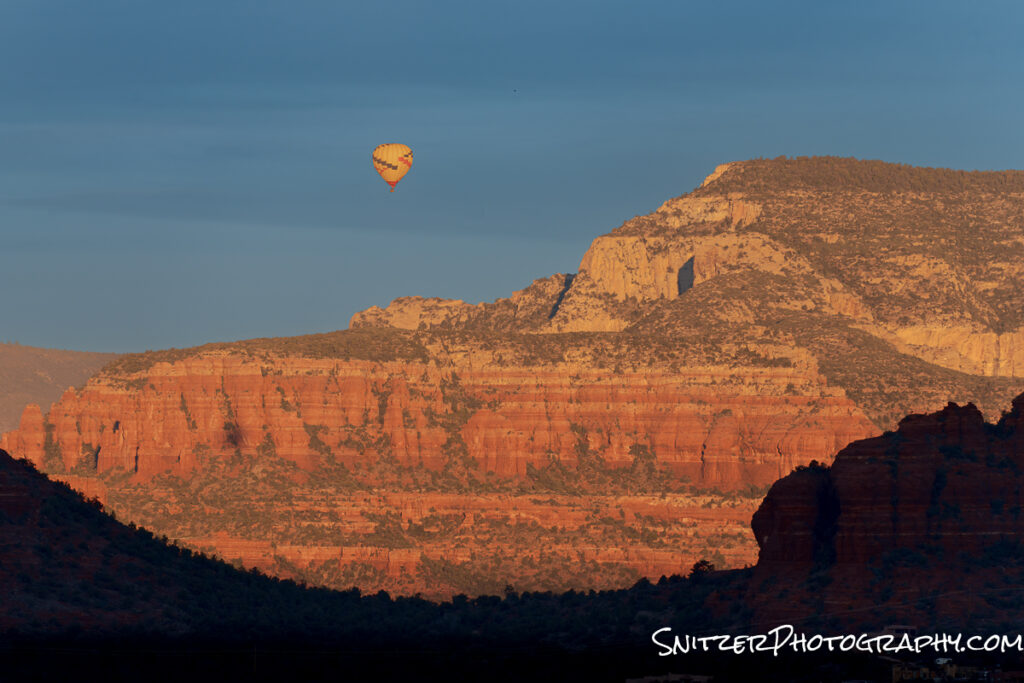
Don’t be afraid to use your telephoto lens to capture some far-away action. This shot was taken shortly after dawn with a 300mm lens.
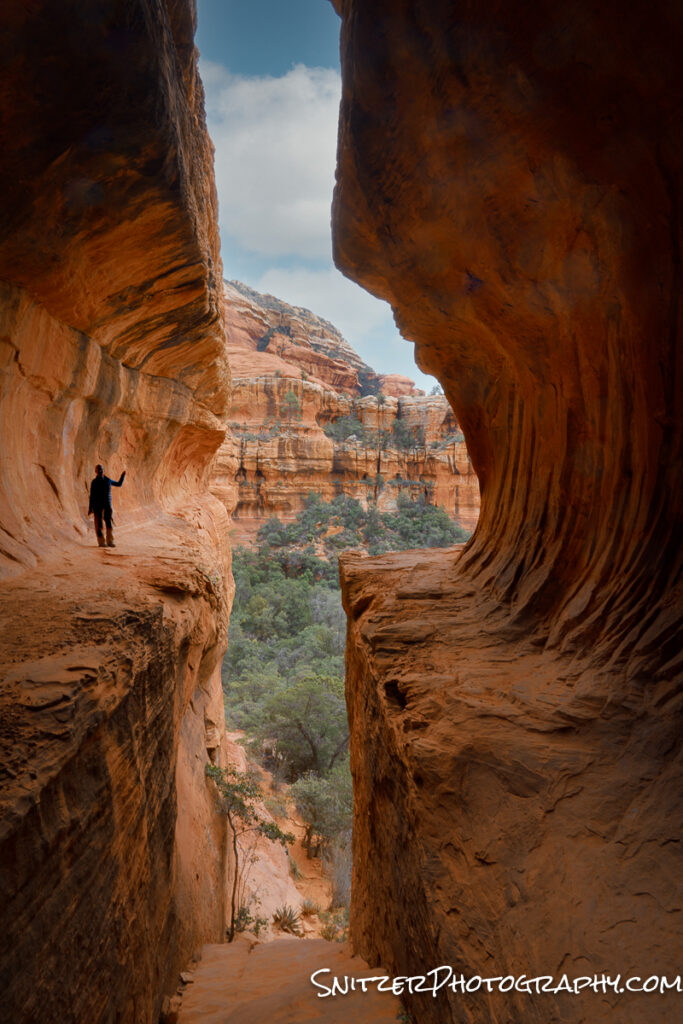
Boyton Canyon to the Subway: The Subway is a detour off the main path that while impressive may prove a bit hair raising for some hikers. Requires a good level of fitness and some climbing experience. https://www.alltrails.com/explore/trail/us/arizona/boynton-canyon-trail
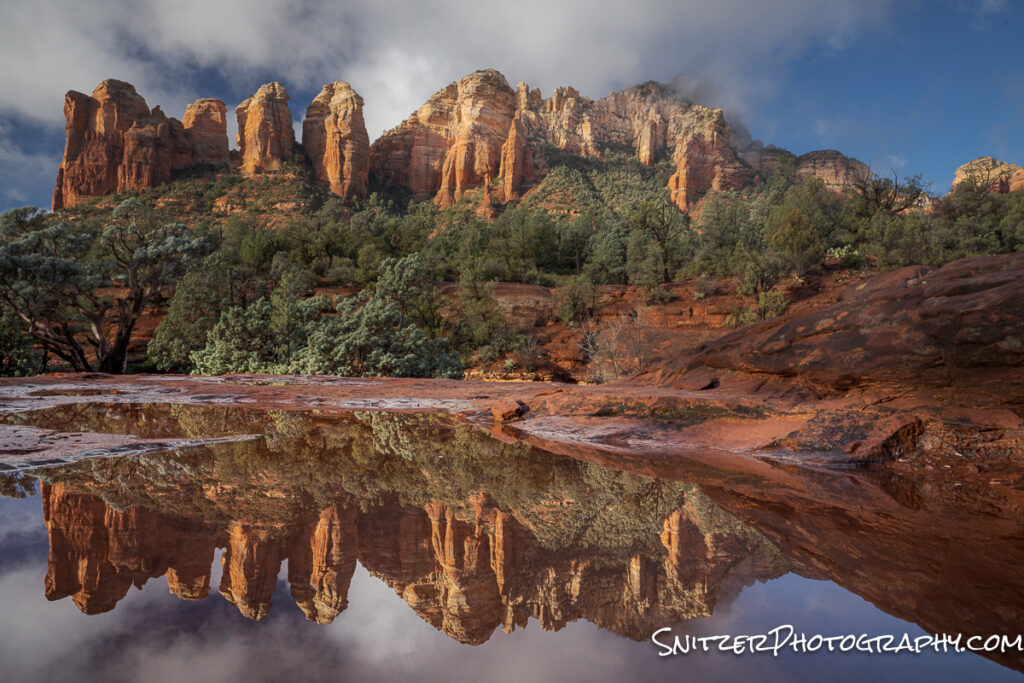
Seven Sacred Pools hike. Great foregrounds. After a rain look for reflecting pools (shoot low). https://www.alltrails.com/explore/trail/us/arizona/soldier-pass-to-brins-mesa-loop

Some of my favorite hikes also include:
Easy/Moderate
Doe Mountain Loop https://www.alltrails.com/explore/trail/us/arizona/doe-mountain-loop-trail
Long Canyon, Deadman’s Pass, Mescal Loop https://www.alltrails.com/trail/us/arizona/mescal-mountain-long-canyon-deadmans-pass-mescal-loop
Secret Slickrock (easy short/great for sunset) https://www.alltrails.com/trail/us/arizona/secret-slick-rock-trail?ref=result-card
Sugarloaf Loop https://www.alltrails.com/trail/us/arizona/sugarloaf-loop-trail
Moderate/Hard
Hangover Trail https://www.alltrails.com/trail/us/arizona/hangover-trail-out-and-back
Sterling Pass https://www.alltrails.com/trail/us/arizona/sterling-pass-trail
Devil’s Bridge via Chuck Wagon Trail (great view, overrun with tourists…everyone flocks to this, I’d skip) https://www.alltrails.com/trail/us/arizona/devils-bridge-via-chuck-wagon-trail
Hard
Bear Mountain https://www.alltrails.com/trail/us/arizona/bear-mountain
Click here to see my original gallery photos: https://www.snitzerphotos.com/Other/Galleries/Sedona-2021/n-XpLtXs/
Programs I use to process photos
Lightroom(LR): The main product I use for most editing, photo file storage, and organization. New AI updates allow for sky, subject, color and luminosity masking. Allows me to massively edit photos and come back later to easily tweak/improve any edits. Harder to update edits in Photoshop without massive file sizes. My go-to program also for pano stitching and HDR. The new SuperrRsolution tool allows for doubling photo resolution.
Photoshop (PS): I’ll export from Lightroom to PS when I need to photostack, noise stack, exposure blend or modify image perspective using warping tools. Also great for creating Orton Effect glow. In general, the go-to program for complex masking applications.
Starry Landscape Stacker: Mac-compatible plugin for celestial photography. Noise stacking when sky is moving but the foreground isn’t. Link for Starry Landscape Stacker
My other Lightroom plugs. Ergo, programs launched from inside Lightroom’s Photo<Edit menu.
Topaz Sharpen AI: The Cadillac of sharpening software. 10x more effective than sharpening tools in LR or PS. Link for Topaz Sharpen AI
Topaz DeNoise AI: Go to tool for noise reduction. Note, in the case of noisy/out of focus images, use this first before trying to sharpen with Topaz Sharpen AI. Link for Topaz DeNoise AI
Nik SilverEffects Pro: Fantastic plug-in to create memorable black and white imagery. Link to Silver Effects Pro
Caddo Lake: Apocalypse Now?
Caddo Lake, located in Northern Texas, is becoming one of the most photographed Cypress Forests in the United States. This unique landscape is both gorgeous and pretty darn mysterious looking.
The wetland lake area is massive encompassing over 25,000 acres and stretches into Lousiana. By the way, since 1965 apparently, there have been literally hundreds of Bigfoot sightings on the lake. Not kidding!
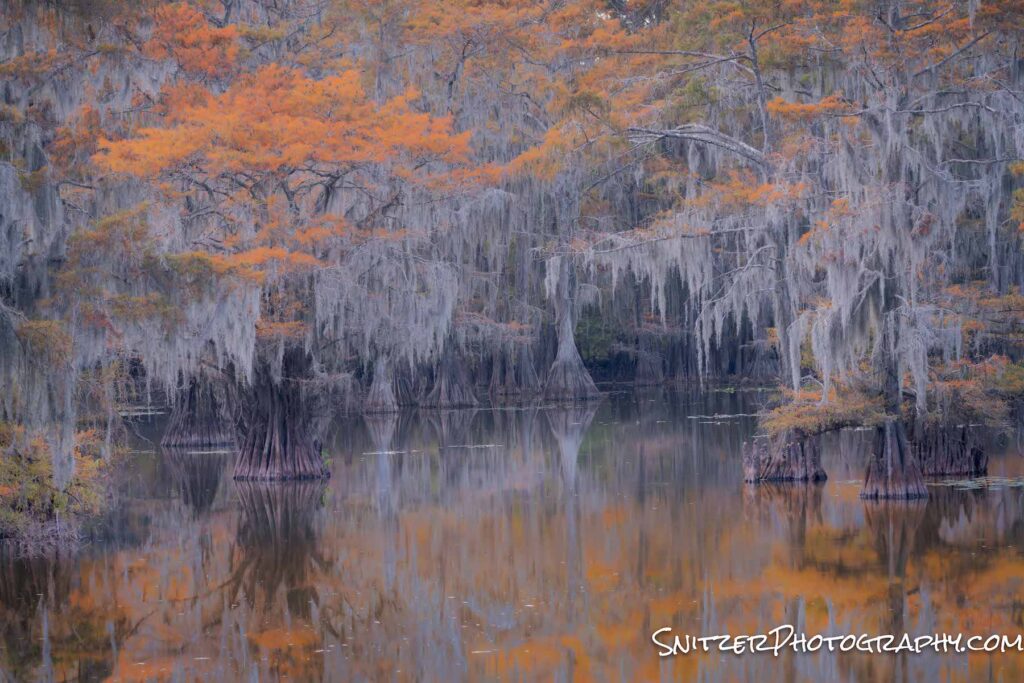
Each fall (Mid November down there), as the colors of the Cypress trees change, legions of leaf-peeping photographers converge on this place… including T Snitz Esq!
There are essentially two ways to view the lake. The first is from shore, inside the Caddo Lake State Park.
20 minutes before sunrise.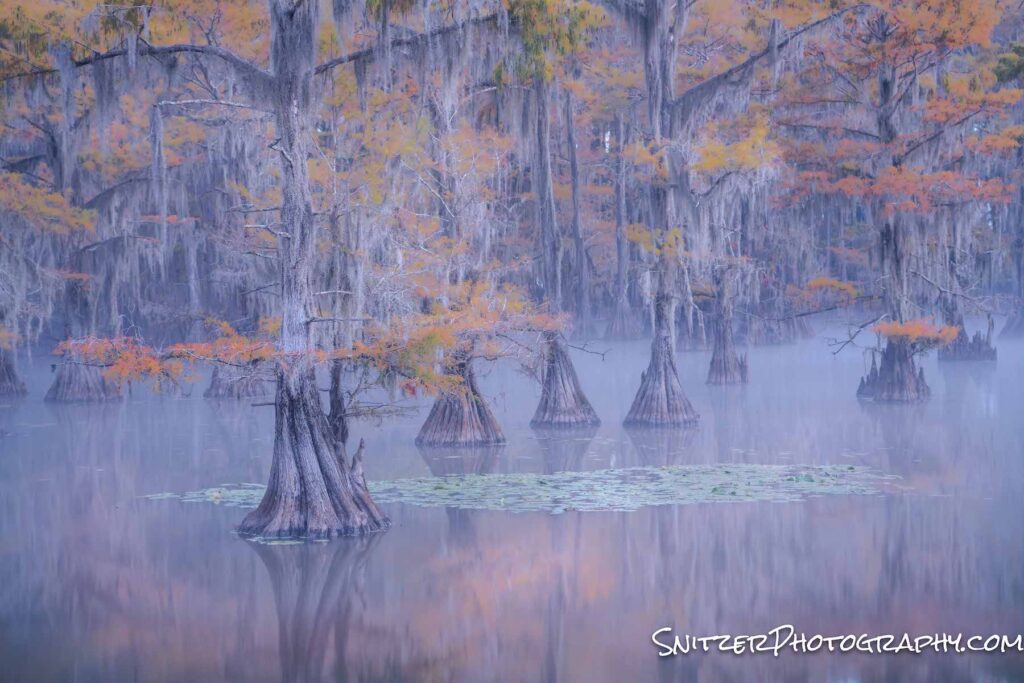
Five minutes before sunrise.
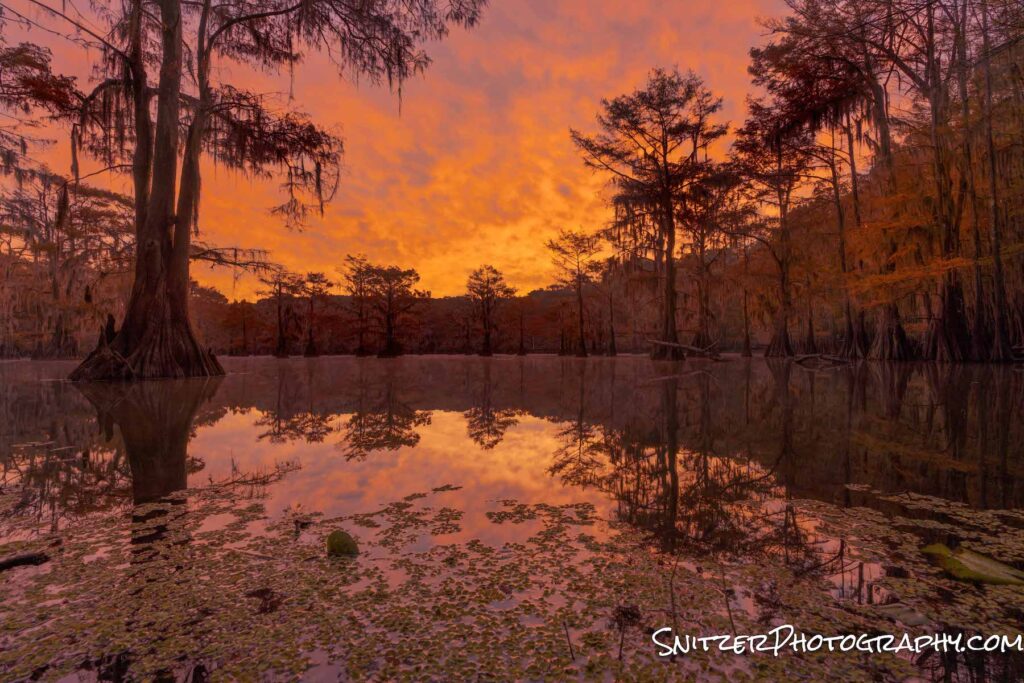
The background forest begins to glow about one hour later! Badabing.
Occasionally you’ll see some folks out paddling in the park.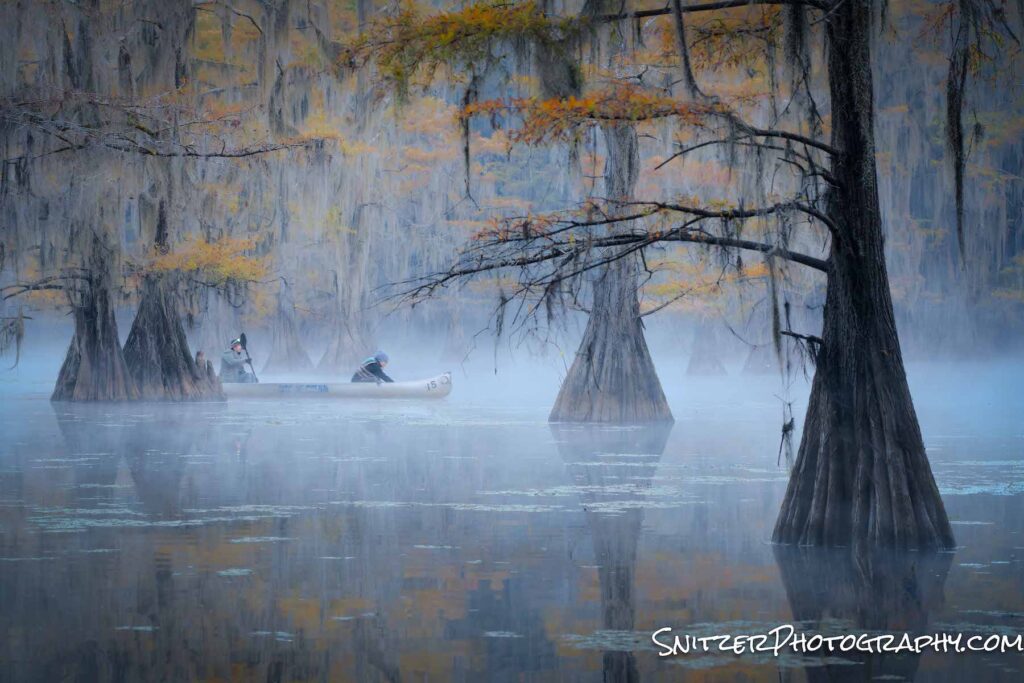
To view the main lake, you need to be on a boat. It’s difficult to view from the shore in most spots. Dawn patrol. Fisherman locked and loaded (with Coors Light)!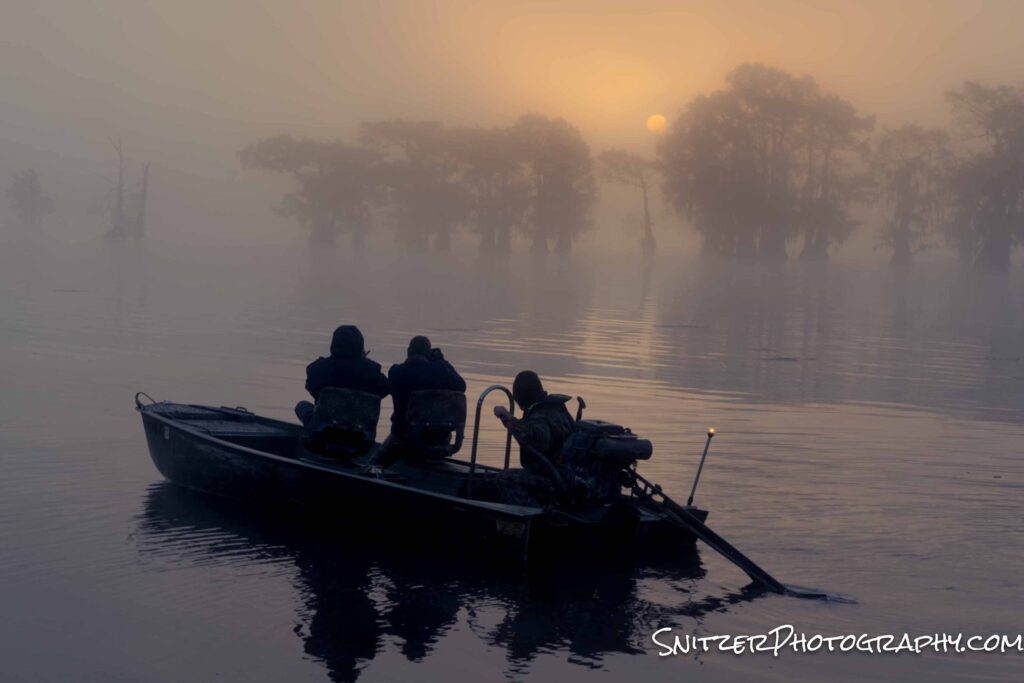
It’s pretty spooky out here.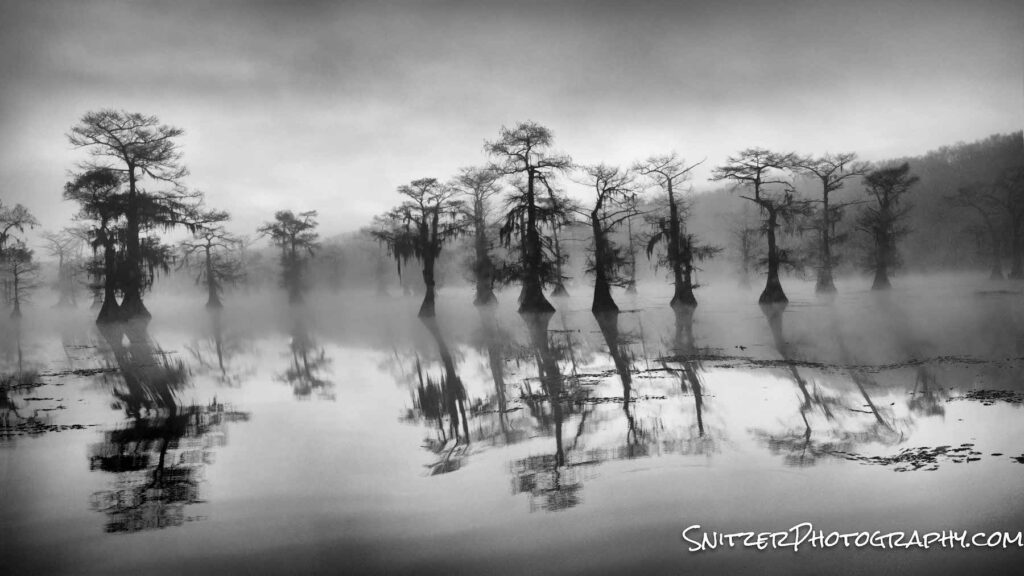
The colors really pop when the sun is obscured by clouds!
An Egret keeping watch.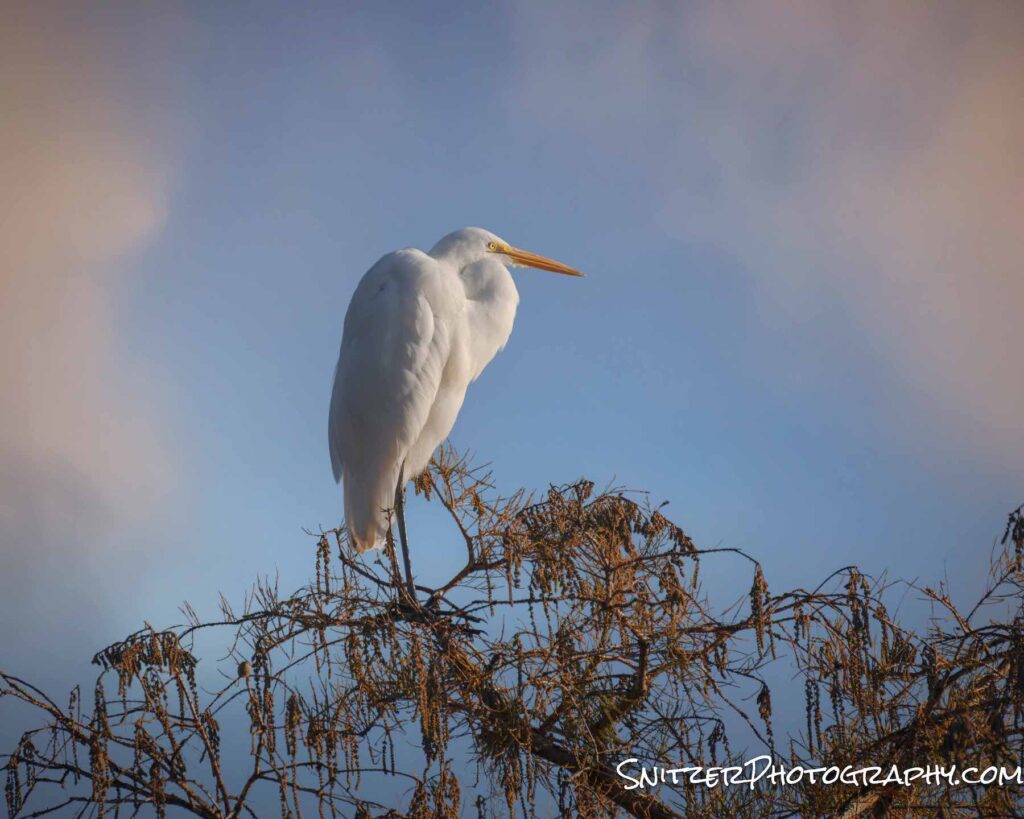
Saying goodbye to the Bayou, I had the op to drive through the Ozarks on route home to Illinois. Armed with a Mavic II Pro drone…got a great vantage point to view the fall color.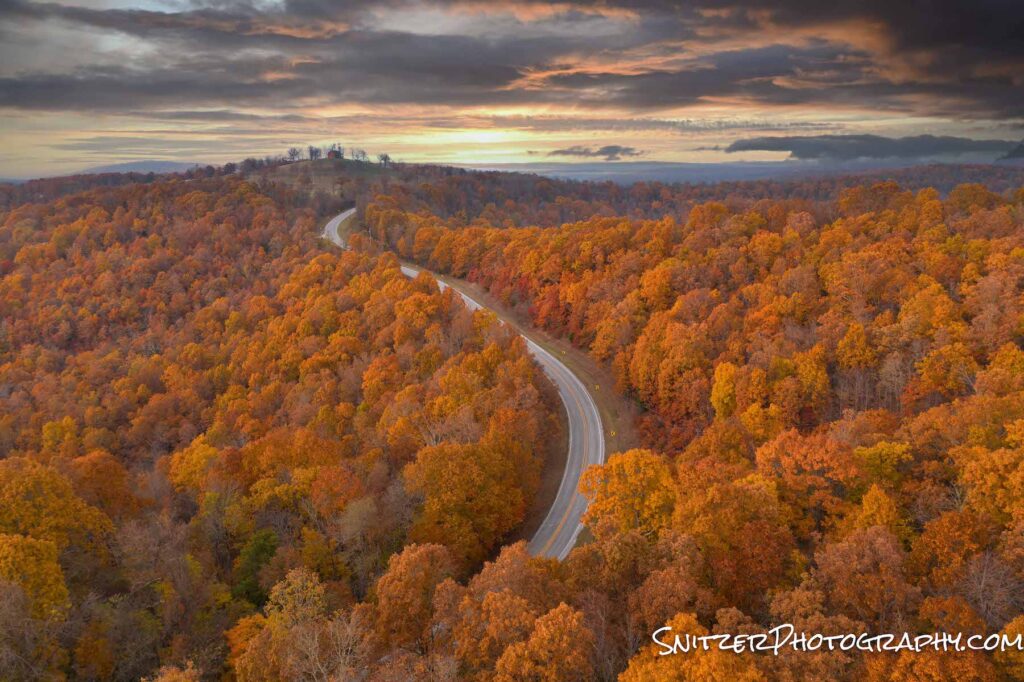
See the rest of my pics by clicking the link: Link to the photo gallery
A final word of caution: Caddo Lake is rapidly getting discovered. Motorized boat rentals which typically come with a guide (lake can be difficult to navigate) are already getting booked up for next fall!. For serious photographers looking for a guided experience, many photo workshops for next fall (2022) are likewise already full. Ergo, plan your trip now!