Camera gear when your hiking a long long long way!
Most nature shooters stay relatively close to the road (ergo, keep it within a 1-mile radius). If you find yourself yearning for adventure and going on some extended excursions (hiking 4+ hours) you may need to mod your equipment to keep up.
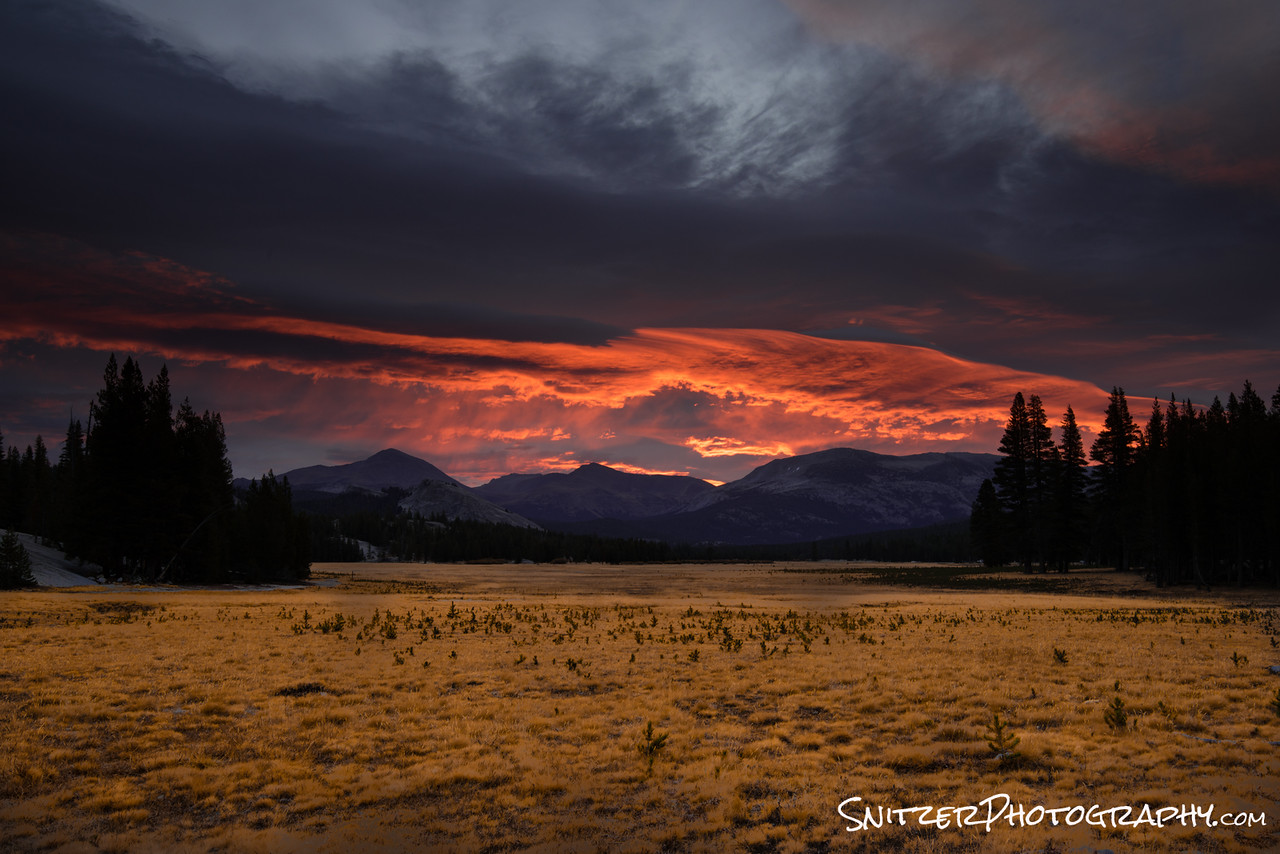
Nuts like me? Not uncommon to clock in more than 10 miles/climb 2,000-3000 vertical feet during a full one-day outing? No, it’s not self-flagellation, you simply like the physical challenge and get to see some bomber scenery that others don’t get to photograph. Ergo, ops for creating some original imagery…BAM!
Some tricks to enjoy those hikes 100% more!
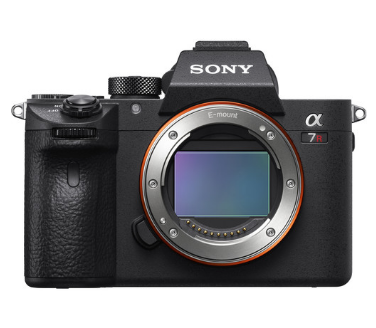
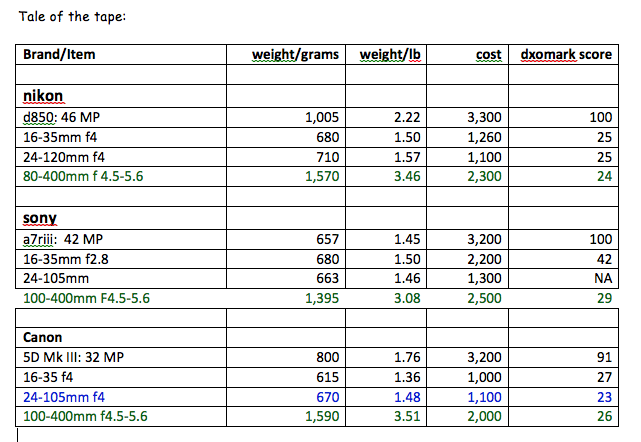
Lighten up the camera/lens kit. I’m shooting with the Sony A7r III, which is almost 1 lb. lighter than Nikon’s 810 or 850, has the same 15 stops of dynamic range and is about ½ the size. Additionally, the key Sony lens choices are as good as Canon or Nikon’s, while being more compact and lighter weight. Less weight on your back, less room is taken up in your pack. See my complete comparison of the Nikon 850 v Canon 5D IV v Sony A7r III. https://snitzerphotography.com/education/template-3/
Be strategic on which lenses you bring.
If I’m going on a long very steep climb, I may simply bring my Sony 24-105mm, a sharp lightweight lens, with great versatility. I always have the option to bang off a multiple exposure pano shots if I need to go wider occasionally on the hike.

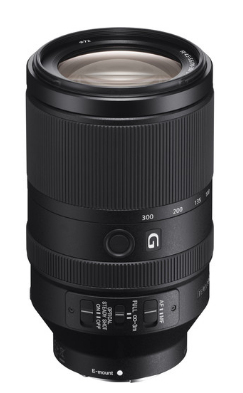
If I expect to encounter many ultra wide angle ops and perhaps some wildlife, then I’ll carry two lenses: The Sony 16-35mm (below left) and the Sony 70-300mm (below right). I’ve now covered a much wider range and added less than 2 lbs. to my pack weight.

Tripod really required?
Unless I’m encountering water features (need to blur water) or plan to shoot in very low light, I’m usually inclined to leave the tripod at home. The Sony with 5.5 stops of built-in image stabilization provides IQ to shoot tack sharp photos even at small apertures.
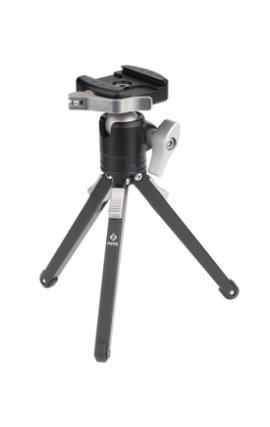
Suspect moving water ahead? I’ll bring my Really Right Stuff Pocket Pod mini tripod. Insert photo At under 1 lb. it’s super light, can handle any of the above lens setups and rock solid. It requires me to shoot low to the ground, set up on top of my pack or perched on a rock but weighs practically nothing. photo of RRS pod
There are several full-size tripod options available but all weigh 3-4 lbs. For me, seldom worth the hassle on a very long hike.
Ditch the camera bag?
Still using a purpose-built camera pack. Few come with the type of well-constructed suspension systems that dedicated hiking packs offer. In short, 99% of camera packs are incredibly uncomfortable on long steep hikes. Did I mention these bags typically weight 5 Lbs. or more? More weight to carry.
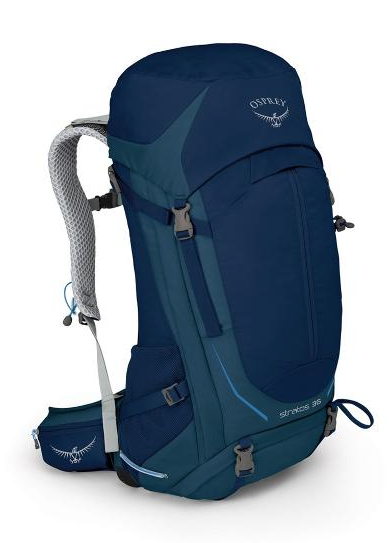
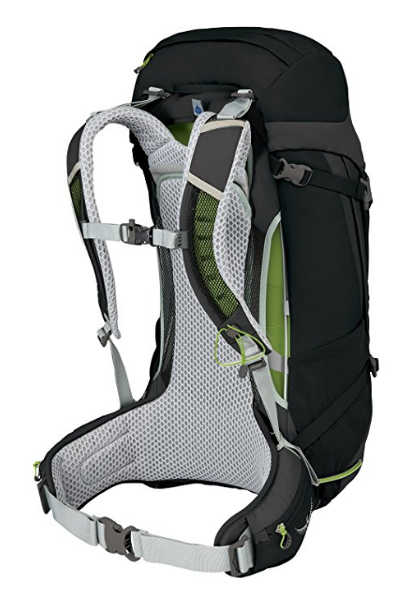
Instead, I use an Osprey Stratos 35 (front/rear views featured below). The bag has plenty of room and compartments to carry my camera/lens set up and weighs only 3 lbs. The pack can be adjusted to fit your back/hips perfectly and is 100% more comfortable on a long hike. There are plenty of pockets, storage spaces for filters, memory and other shooting accessories, plus multiple layers of clothing and food. The pack also comes with a waterproof rain cover
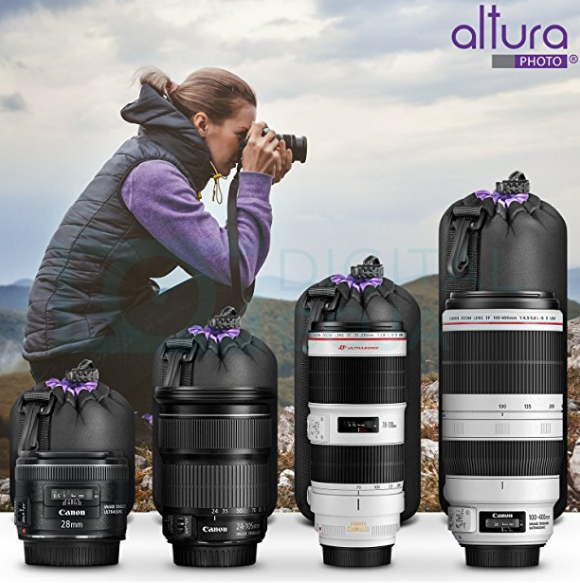
How do I protect my lenses while packed? I typically store them in the Altura Pouches. Soft, protective, lightweight. My camera: it’s usually at the top of the pack’s main compartment sitting safely atop a jacket or other soft clothing. Because I’m carrying one camera and one or two lenses, I needn’t bring bulky camera packing dividers/systems on board.
The new Shimoda 40 camera backpack is a notable exception (worth looking at). I opted against because it lacks exterior water bottle holders. https://www.amazon.com/gp/product/B00MJ3RC8E/ref=oh_aui_detailpage_o00_s00?ie=UTF8&psc=1.
The result: I have a lightweight comfortable set up that allows me to travel great distances in comfort and expand my experience in the wild. I can bring back photos of places that most shooters won’t go.
Below are the details comparing the Sony camera/lenses to Canon/Nikon for the technically inclined!
Your Iphone can shoot in RAW!
Well wait no more. With the ProCamera Ap you have the ability to shoot in RAW mode baby! Woooo!!! Talk about a game changer. Now when you’re stuck without your DSLR/Mirrorless camera you can still crush it.


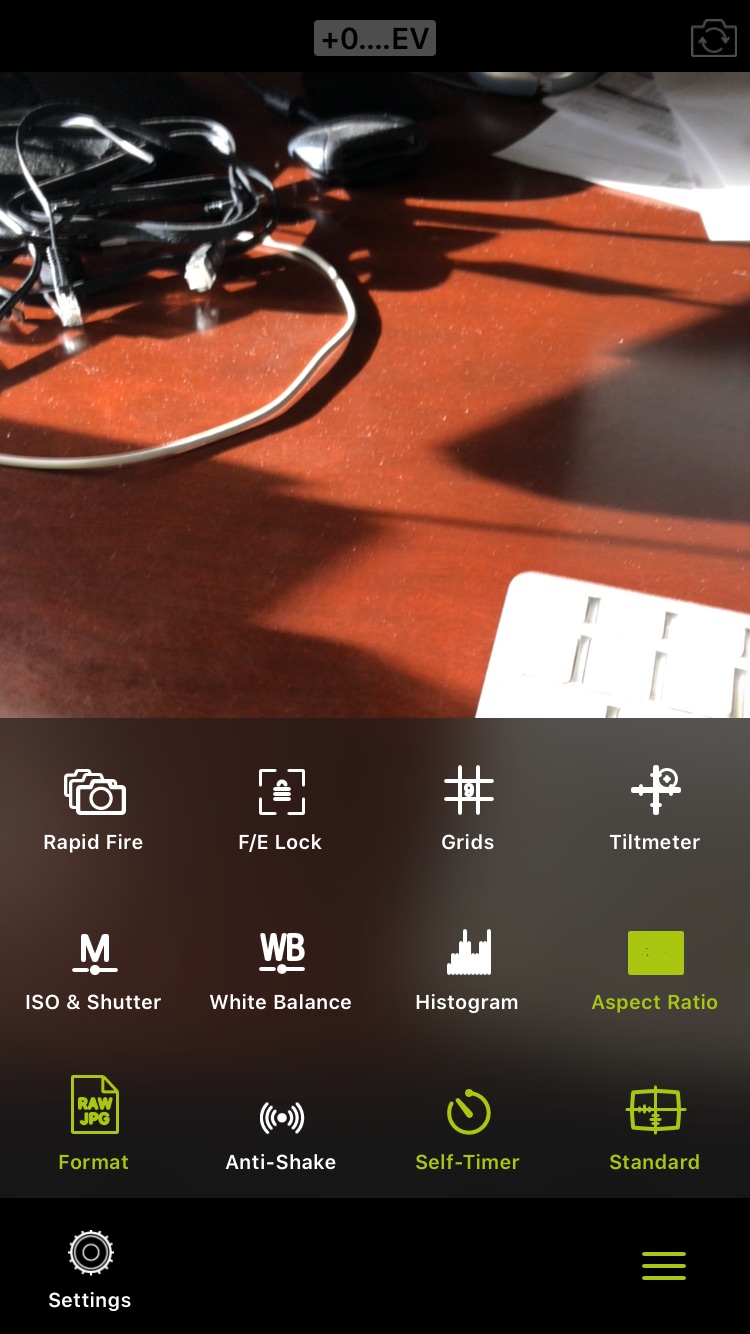
The author is taking a bomber photo of my keyboard. I know, great composition! I have the gift.
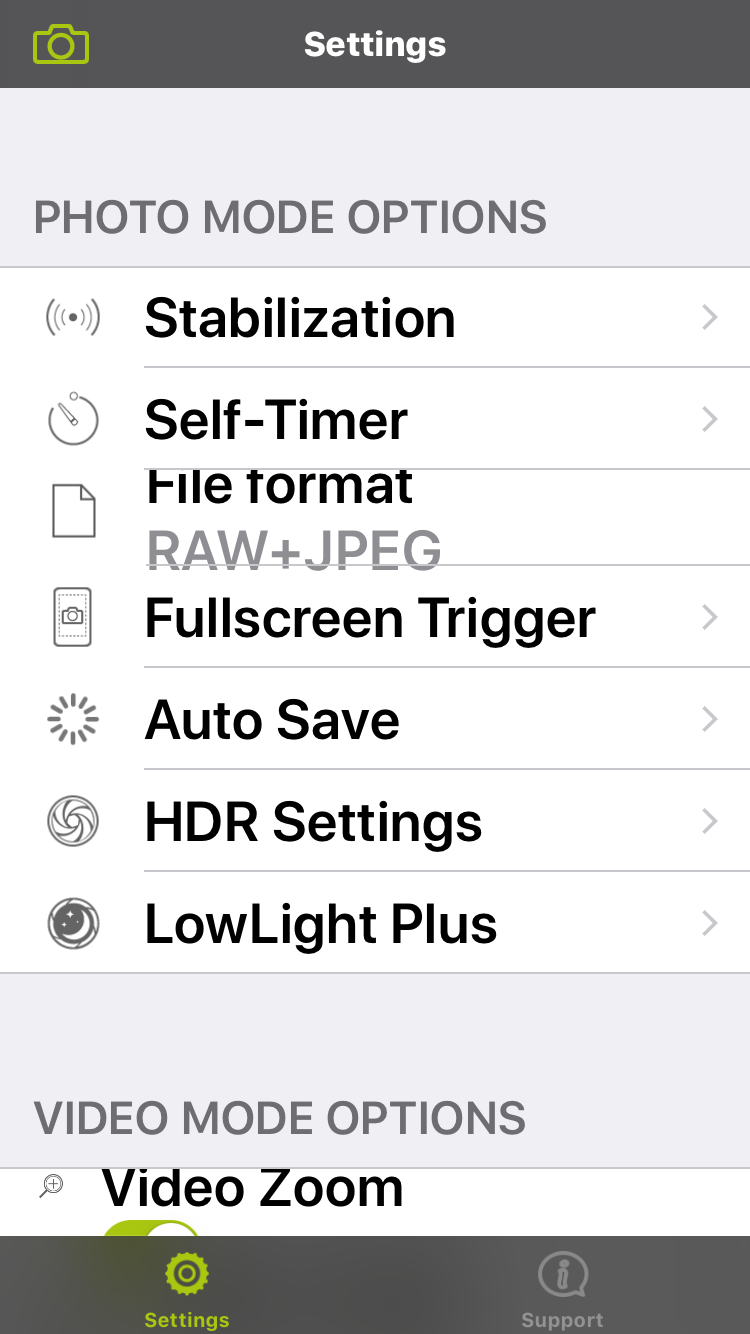
The option to select RAW + Jpeg is midway down the menu.

The workflow is pretty simple. You’ll save the photos you take with ProCamera to the Iphone’s camera roll, then open up that image in Snapseed. Snapseed can easily read any image in that file.
Good luck and gods speed.
Note: ProCamera will merge 3 RAW images and then create a JPEG/HDR composite. Otherwise when doing single photo captures the program produces a RAW digital file.
Battle of the hiking Tripods
Let face it, I hate hiking with a tripod (oh, my aching back). But if you’re out for a day of shooting waterfalls, or an amazing sunrise you’ve got little choice. Quit complaining.
Even so, wouldn’t be nice to find a sturdy lightweight tripod that is bomb proof and will allow quick adjustment of your camera from horizontal to vertical mode? Something that will comfortably hold a wide angle zoom up to a 70-200mm F 4.0.
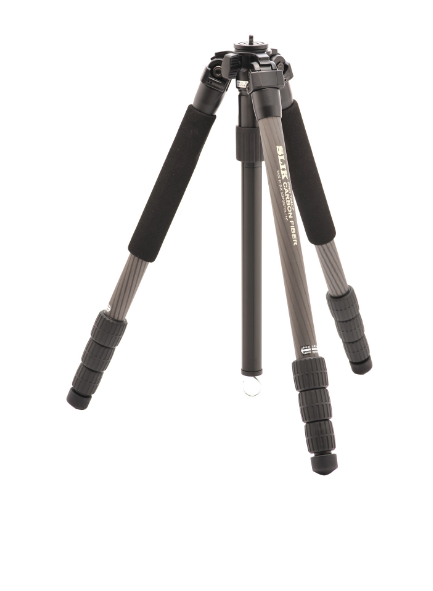
No worries, the Real Right Stuff(RRS) has you covered. The TQC-14 carbon tripod (below left) weighs only 2.7 lbs. and fits into a carry on airline bag! PS. Suggest you choose the version without the center column if you like to shoot low to the ground(IMP) https://goo.gl/f9myDM
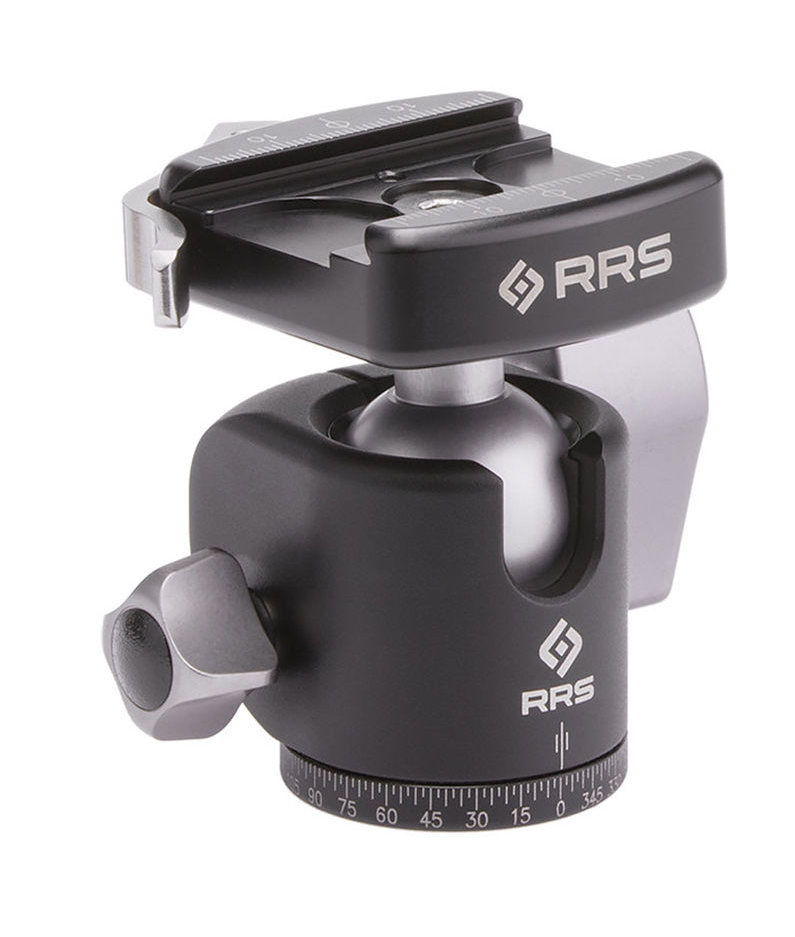
Add a BH-30 ball head (below center) weighing only .5 lbs. and you have a very stable workhorse at just over 3 lbs. https://goo.gl/ALG6Zf
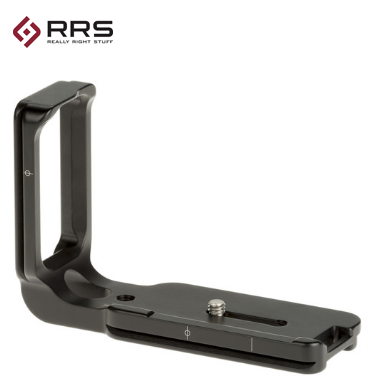
Plus using the RRS L bracket (below right) you can quickly shift your camera 90 degrees!


Ok, can’t afford all that. Not to worry, you have some great options that won’t break the bank. They will, however, require you to buy a few components separately.
Tripod:
The Slik Pro 634* is 2lbs and priced at only $250. It’s not quite as well built or durable as the RRS, but a great performer at ¼ the price. https://goo.gl/d8QScz
You can also opt for the Slik Pro 834 a beefier version of the former @ 3 lbs $219. https://goo.gl/RyLTsj
The RRS 30 ballhead is awesome and arguably worth buying for $300. The Leofoto 30 is almost as good (.1 lbs. heavier) and will put you back $115. Much more reasonable. https://goo.gl/qzZAGK

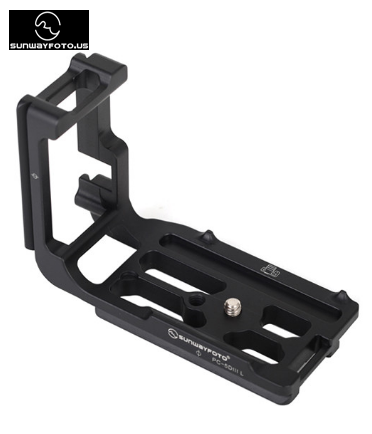
Sunwayfoto makes L brackets, custom designed to fit your mirrorless or DSLR for approx. $60
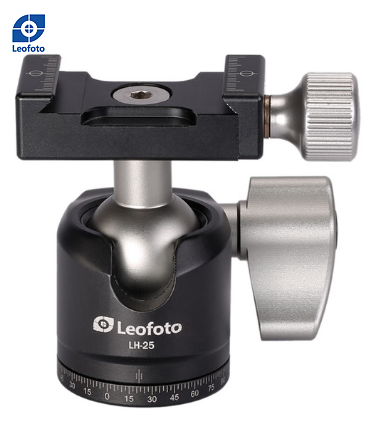
with the Leofoto 25 mini ballhead $60 https://goo.gl/w9QACL. This is perfect for mirrorless cameras or DSLRs (nothing heavier than a 70-200mm F 4.0 however)
*requires an adapter to accommodate the RRS 30 or Leofoto 30 head. Don’t let that scare you off. Takes 5 seconds to screw on. https://www.bhphotovideo.com/c/product/620896-REG/Wimberley_BS_100_BS_100_3_8_16_to_1_4_20.html

Patagonia Dreaming!
Ever toyed with the crazy idea of visiting Patagonia? The long 9,000-mile trip yielded amazing photos and world-class trekking!
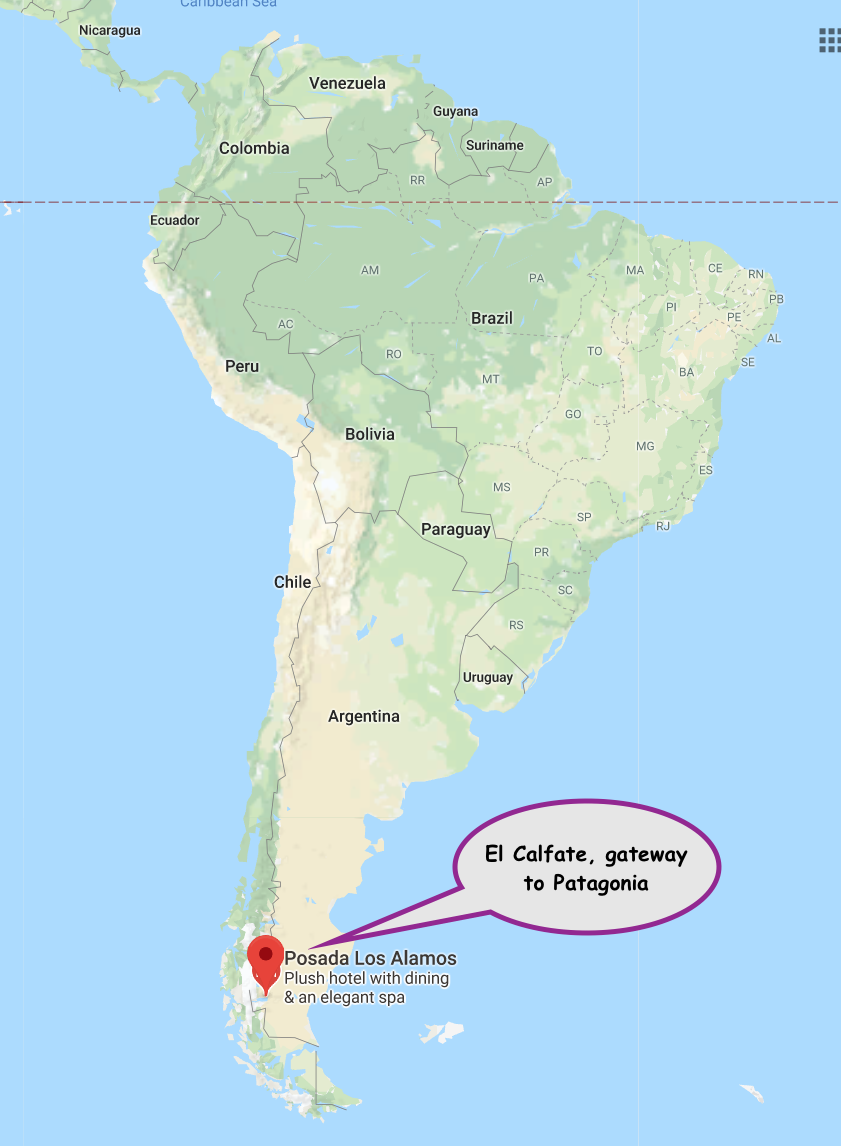
Patagonia is located at the southern tip of South America. Go any further and you’re practically atop the South Pole.
My 12-day trip started with a flight to Miami, connecting in Buenos Aires and finally landing in El Calafate, Argentina, the entry point to this amazing National Park.
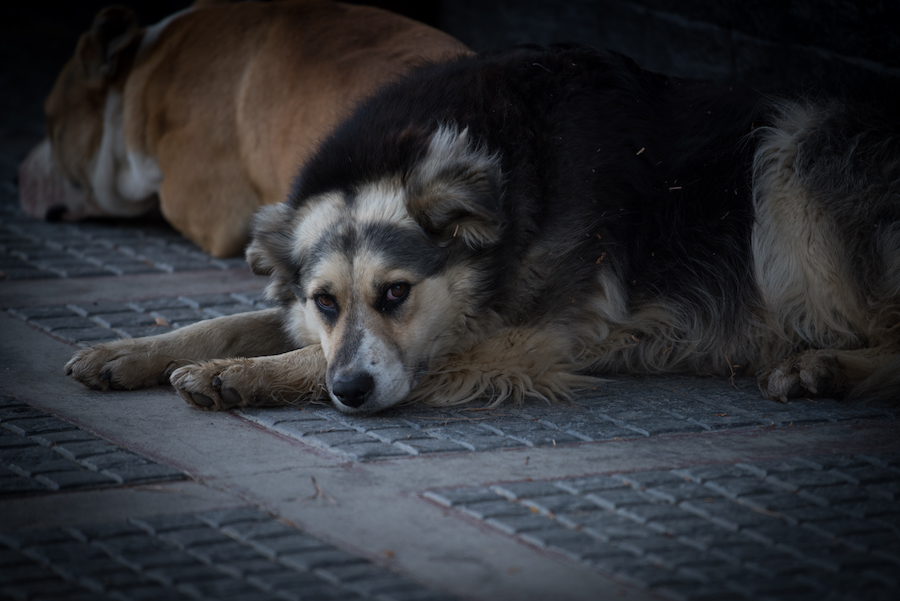
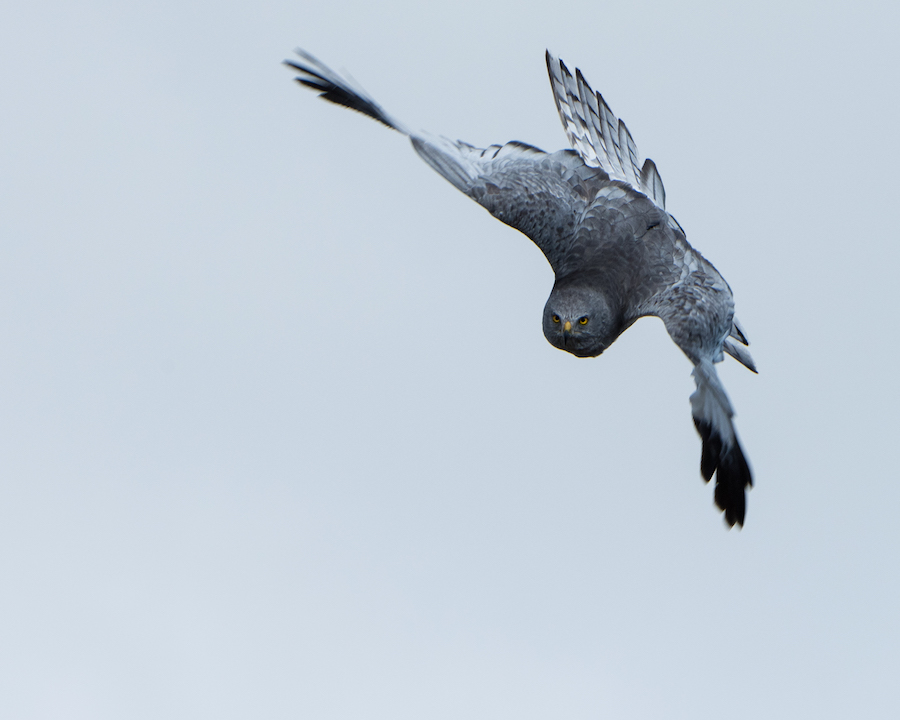
The small town is home to a bunch of climbing shops, small hotels and a large population of homeless canines. They’re friendly and ironically pretty well fed.
A few blocks from the center of town; hawks patrol a local wildlife sanctuary (an unexpected treat). I wasn’t sure if this guy was about to dive bomb me!
My serious exploration, started the following day at the Perito Moreno Glacier. The 200 foot tall wall of ice descends 5+ miles from the mountains eventually terminating into Lake Argentina. The frozen mass ice has an eerie blue cast and dwarfs the occasional viewing boat that ventures in for a closer look.
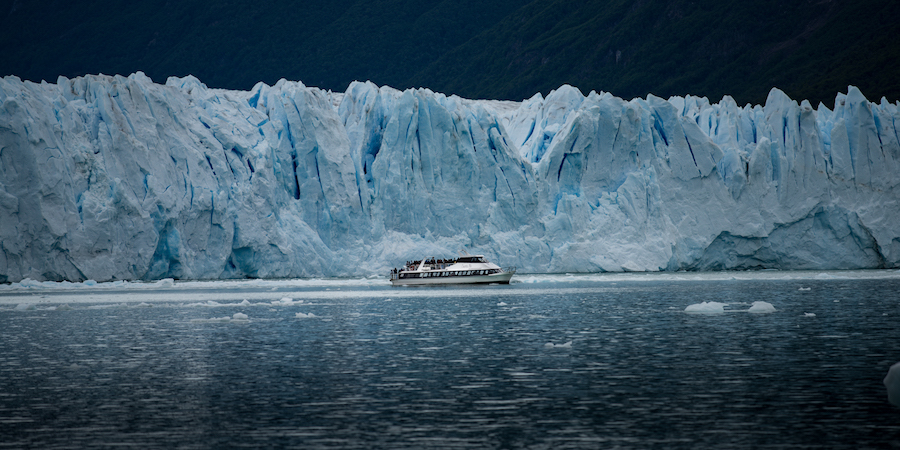

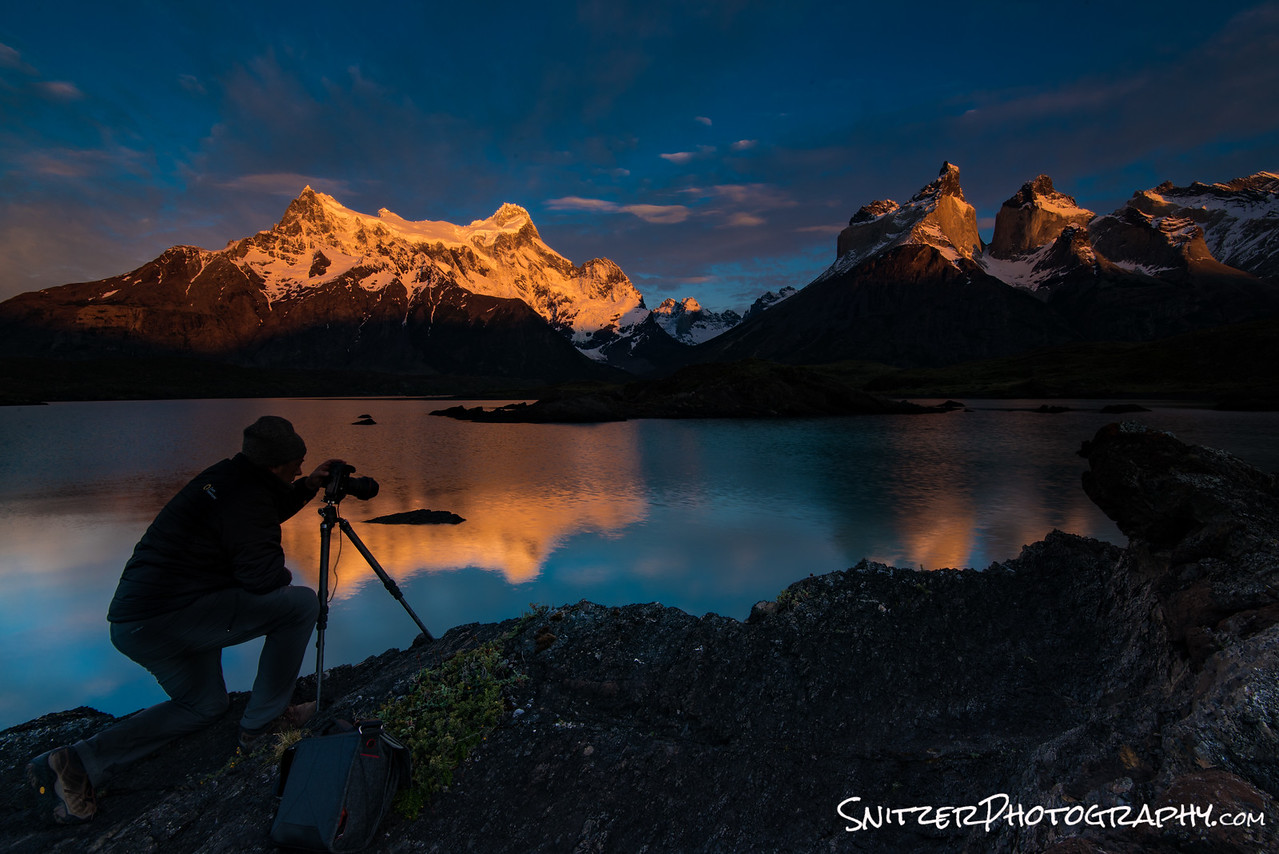
Below I’m pictured getting ready to grab the shot!
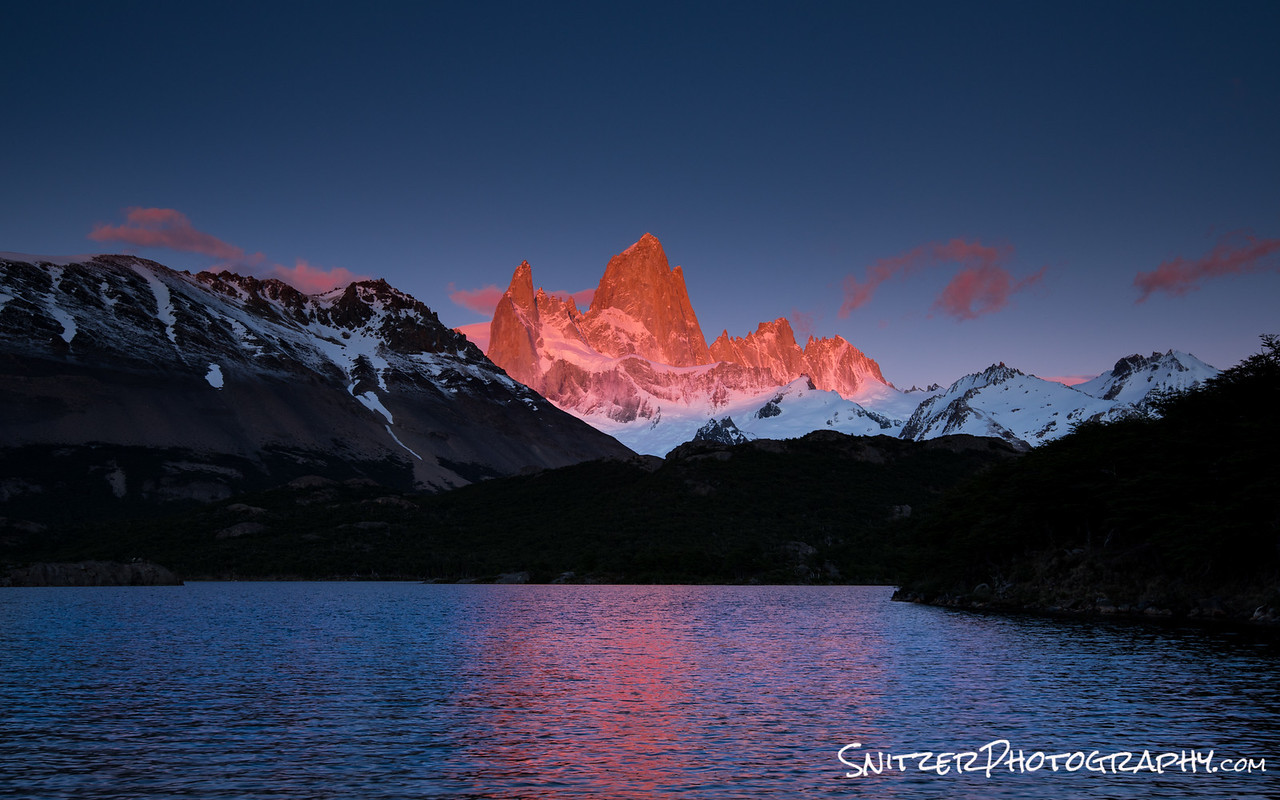
Fritz Roy is also an iconic peak that looms over the park and stands as one of the world’s most famous and challenging technical climbs. At 4am we start hiking up to view it from the small town of El Chalten. We reach the Laguna Capri just in time to see the first light spill over its main spire.
2 hours later…we’re still going & getting closer to the base of Fitz!
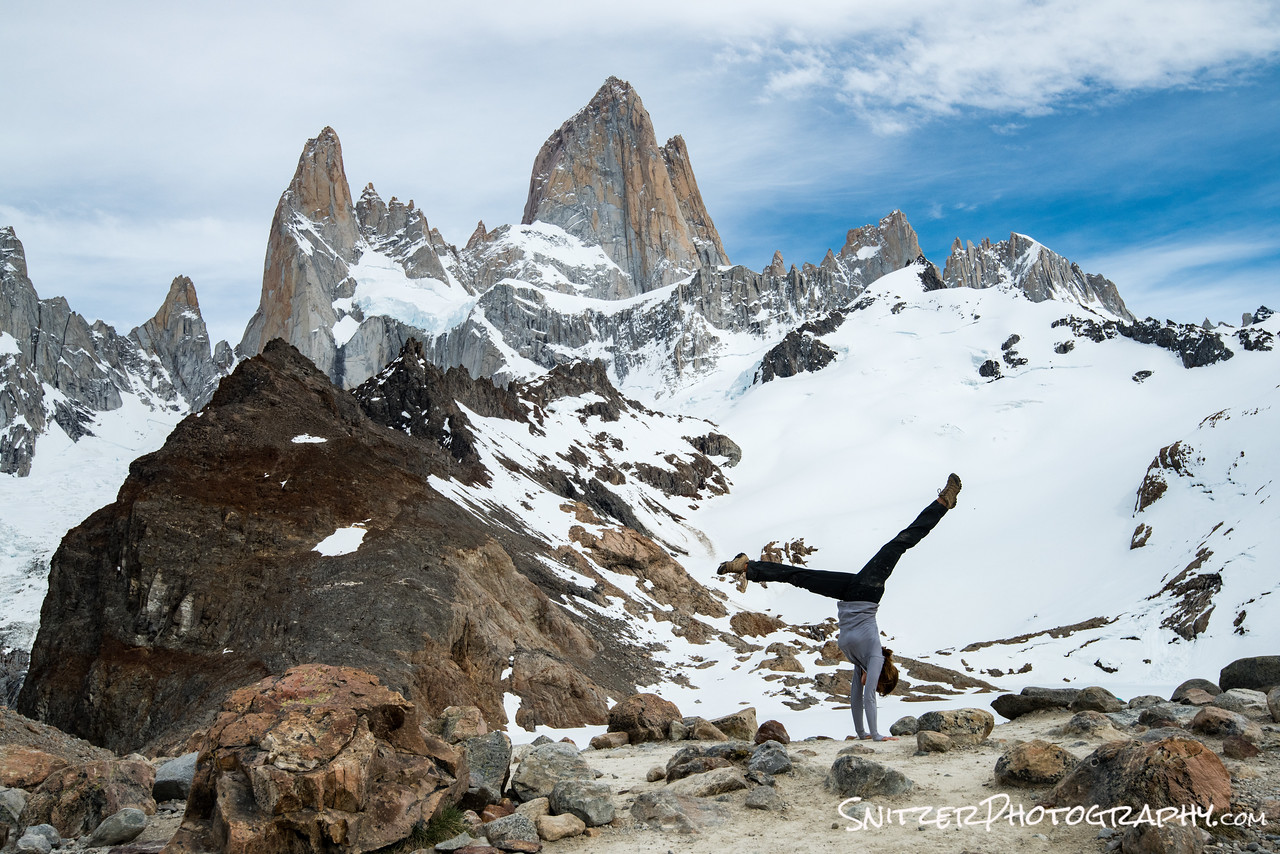
I’m hiking with two other photographers from NC, one of whom (Sharon) was a collegiate gymnast. Great op for a hand stand!

We’ll be exploring the Fitz Roy area for the following 3 days. Lot’s of great hikes, mountain views and crystal clear water. In fact, with no pollution or animal grazing, it’s totally safe to drink out of any stream.
With day 6 comes phase II of our trip, passing thru the border from Argentina to Chili allowing our exploration of the Cerro Torre area.
Our hotel, The Hosteria Peho, is located on an small island (pictured to the left in the photo below) in the park which overlooks two mountain peaks rising over 8,000 feet from the lake floor (The Paine Grande and Los Cuernos del Paine).
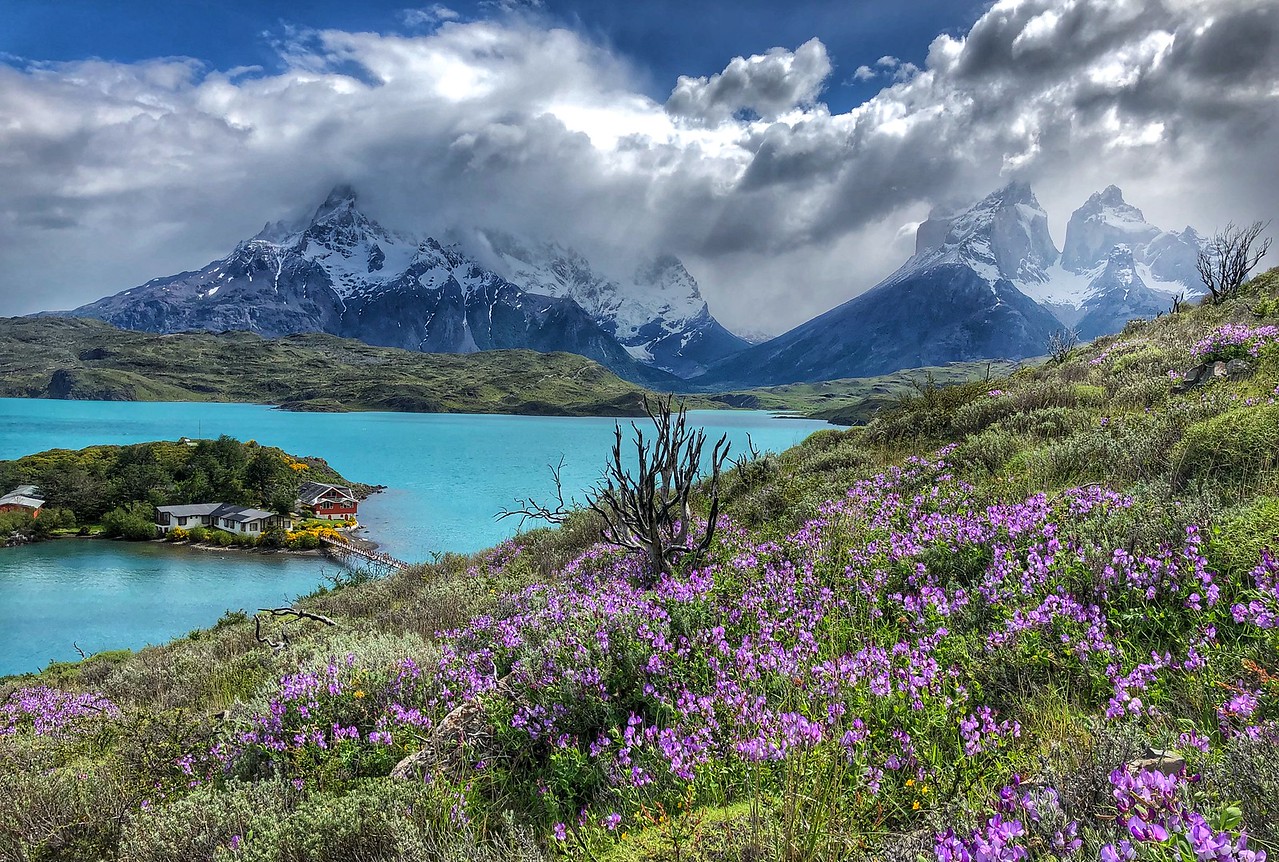
Check out the view from behind the hotel. Not bad!!!!

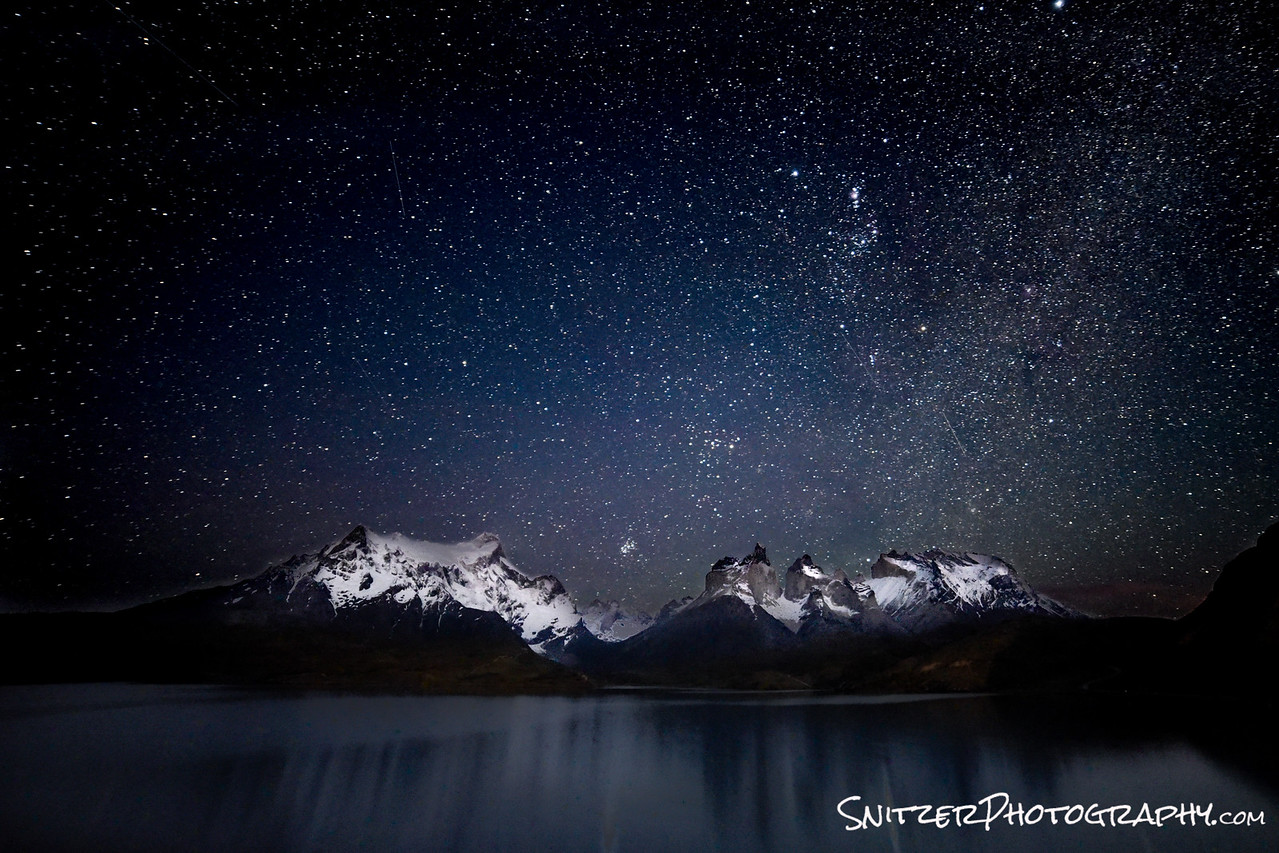
Like that? It looks even cooler at 3am allowing me to catch the stars overhead…with a little moonlight reflecting off the snowcovered peaks!
The terrain and variety of scenery in Chili are inspiring. We’re typically up each morning around 5am so get into position for great pre sunrise light.
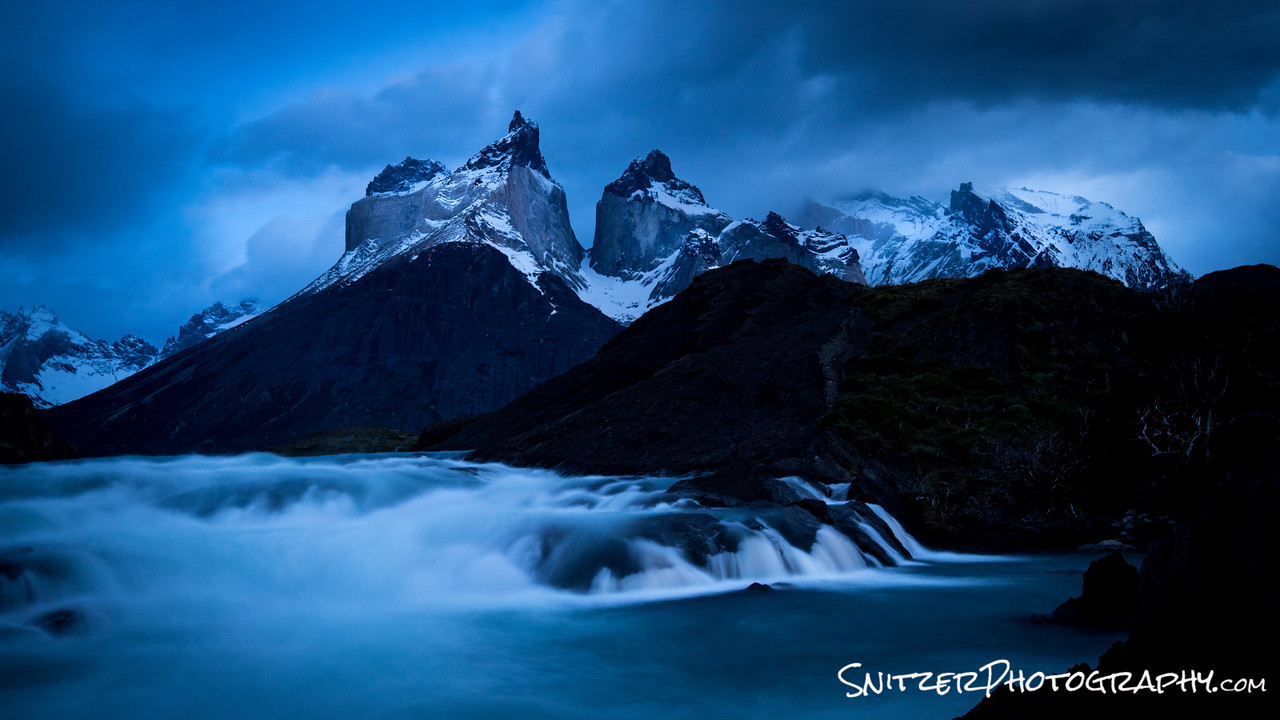
The next day brings completely different weather. The shot below was taken while perched on a mid-stream rock outcropping as a storm front moved in. Fortunately we had 15 minutes to shoot before the rain hit.
So the really important question: Is Patagonia worth visiting? Yes! For photography and hiking, there’s nothing like it I’ve experienced. It’s an unspoiled, generally uncrowded mountain local that’s unmatched in our country. Will the tranquility last forever? Don’t think so…more tourists are discovering this gem every year.
Click the link below for more photos from my trip!
https://www.snitzerphotography.com/Nature-Travel/Galleries/Patagonia-2017/n-jW68rv/
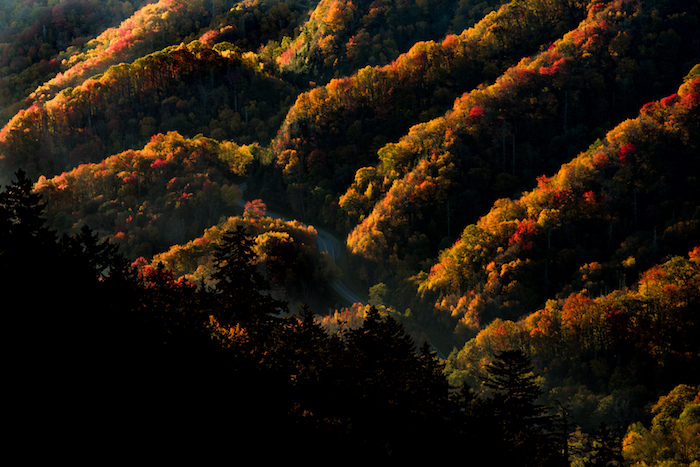
Great Fall Color In The Smoky Mountains
October is a magical time to travel to Townsend Tennessee, a gateway to the Great Smoky Mountain National Park. Happily, this year the leafs decided to change colors literally as I was pulling into town.Lucky break!
I had the opportunity to combine photography with exceptional road biking. My typical day consisted of a morning shoot around 6am as first slight spilled over the mountains. The image below was captured on the Foothills Parkway 20 minutes before the sun made it’s appearance.
Once the sun emerged, it was time to re-group and start riding up the 2,500 ft. elevation gain to the summit of the parkway. Oh my burning legs!
Over the next few days when not on the bike, I had the chance to explore a myriad of uncrowded streams that traverse the National Park. The view below is just off a gravel road leading to the small town of Tremont.


Seems like there’s a waterfall around every turn!
The author taking a break.
Ok, now to photograph that scene behind me!
One of the park’s main attractions is an area called Clingman’s Dome. The drive from town to this vista takes around 70 minutes. Lot’s of vistas emerge as you weave your way up the park road…showcasing the fall color change.
The best view in the park has to be a sunset atop the Dome! The low lying clouds created the backdrop for the glowing rays of light to backlight the scene. Pretty special.

Want to see more from the trip? Click the gallery link below:
https://www.snitzerphotography.com/Nature-Travel/Galleries/Smoky-mountains/n-QzDf8q/
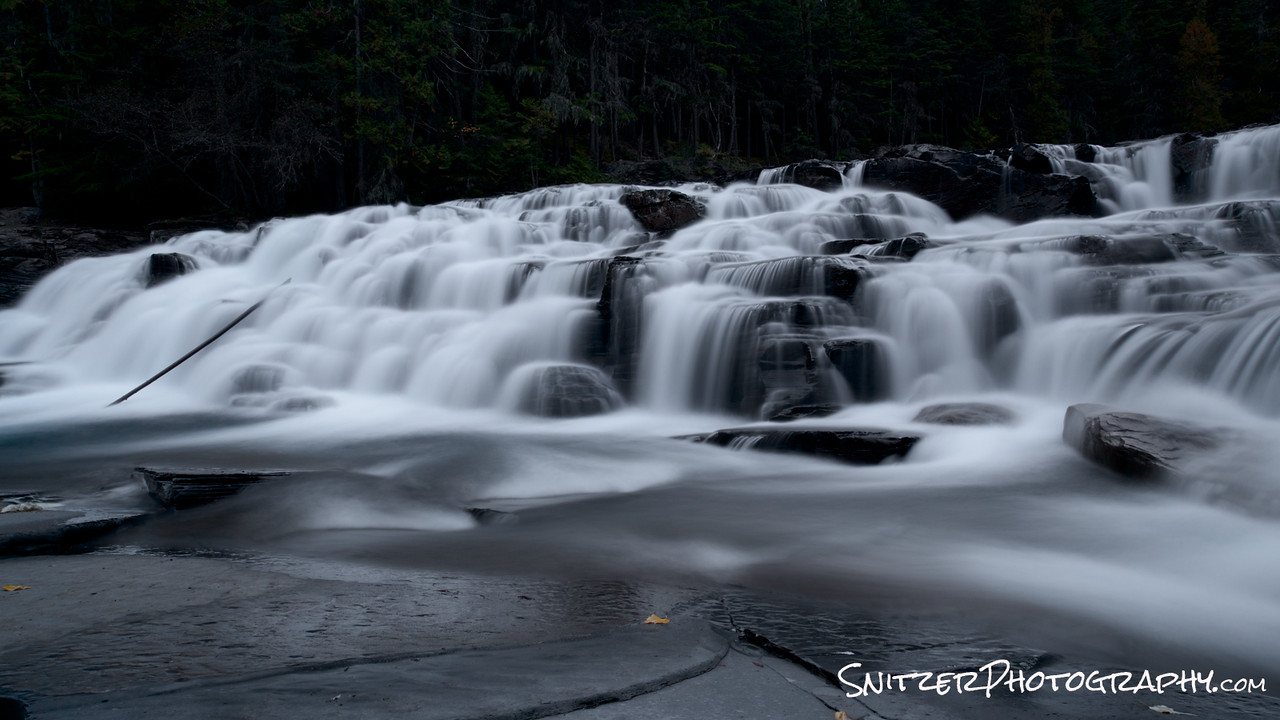
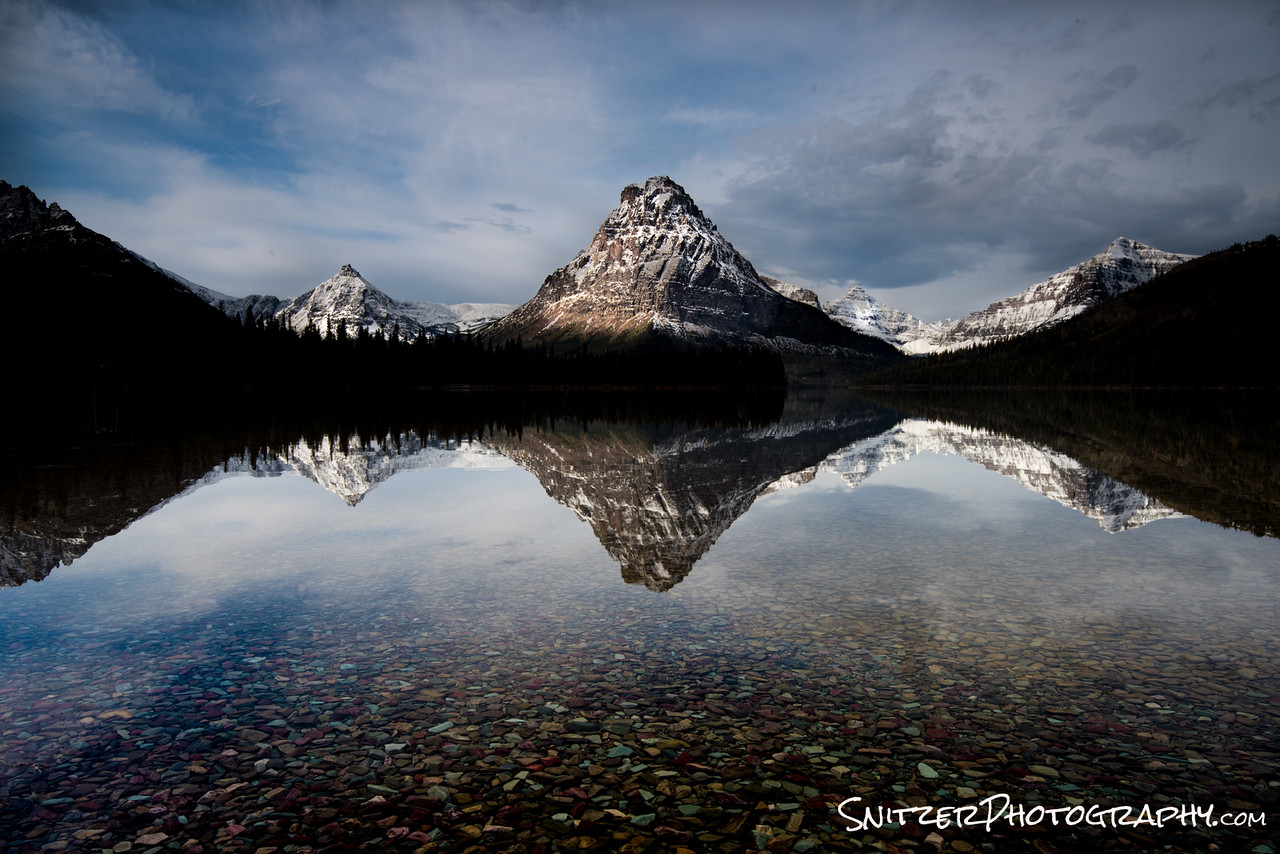
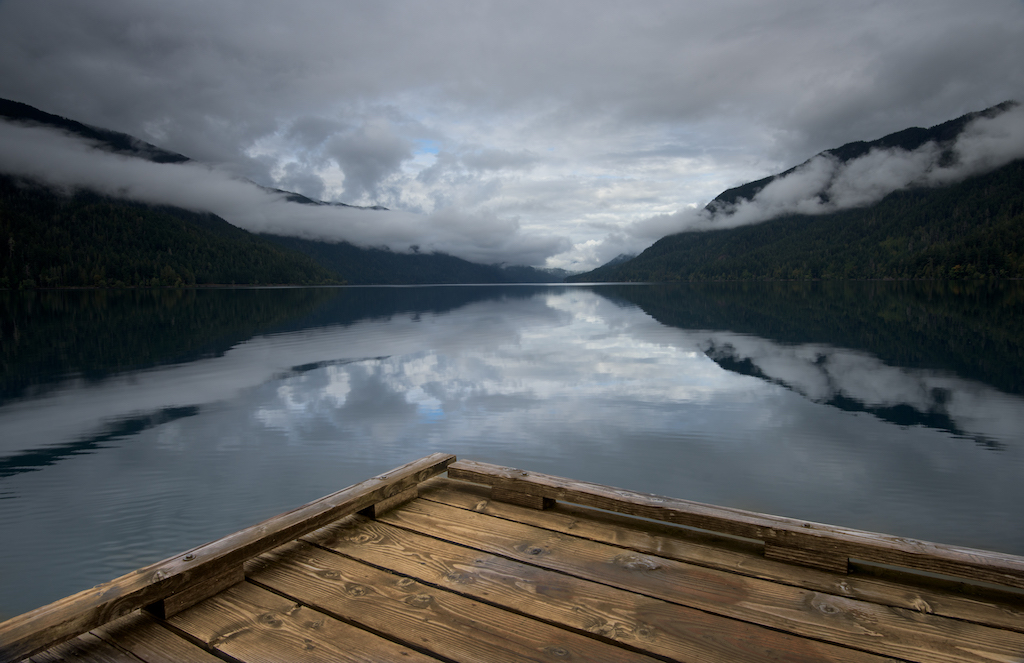
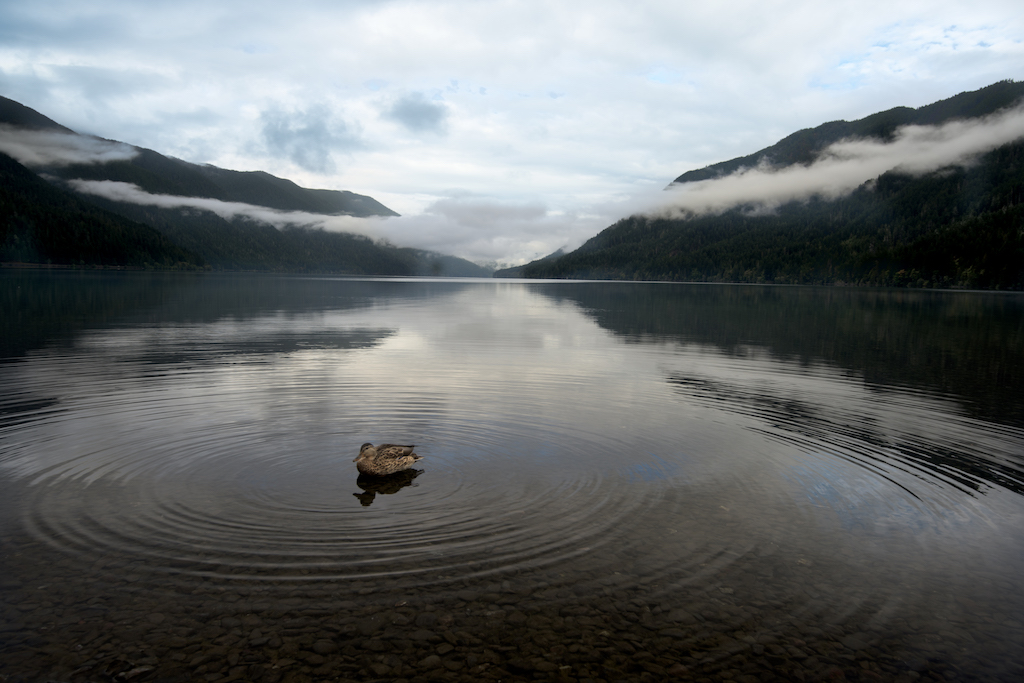
Is Glacier Nat Park the best?
I’m sick and tired of folks asking…”Spritzler…what’s your fav, National Park. You’re a nature photographer…seen them all. So?”.
I can’t possibly begin to answer that. Each park is an individual snowflake, special, unique with features that set it apart…errr…Ok. It’s Glacier Dagdamit! There I said it.
But seriously folks, Glacier combines amazing lakes (with mountains prominently featured in the background …poetic aren’t I!), out of this world hiking and the opportunity to view this stuff in solitude. I love Yellowstone, but not seeing it with 1,000 of my closet friends. Did I mention waterfalls…Glacier has that too!
The trick is knowing when to visit (hint: fall, specifically mid-Sept the last week the park hotels are open) , being ready to hike a long long way (for the good stuff) and being on the trail at first light (to beat any others to the punch).
I’m the map, I’m the map, I’m the map (Dora the Explorer…dont you watch cartoons)?
Ok, Glacier has 4 main areas to explore. Lake McDonald to the West, Logan Pass, Many Glacier and Two Medicine. The first three areas are connected by the Going to the Sun Road, one of the countries most iconic (aka bomber!) drives.

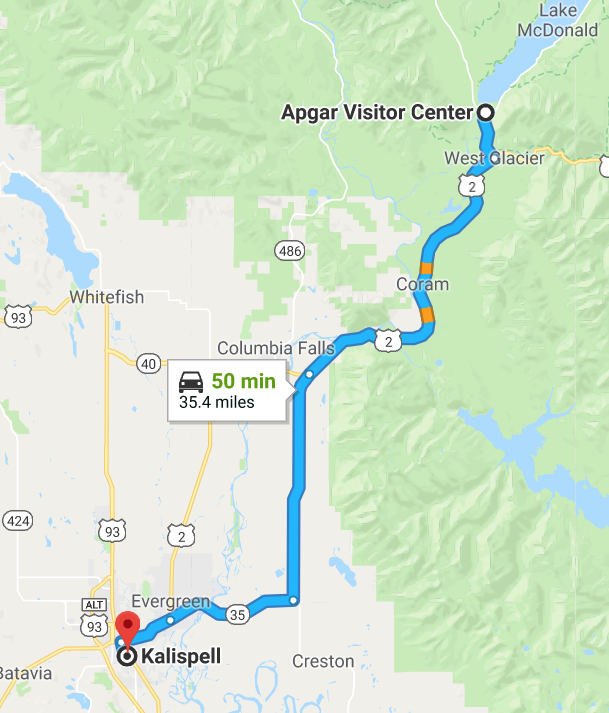
The easiest way to access Glacier is by flying into Kalispell, the nearest airport (45 mins away). Your first entry into the park is Lake McDonald.
The lake area is beautiful, but probably only worth one day of your time.
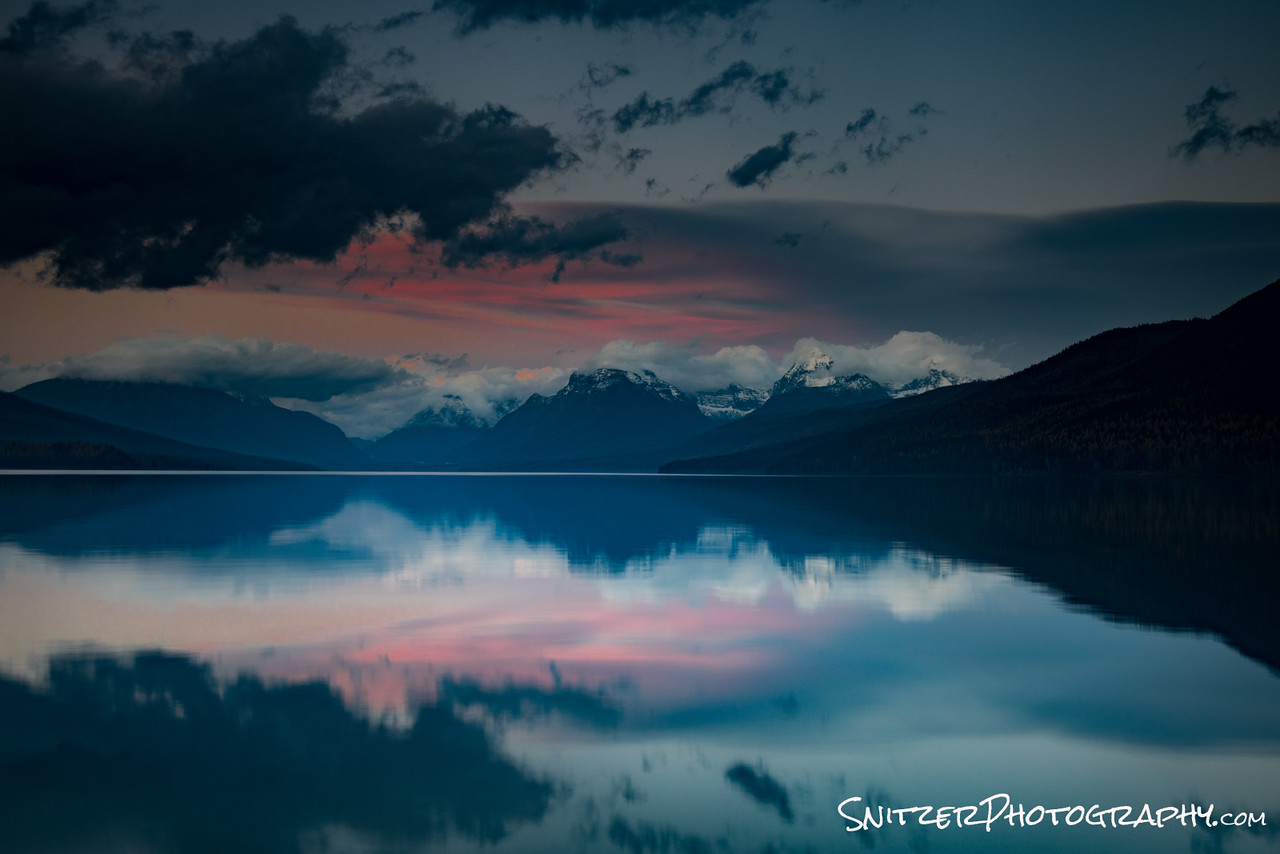
Lake McDonald at sunset, from the Apgar pier.
The real fun starts as you begin the drive up toward Logan Pass. A few minutes after you reach the Lake McDonald Lodge, you hit McDonald Falls. Feel free to hike down like I did….watch out…very steep.
The views continue to improve as you wind up the road!
Eventually, when you reach the top of the pass, pull into the parking lot and hike up to Hidden Lake (takes about 75 mins one way). There’s a pretty good chance you’ll see some bighorn sheep!

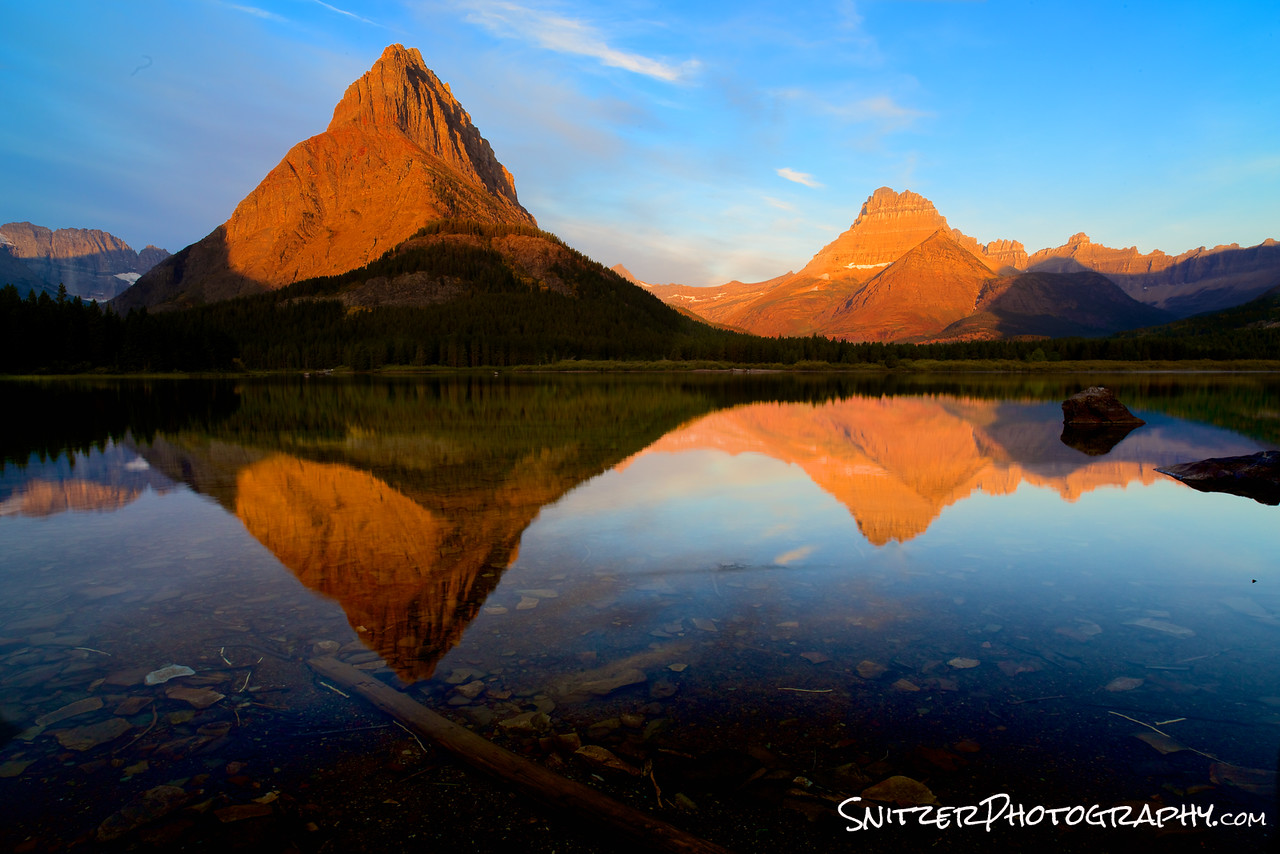
After returning from Hidden Lake, you’ll continue along the Going to the sun road now losing altitude, having crested the pass. Eventually you’ll arrivie at the Many Glacier Lodge. This is the epicenter for the park’s best hiking (plan to spend at least 3 days here). The hotel fills up fast, reserve wayyy in advance.
Swiftcurrent Lake sits immediately in front of the lodge.
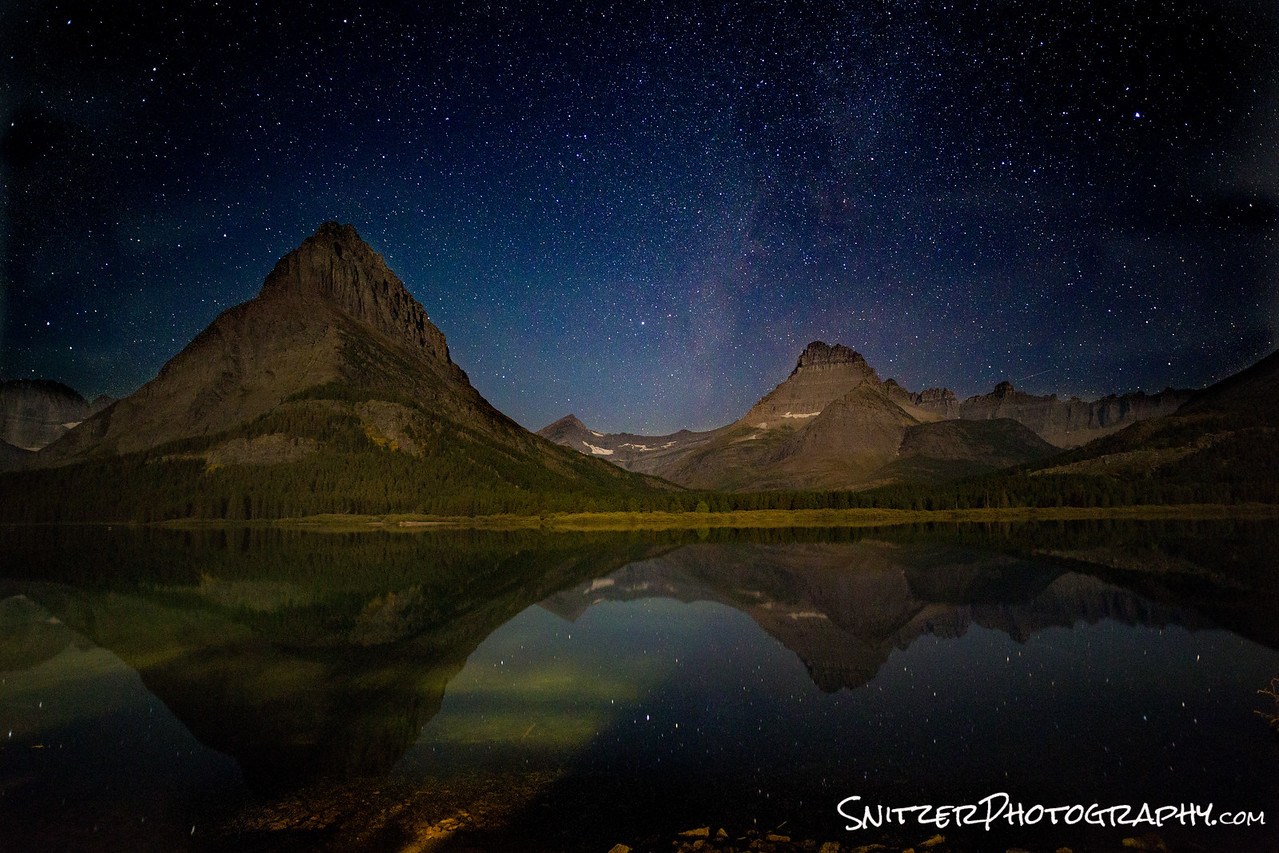
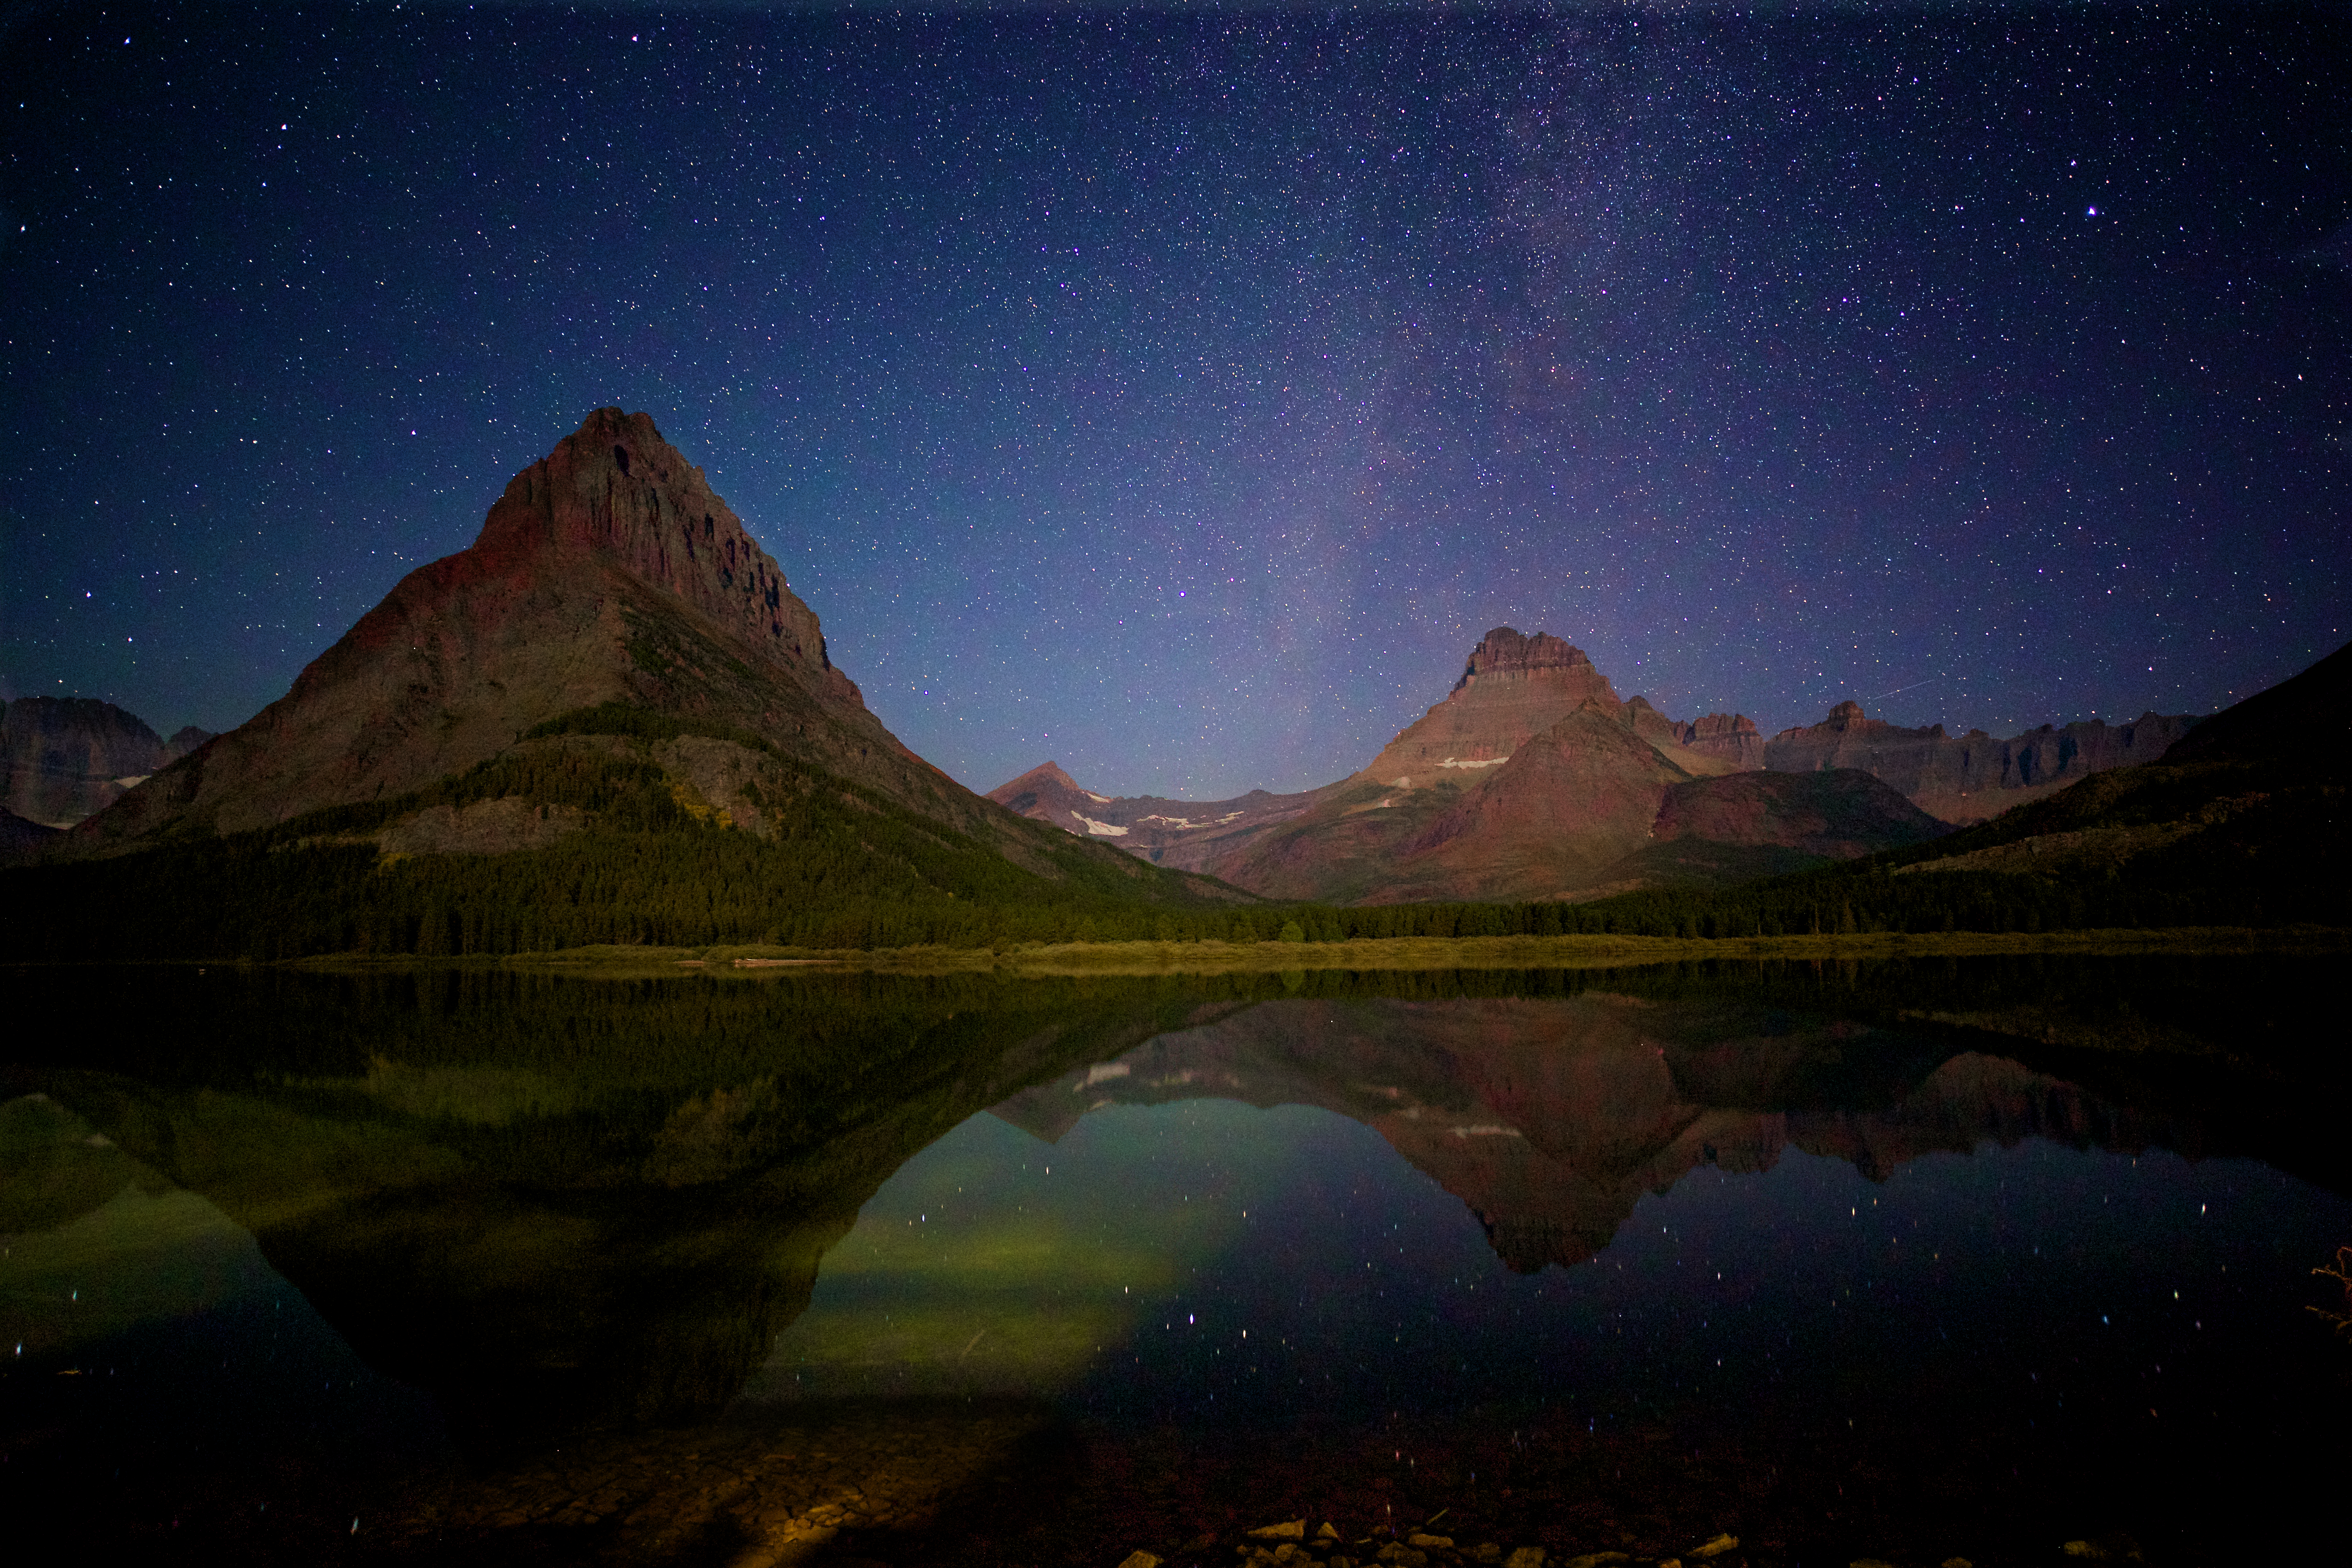
The view of the lake at night isn’t half bad either. I took this image at 3am with a small crescent moon behind me illuminating the mountains ahead.
Ok, enough talk, let’s get to hiking.
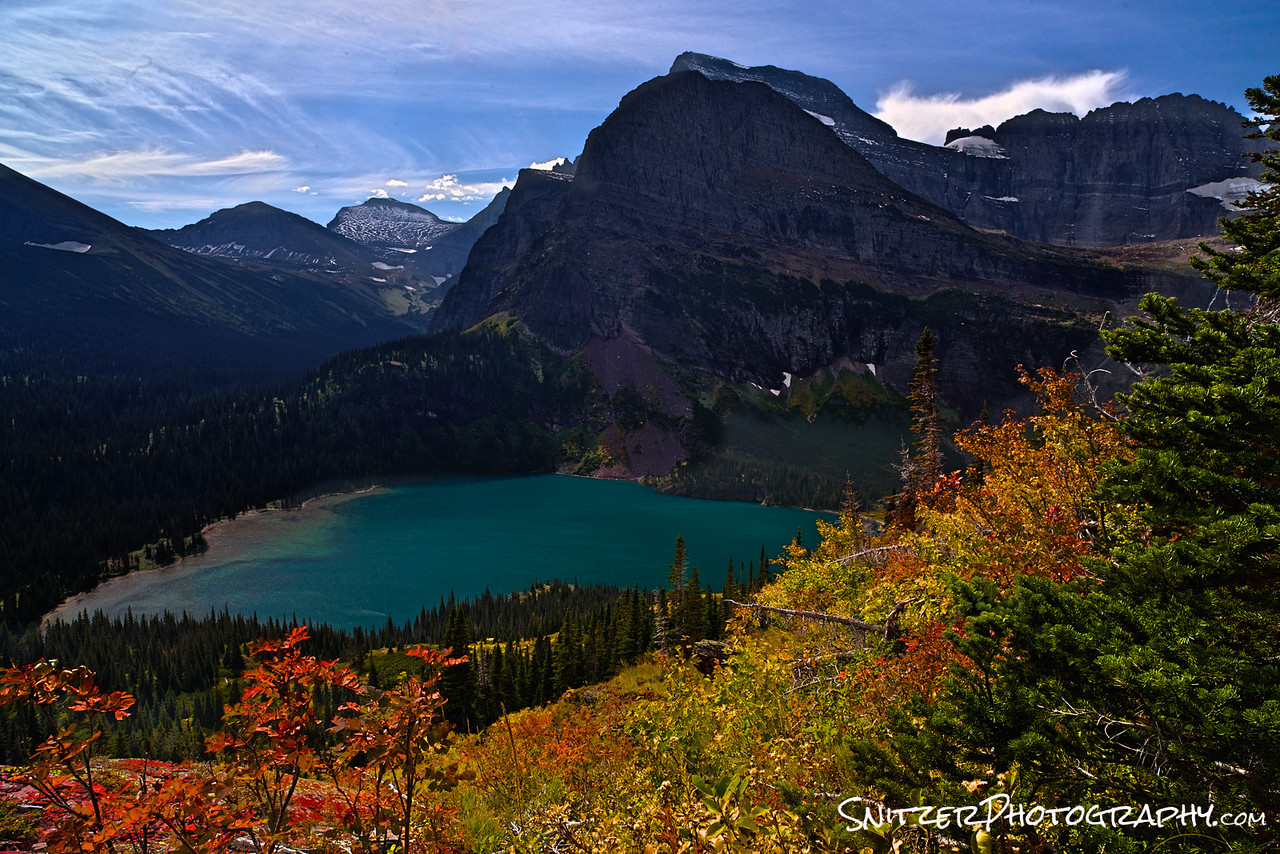
My favorite place to start: the trek up to Grinnell Lake. Actually, the best way to see the lake is to take the traverse that climbs above. As I mentioned before, start hiking about 20 minutes before sunrise. You’ll have the entire place to yourself and the lighting (for you photo bugs) will be spectacular as you ascend.
http://www.hikinginglacier.com/grinnell-glacier-overlook.htm
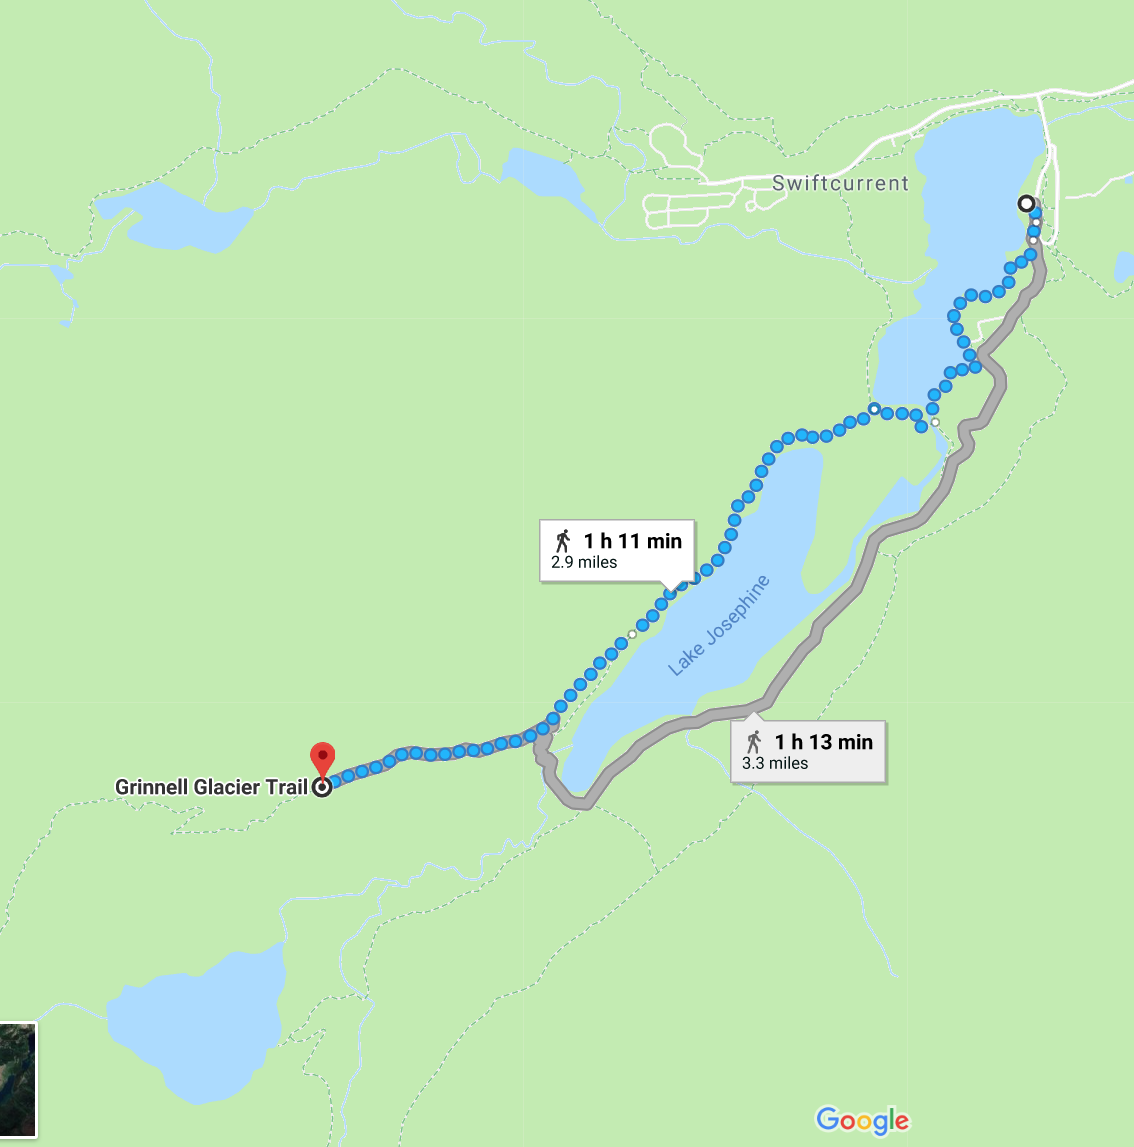
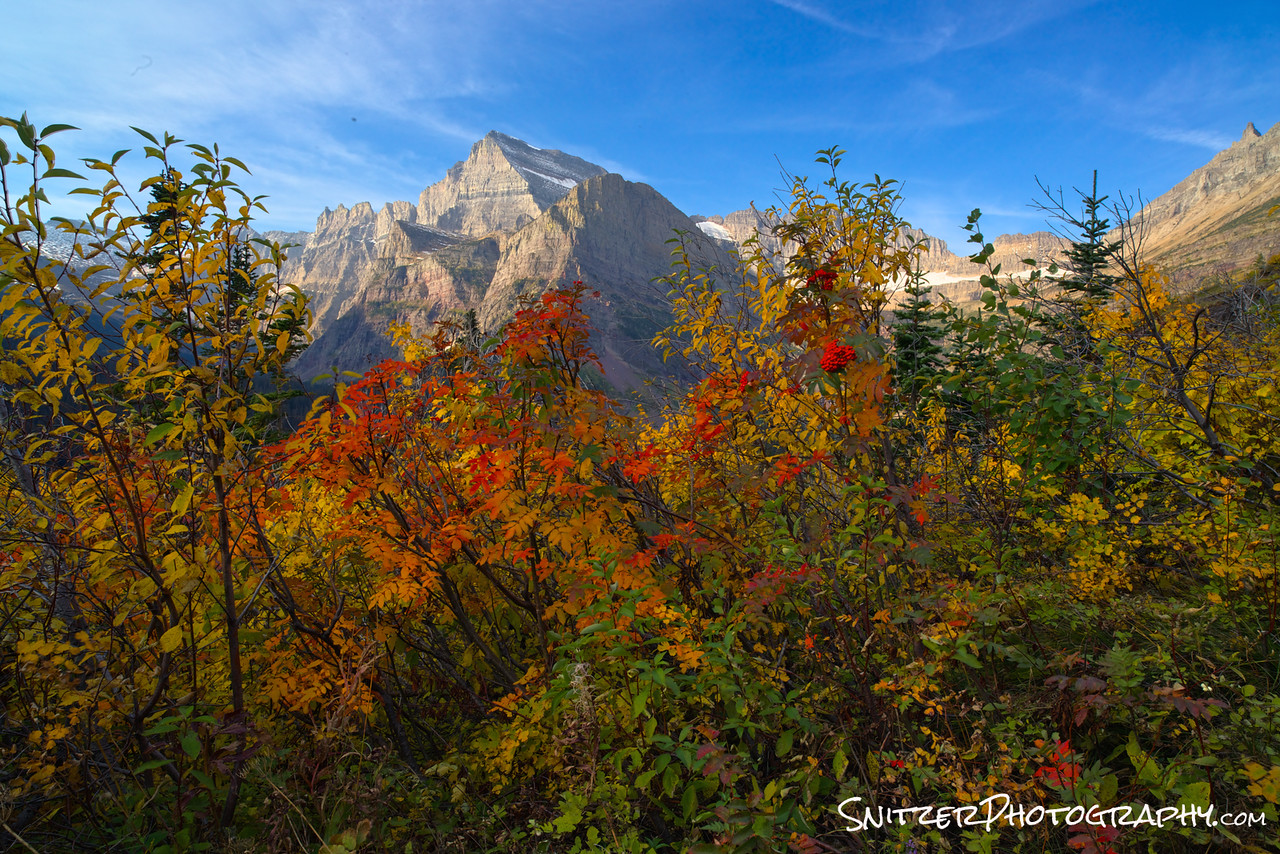
Pictured below left is the view about 30 minutes into the hike. Check out the fall colors (Woooooo!!!). Below right is one of the great viewpoints (there are about 100) as you traverse your way up the mountain.
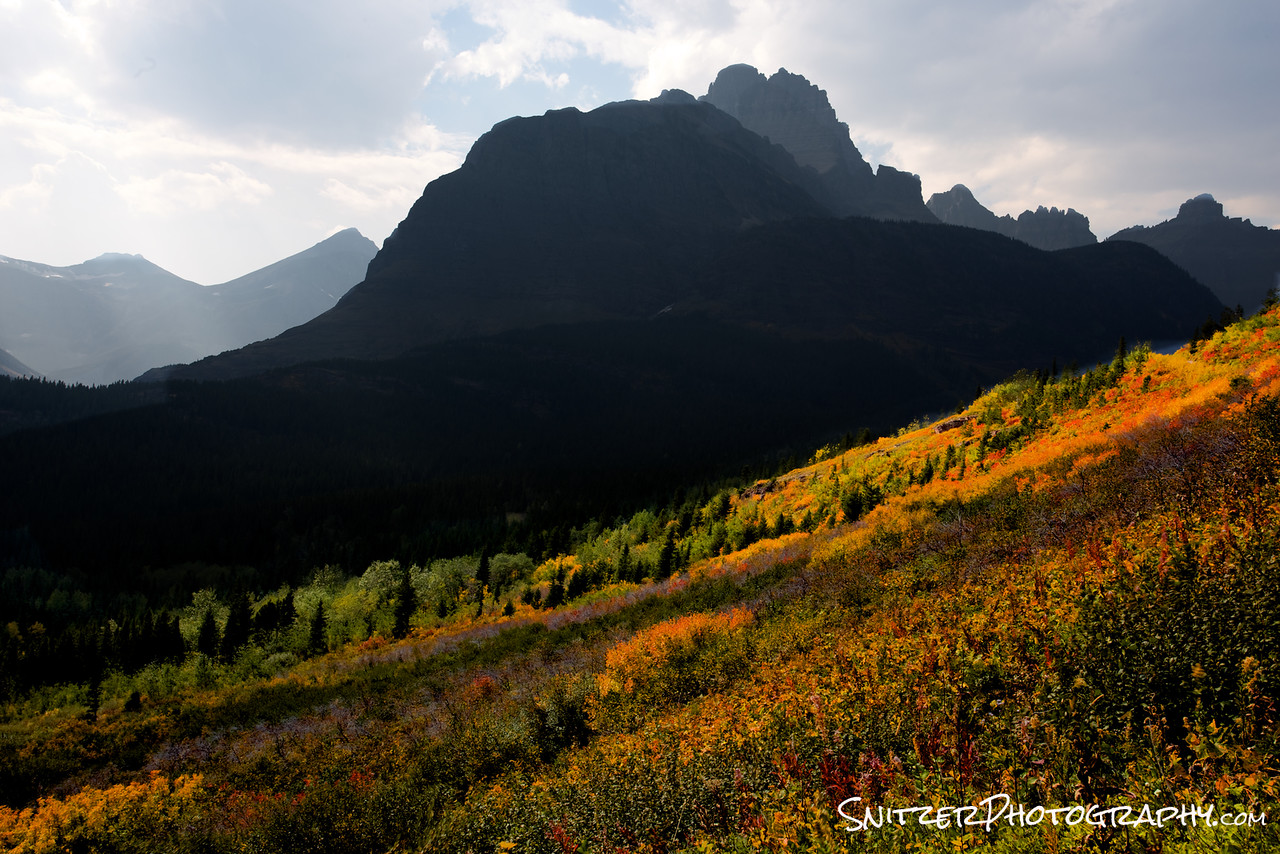
BAM! There’s Grinnell Lake. I told you it was worth it. Yes, you’re climbing almost 2,000 vertical feet. Quit complaining and enjoy the view. Besides…no once else has made it up there yet Earlybird! Pat yourself on the back. SOLITUDE BABY!
Ok, day 2! You loved Grinnell lake and are ready for more Cowbell!
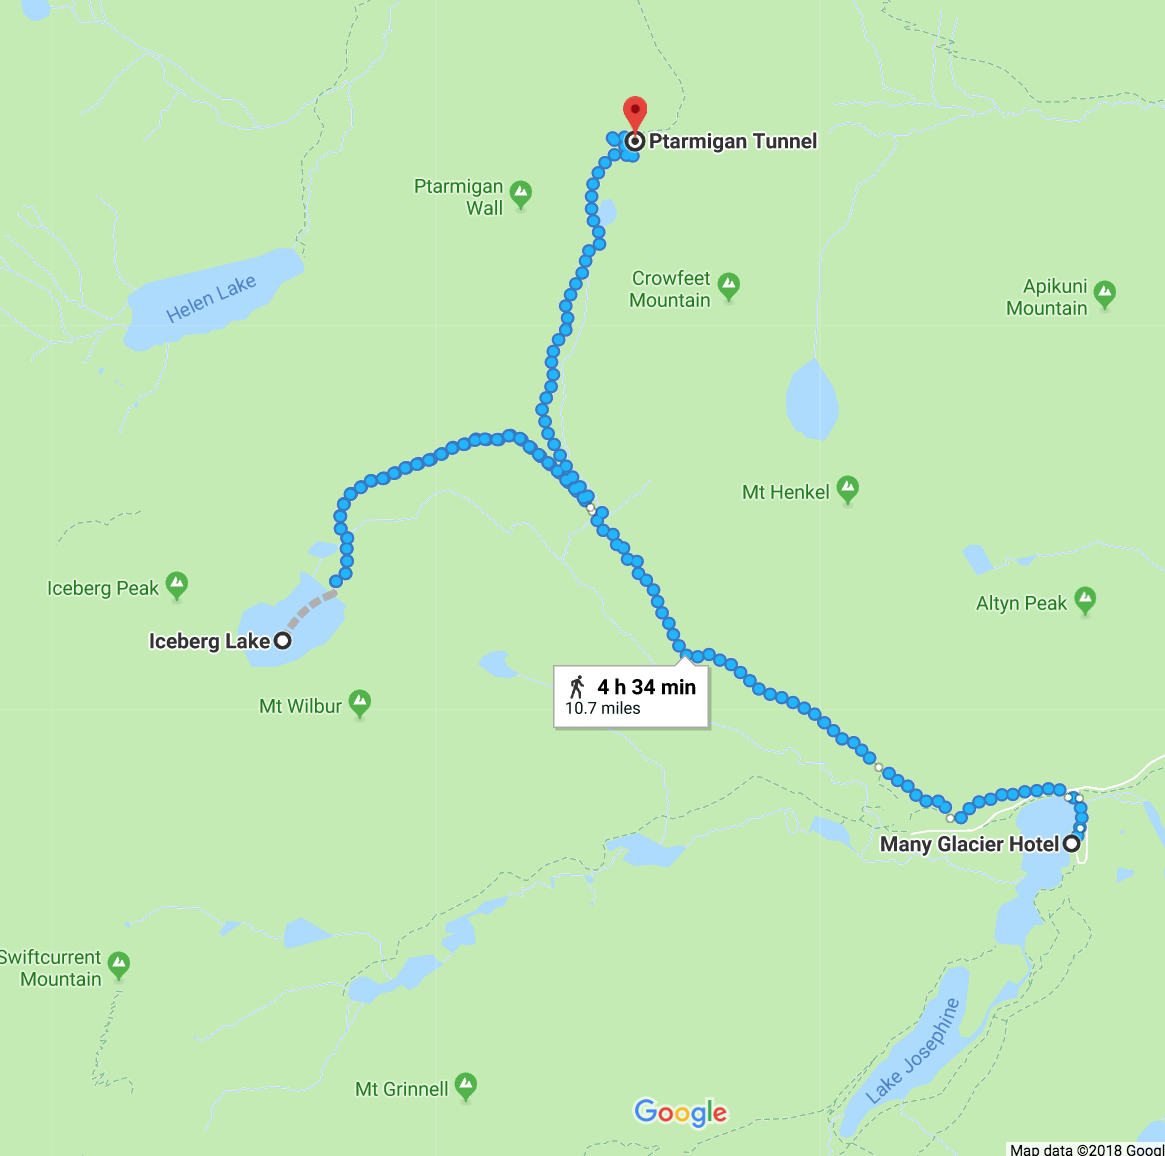
Your in for a double treat…you can either hike to Iceberg Lake (an awesome hike by itself…below left)…or you can combine with a hike to the Ptarmigan Tunnel. Doing both hikes involves about 3,400 verticle feet of climbing (if you’re in shape do both….Wooooo!!!).
http://www.hikinginglacier.com/iceberg-lake.htm http://www.hikinginglacier.com/ptarmigan-tunnel.htm

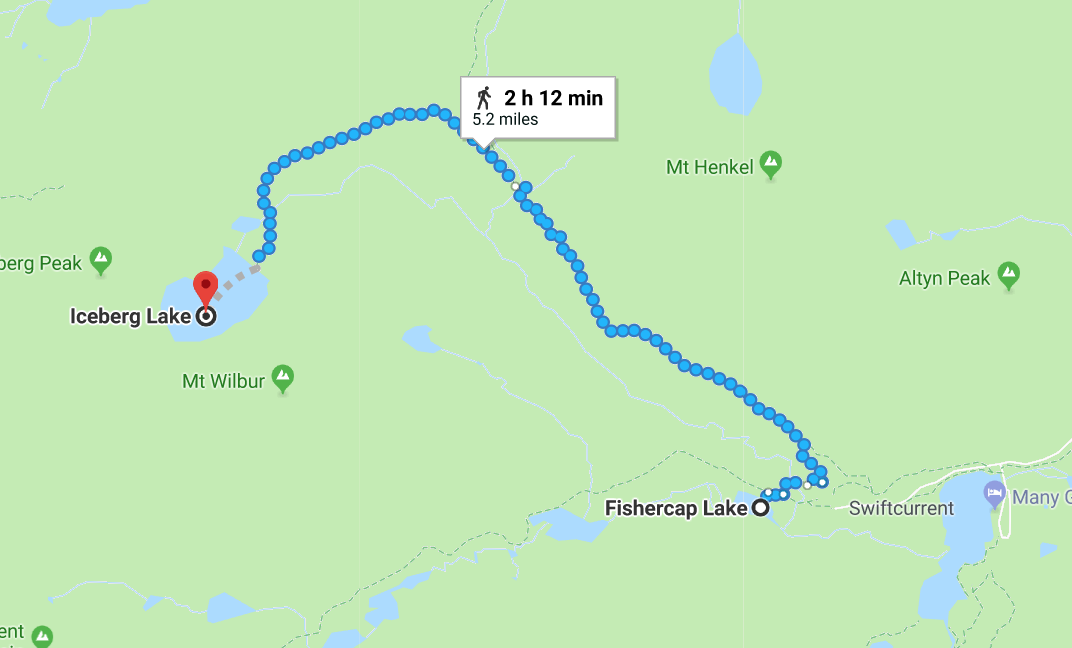
On your way back from Iceberg Lake, I strongly recommend you take a brief (1/4 mile) detour off the trail to visit Fishercap Lake.
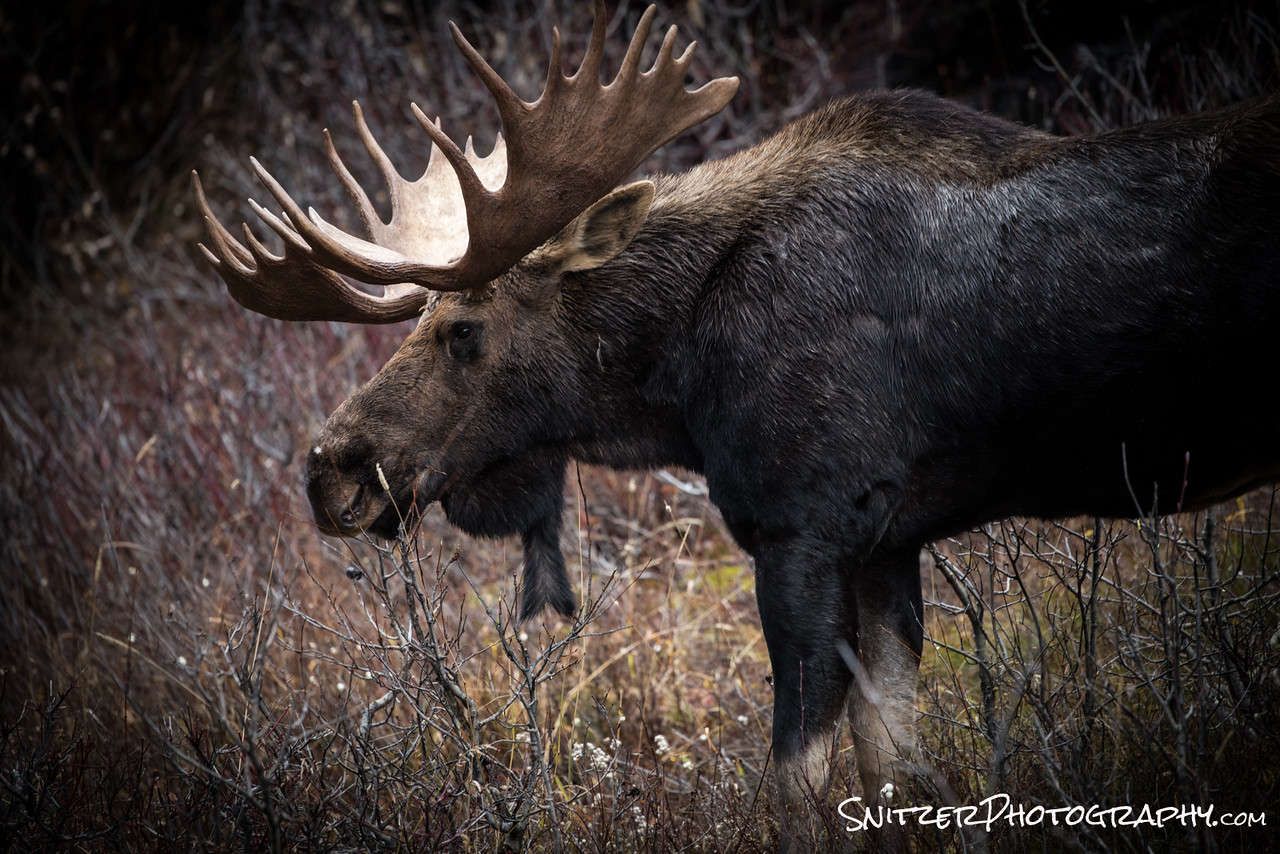
Nice to look & NEWSFLASH: its a great place to view moose and deer feeding. The lake has a high salt content on its bottom and attracts all sorts of critters.
You thought I was kidding about the moose? I’m serious…go to the lake….see a funny animal with big antlers. Don’t get too close..their actually more dangerous than Grizzly Bears.
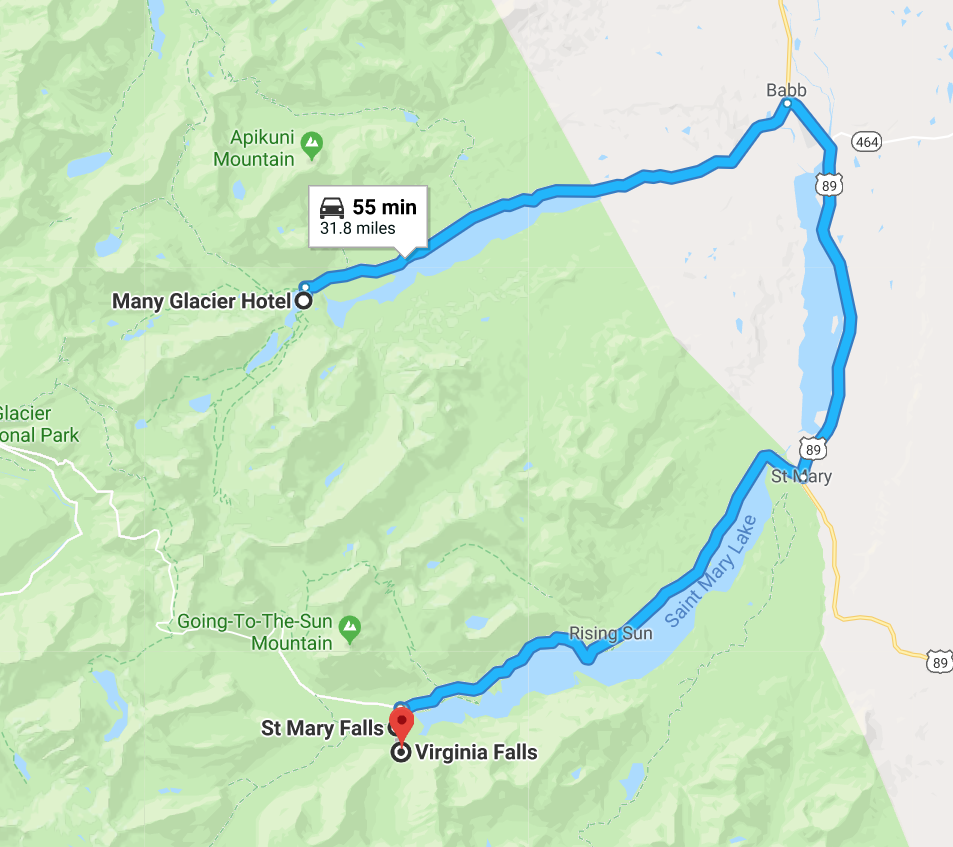
Ok, once you’ve exhausted the Many Glacier area, I strongly suggest you go down to visit Two Medicine. Along the route down there is a detour to hike to explore Virginia & St Mary’s Falls (map below left). The detour takes about 20 mins in and out. It’s well worth the effort….great hike.
http://www.hikinginglacier.com/virginia-falls.htm
http://www.hikinginglacier.com/st-mary-falls.htm
Once you’ve completed the waterfall trek, then backtrack to route 89 and continue on to Two Medicine.

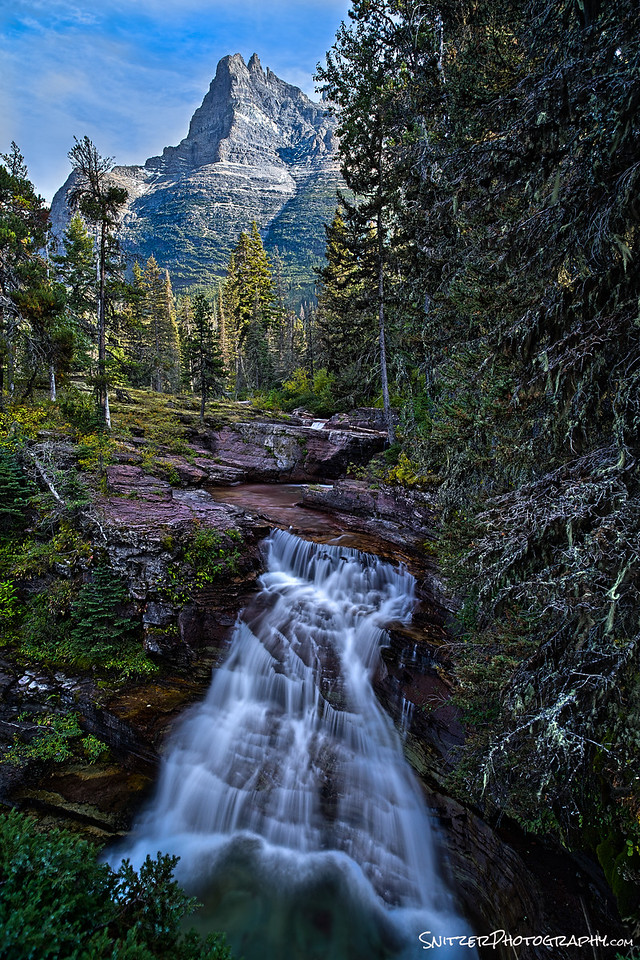
Wooops…forget to show you what some of the waterfalls look like on the hike. Behold!!!
When you arrive at Two Medicine, the view is!!!!!…Yes I’m crushing it behind the lens. Hint: Want to get the reflection of the water and the cool rocks underneath the surface…two words: Polarizing Filter! Enough said.
Hiking options: you can enjoy the view or take one of several amazing hikes. My #1 favorite is the Pitamaken Loop. It’s 15.4 miles and takes you through some magnificent scenery and great climbing. Again…not for those who are out of shape. Start at first light….it’s an all-day event.
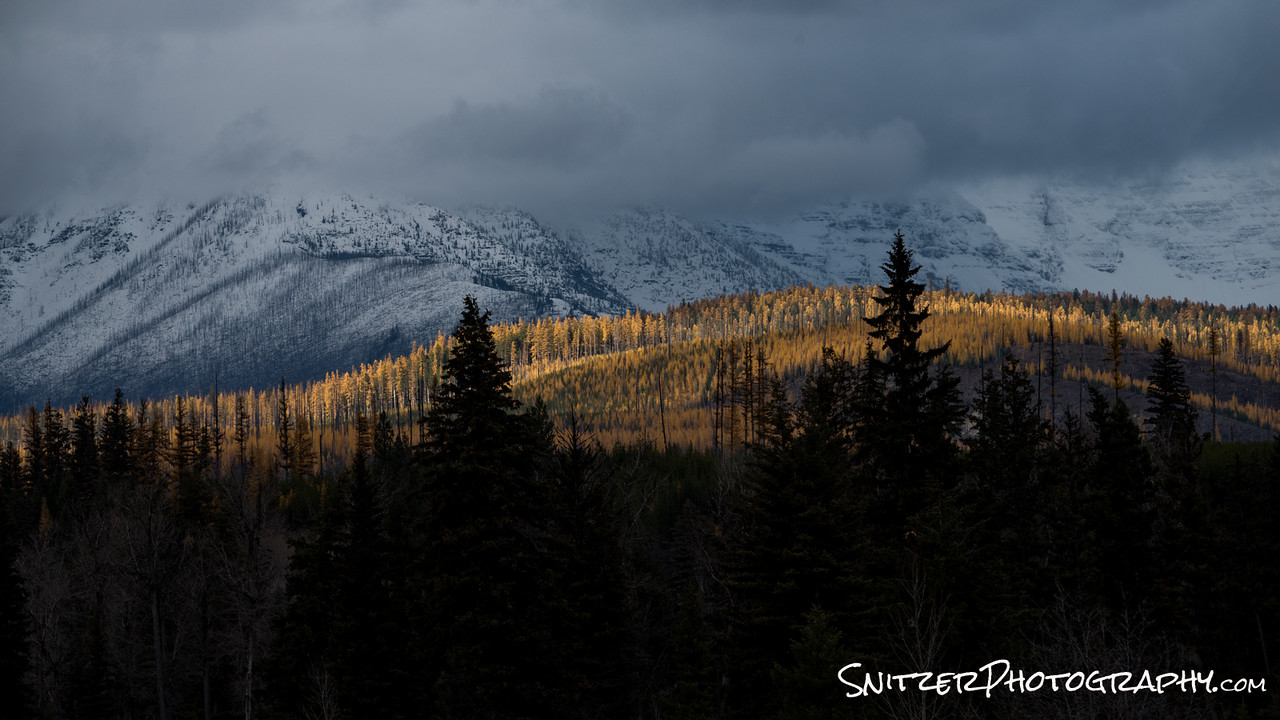
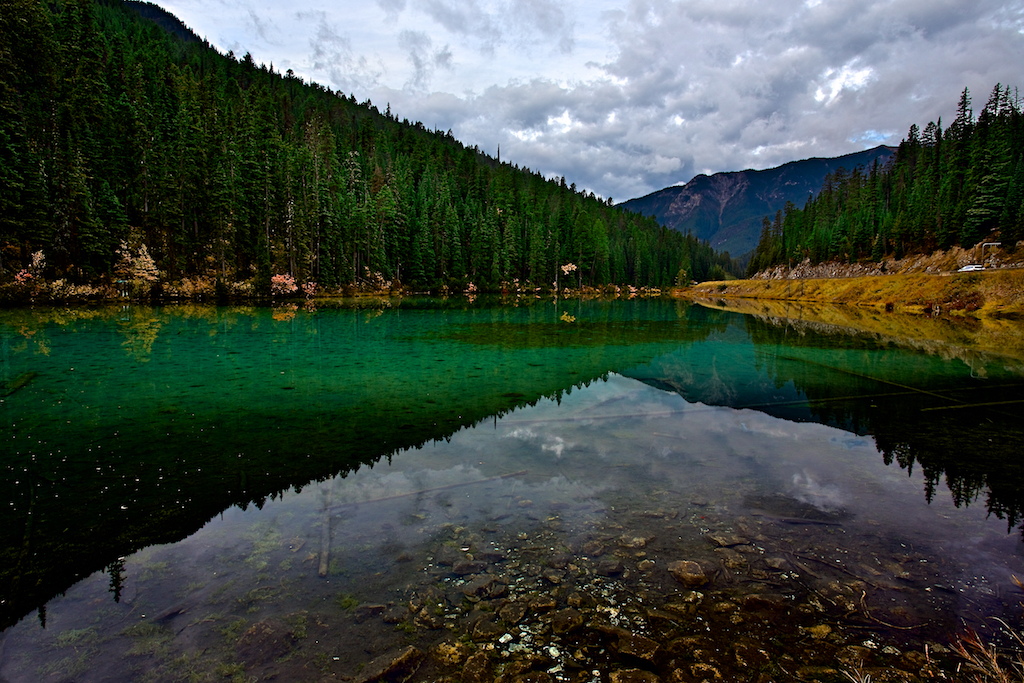
Other stuff in the park I haven’t yet mentioned? Yes, in the fall, the larch trees begin to turn yellow. This is typically in early October after the park concessions have all closed. If you’re lucky enough to stay in nearby Whitefish you have the opportunity to explore some amazing areas that are hitting peak color.
One of these it Bowman Lake. The drive to the lake is along a lousy 4 wheel drive dirt road. It’s a bitch to navigate (very bumpy) but the lake is amazing, particularly at sunset. Don’t attempt without 4WD!
Pictured below is a view along the drive in.
Along the route is the small outpost of Polebridge. There’s a great country store with A+ baked goods. Stop, check out, have an Elephant Ear.

After a nasty nasty drive…here is Bowman Lake. BAM

So is there other stuff to see outside the park? You bet. The town of Whitefish is surrounded by interesting roads to explore (also some great biking).

We done yet? Not by a long shot. It’s a short drive up to Canada, the Waterton district and Banff/Lake Louise. If you can spare an extra 2-3 days (or more), I highly recommend tacking that on to your trip!
Pictured left is Mirror Lake on a hike high above Lake Louise.
My favorite park in the USA…like I said…it’s hard to say…can’t think of anywhere I like better!
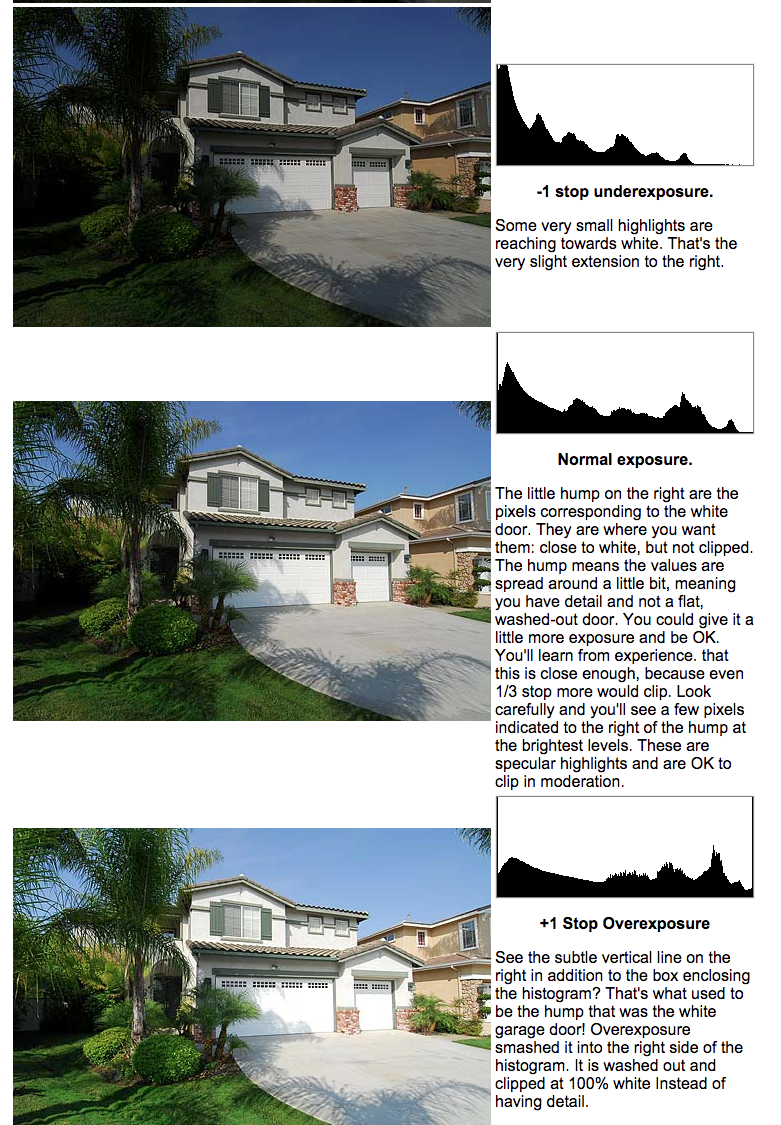
Getting your exposure right: stop blowing out highlights!
The photos below all share one common trait: They couldn’t be taken shooting in Aperture Priority mode.

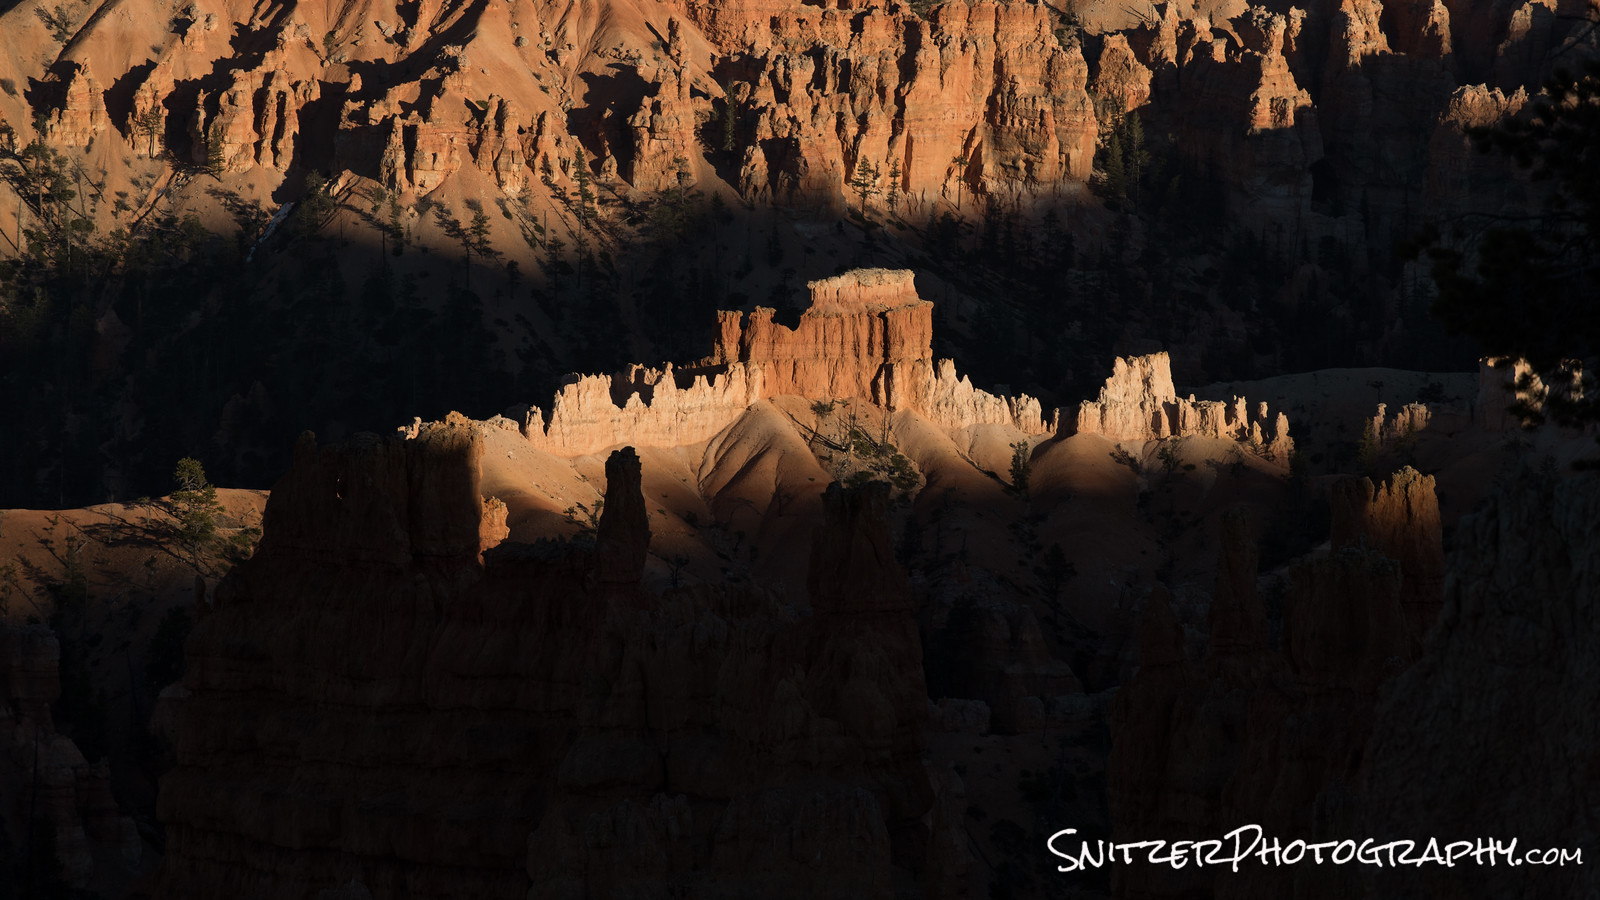
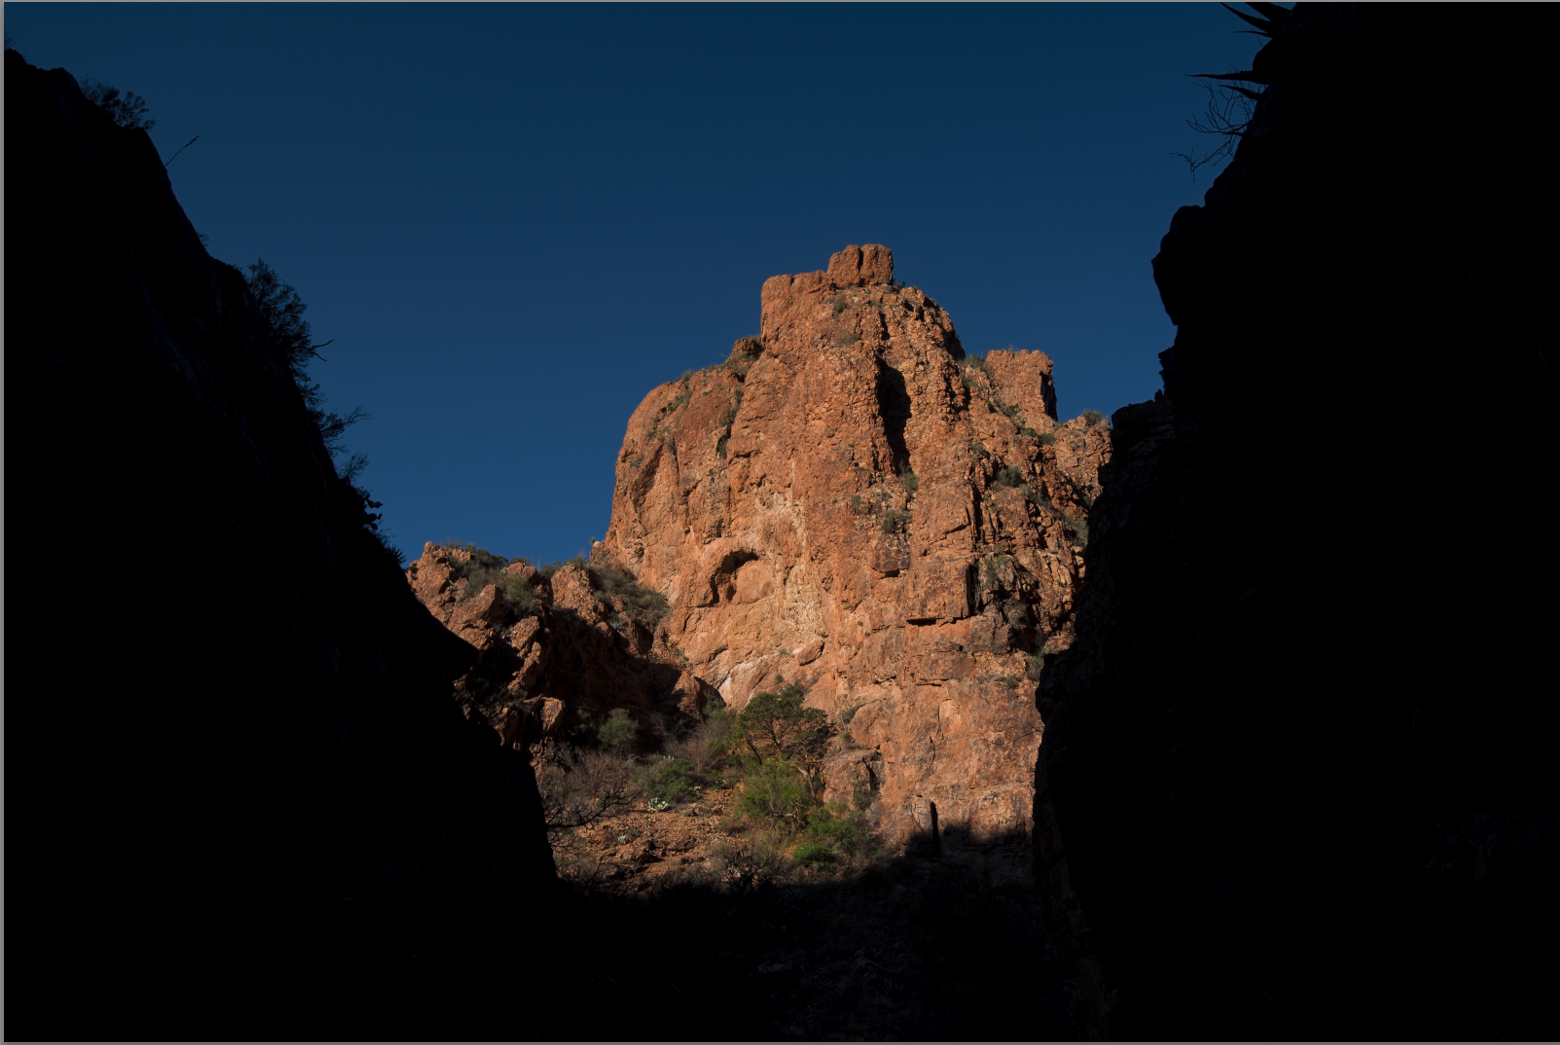
Why is that? Both photos were taken 2.5 stops under what the camera’s light meter indicated was “proper” exposure. That’s because while the photo’s subject is well lit, the majority of the frame is dark. Getting the subject to come out “right” requires the user to tweak the exposure properly. In this case, that means setting the exposure to get the rocks/yellow trees (shown above) perfect.
Using the camera’s Aperture Priority mode, even if bracketing (1 stop over/under), you’d have over exposed the photo & blown the opportunity. The dark areas in the photo would have been gray and the rock highlights/yellow trees would be white and unrecoverable.
So how do you get the exposure right every time? How to stop losing great photos? Simple, shoot in manual mode! Here’s how.
Step 1: Set your DSLR to “manual exposure” mode and the metering to “center weighted average”. Prepare to take a “test photo”.
Step 2: Look through the viewfinder. If it’s an overcast day or you don’t have a bright sky in your photo, just frame the picture normally. If you have a bright sky, however, you’re going to point the camera up to the sky for purposes of adjusting the exposure manually.
Step 3: Now that you’re pointing the camera in the right direction it’s time to adjust the exposure. You’ll see a scale inside the viewfinder indicating if you’re over or under exposed and the aperture/shutter speed settings. Adjust aperture or shutter speed till the meter indicator is centered
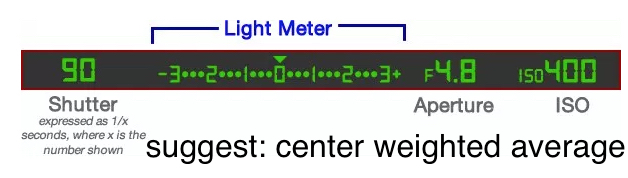
Step 4: Frame your image in the viewfinder, depress the shutter.
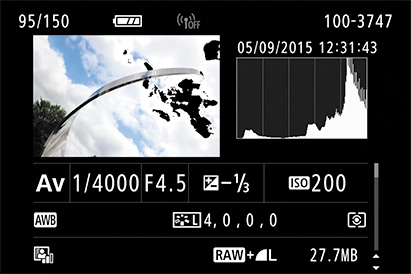
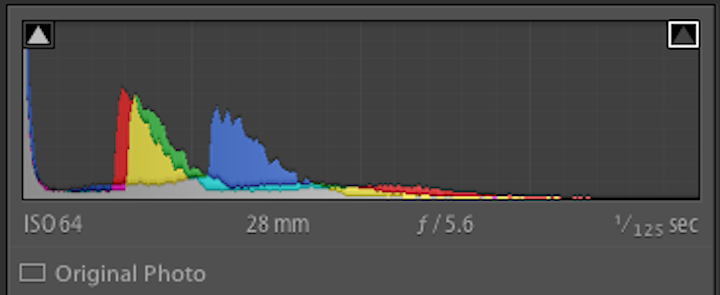
Step 5: Review the photo in the camera’s LCD viewer & check your histogram to see how you did. The key is to “keep it between the uprights”. You want to avoid overexposing your photo! As I explain below, it’s far better to under-expose a photo (easier to recover dark portions of the image). If your histogram is slammed up the right-hand side of your photo you’re overexposed.
Some good news: your camera is using a JPEG image to produce the histogram. Back home when processing in PhotoShop or Lightroom, you’ll be using the RAW file and will have 1.5 stops of additional dynamic range to the right. Rule of thumb…once your in-camera histogram starts to bump up on the right, you can still turn up the exposure 1.5 stops without harm. If your histogram is showing an area bumped up on the area to the left (portions too dark) you can increase the exposure accordingly.
Step 5: Also check your over exposure warning indicator. If it’s not yet turned on…turn it on!!! Any overexposed areas of your photo will flash white or black. This is a great way to make sure no smaller important areas of your photo are overcooked. Works great for shots of the moon!
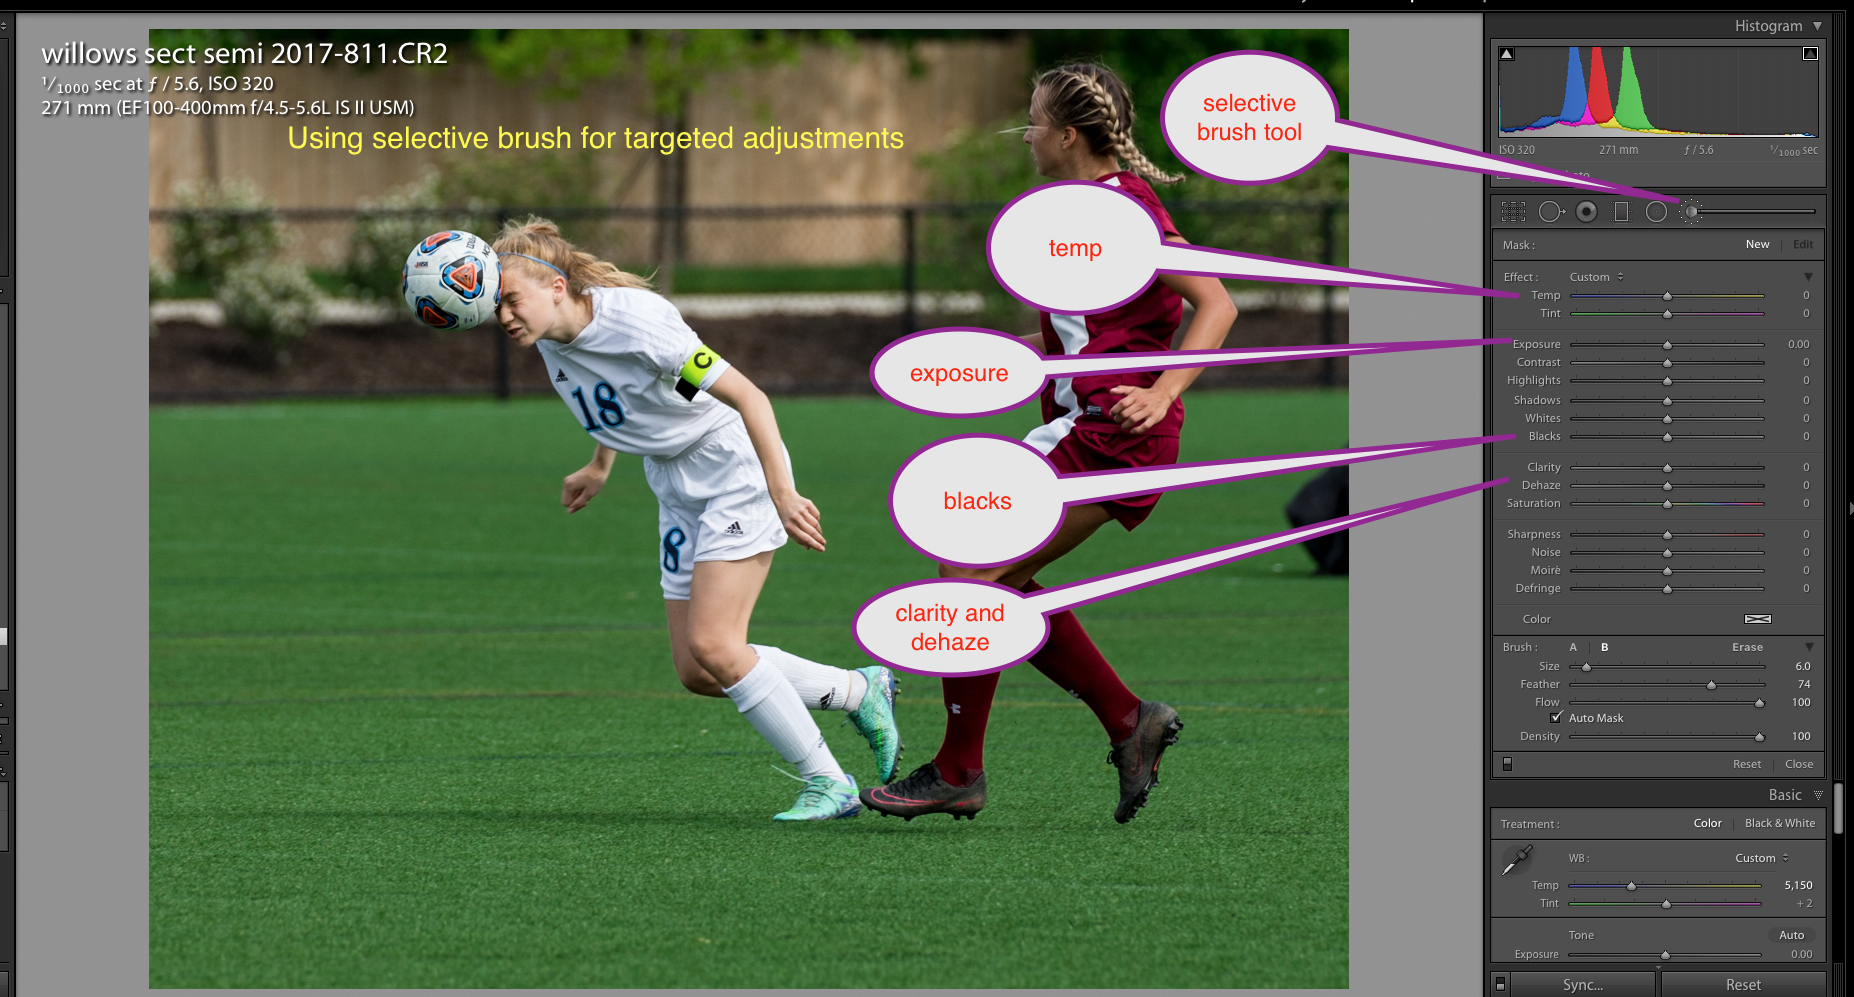
Once you’ve managed to get your photo properly exposed you can then tweak in Lightroom/Photoshop. See example below. I’ve used Lightroom’s selective adjustment brushes to make local adjustments to the image.
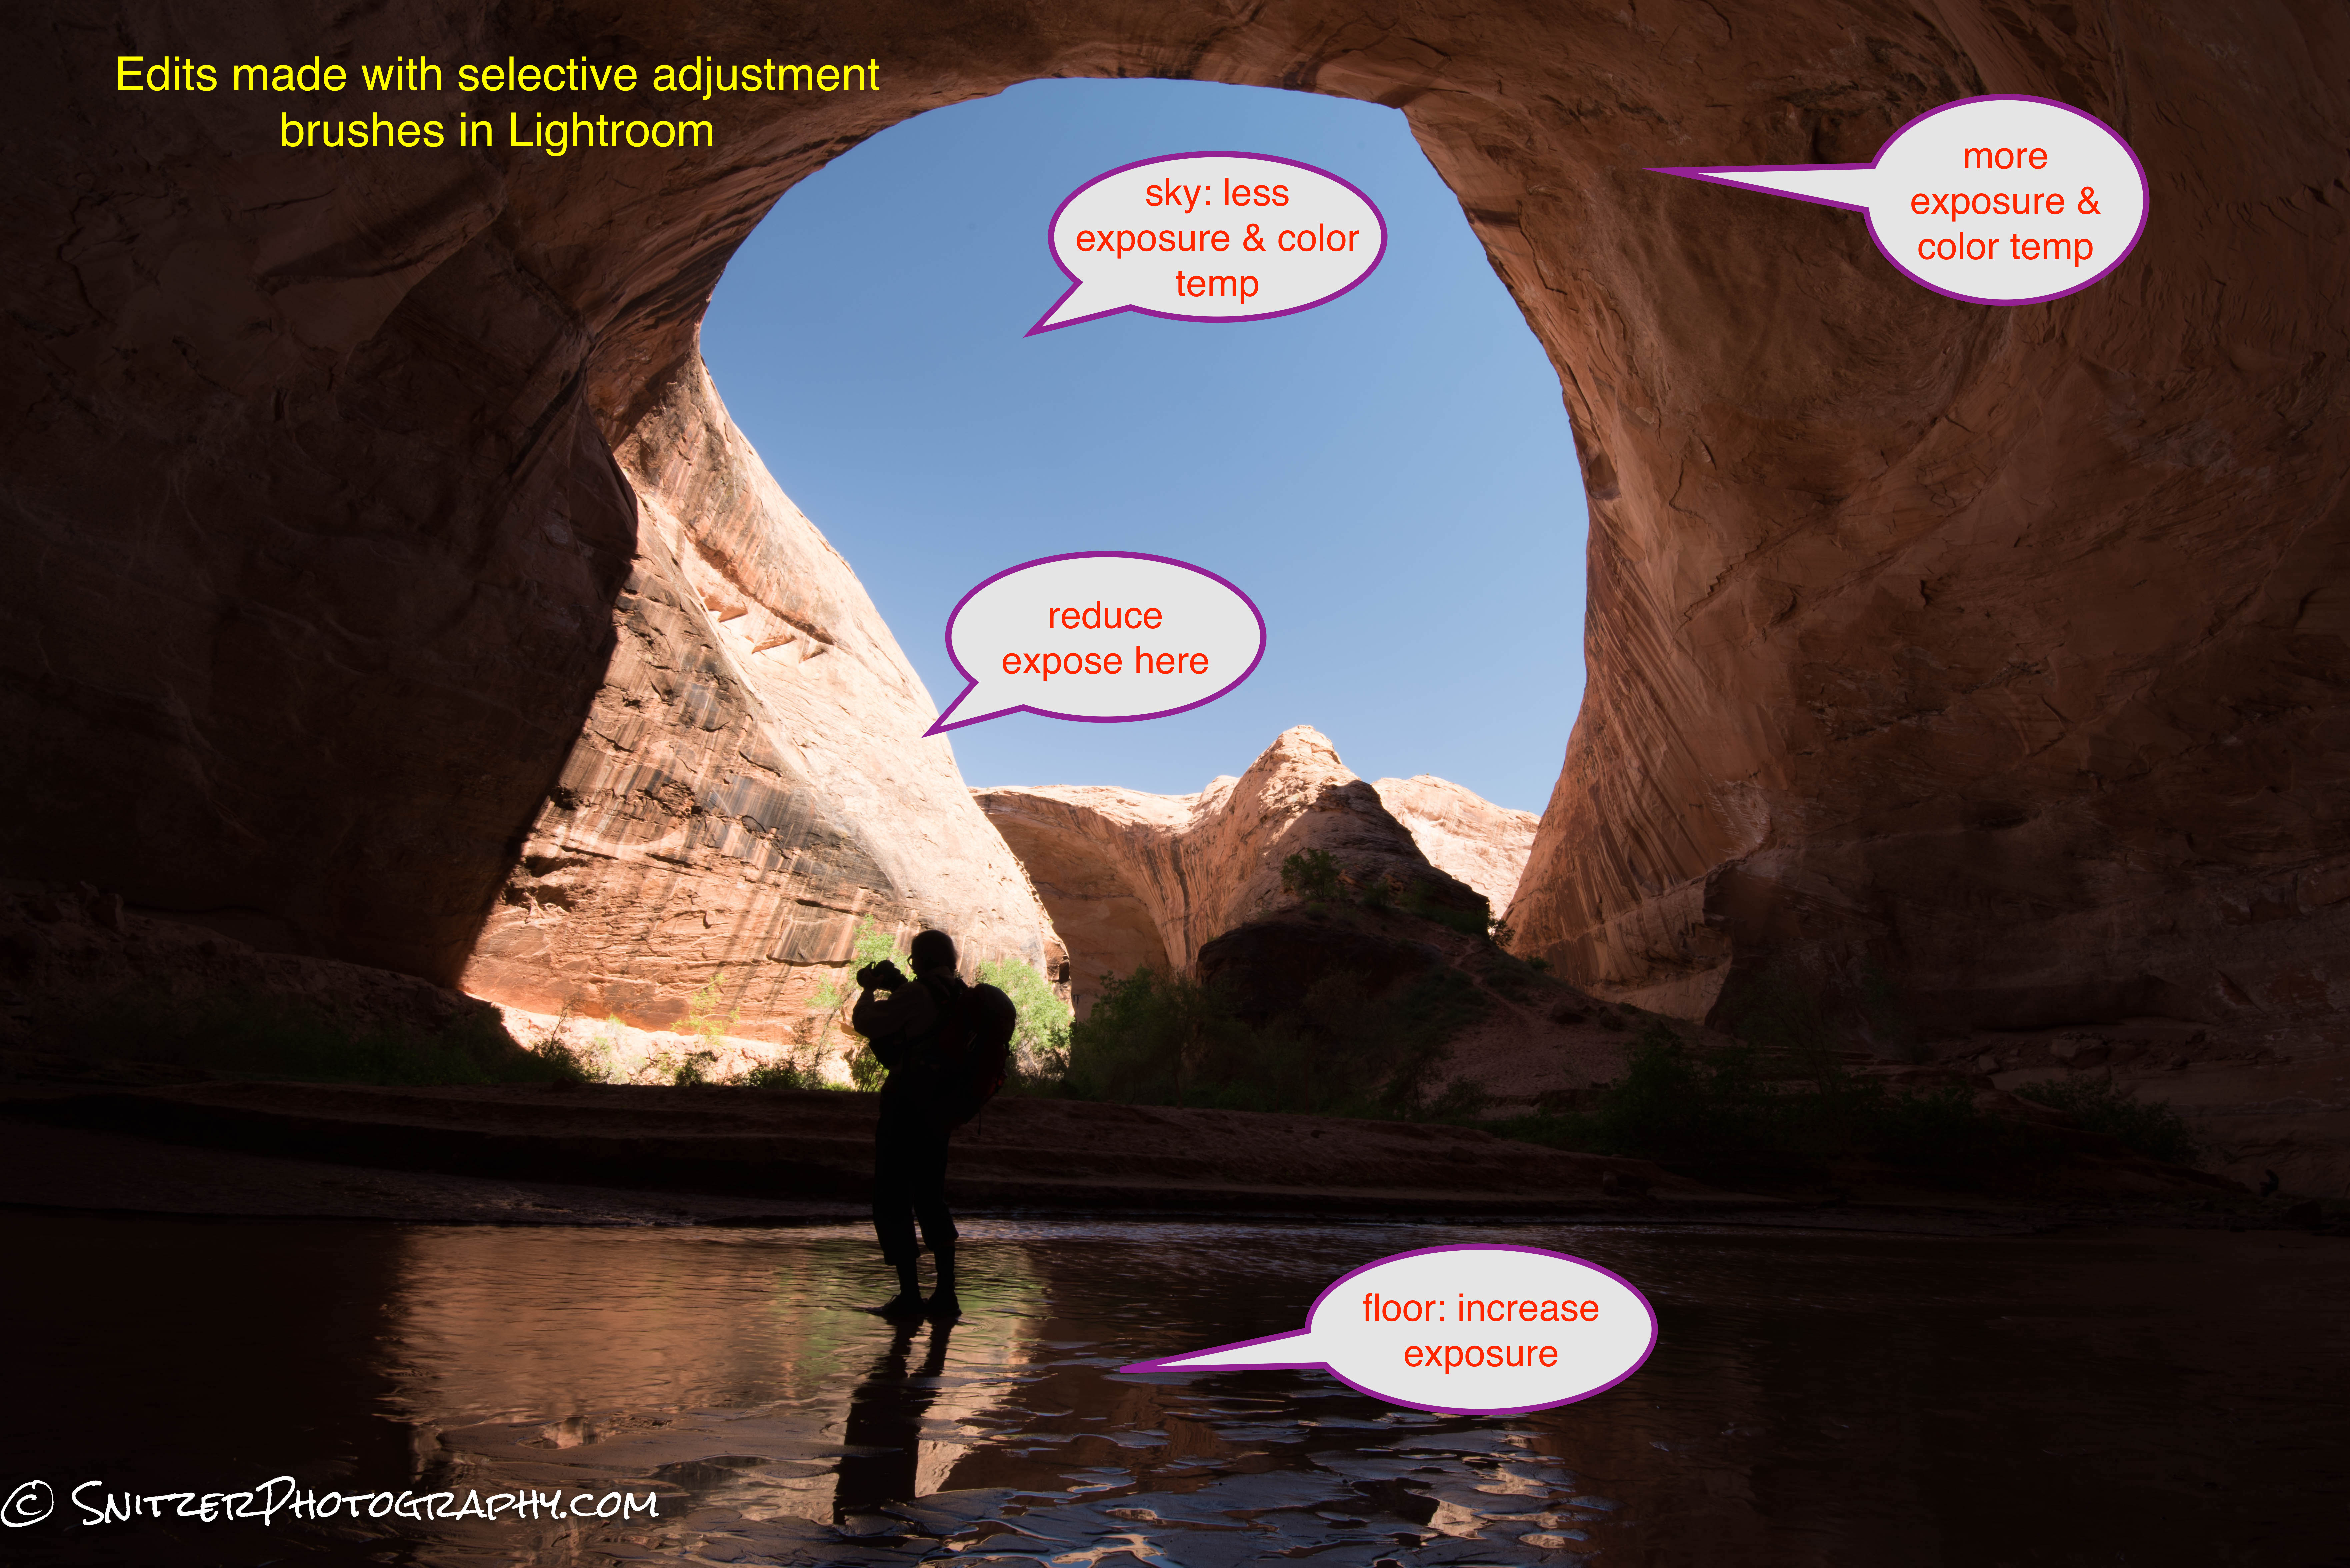
Orig image. Properly exposed but needs adjustment.
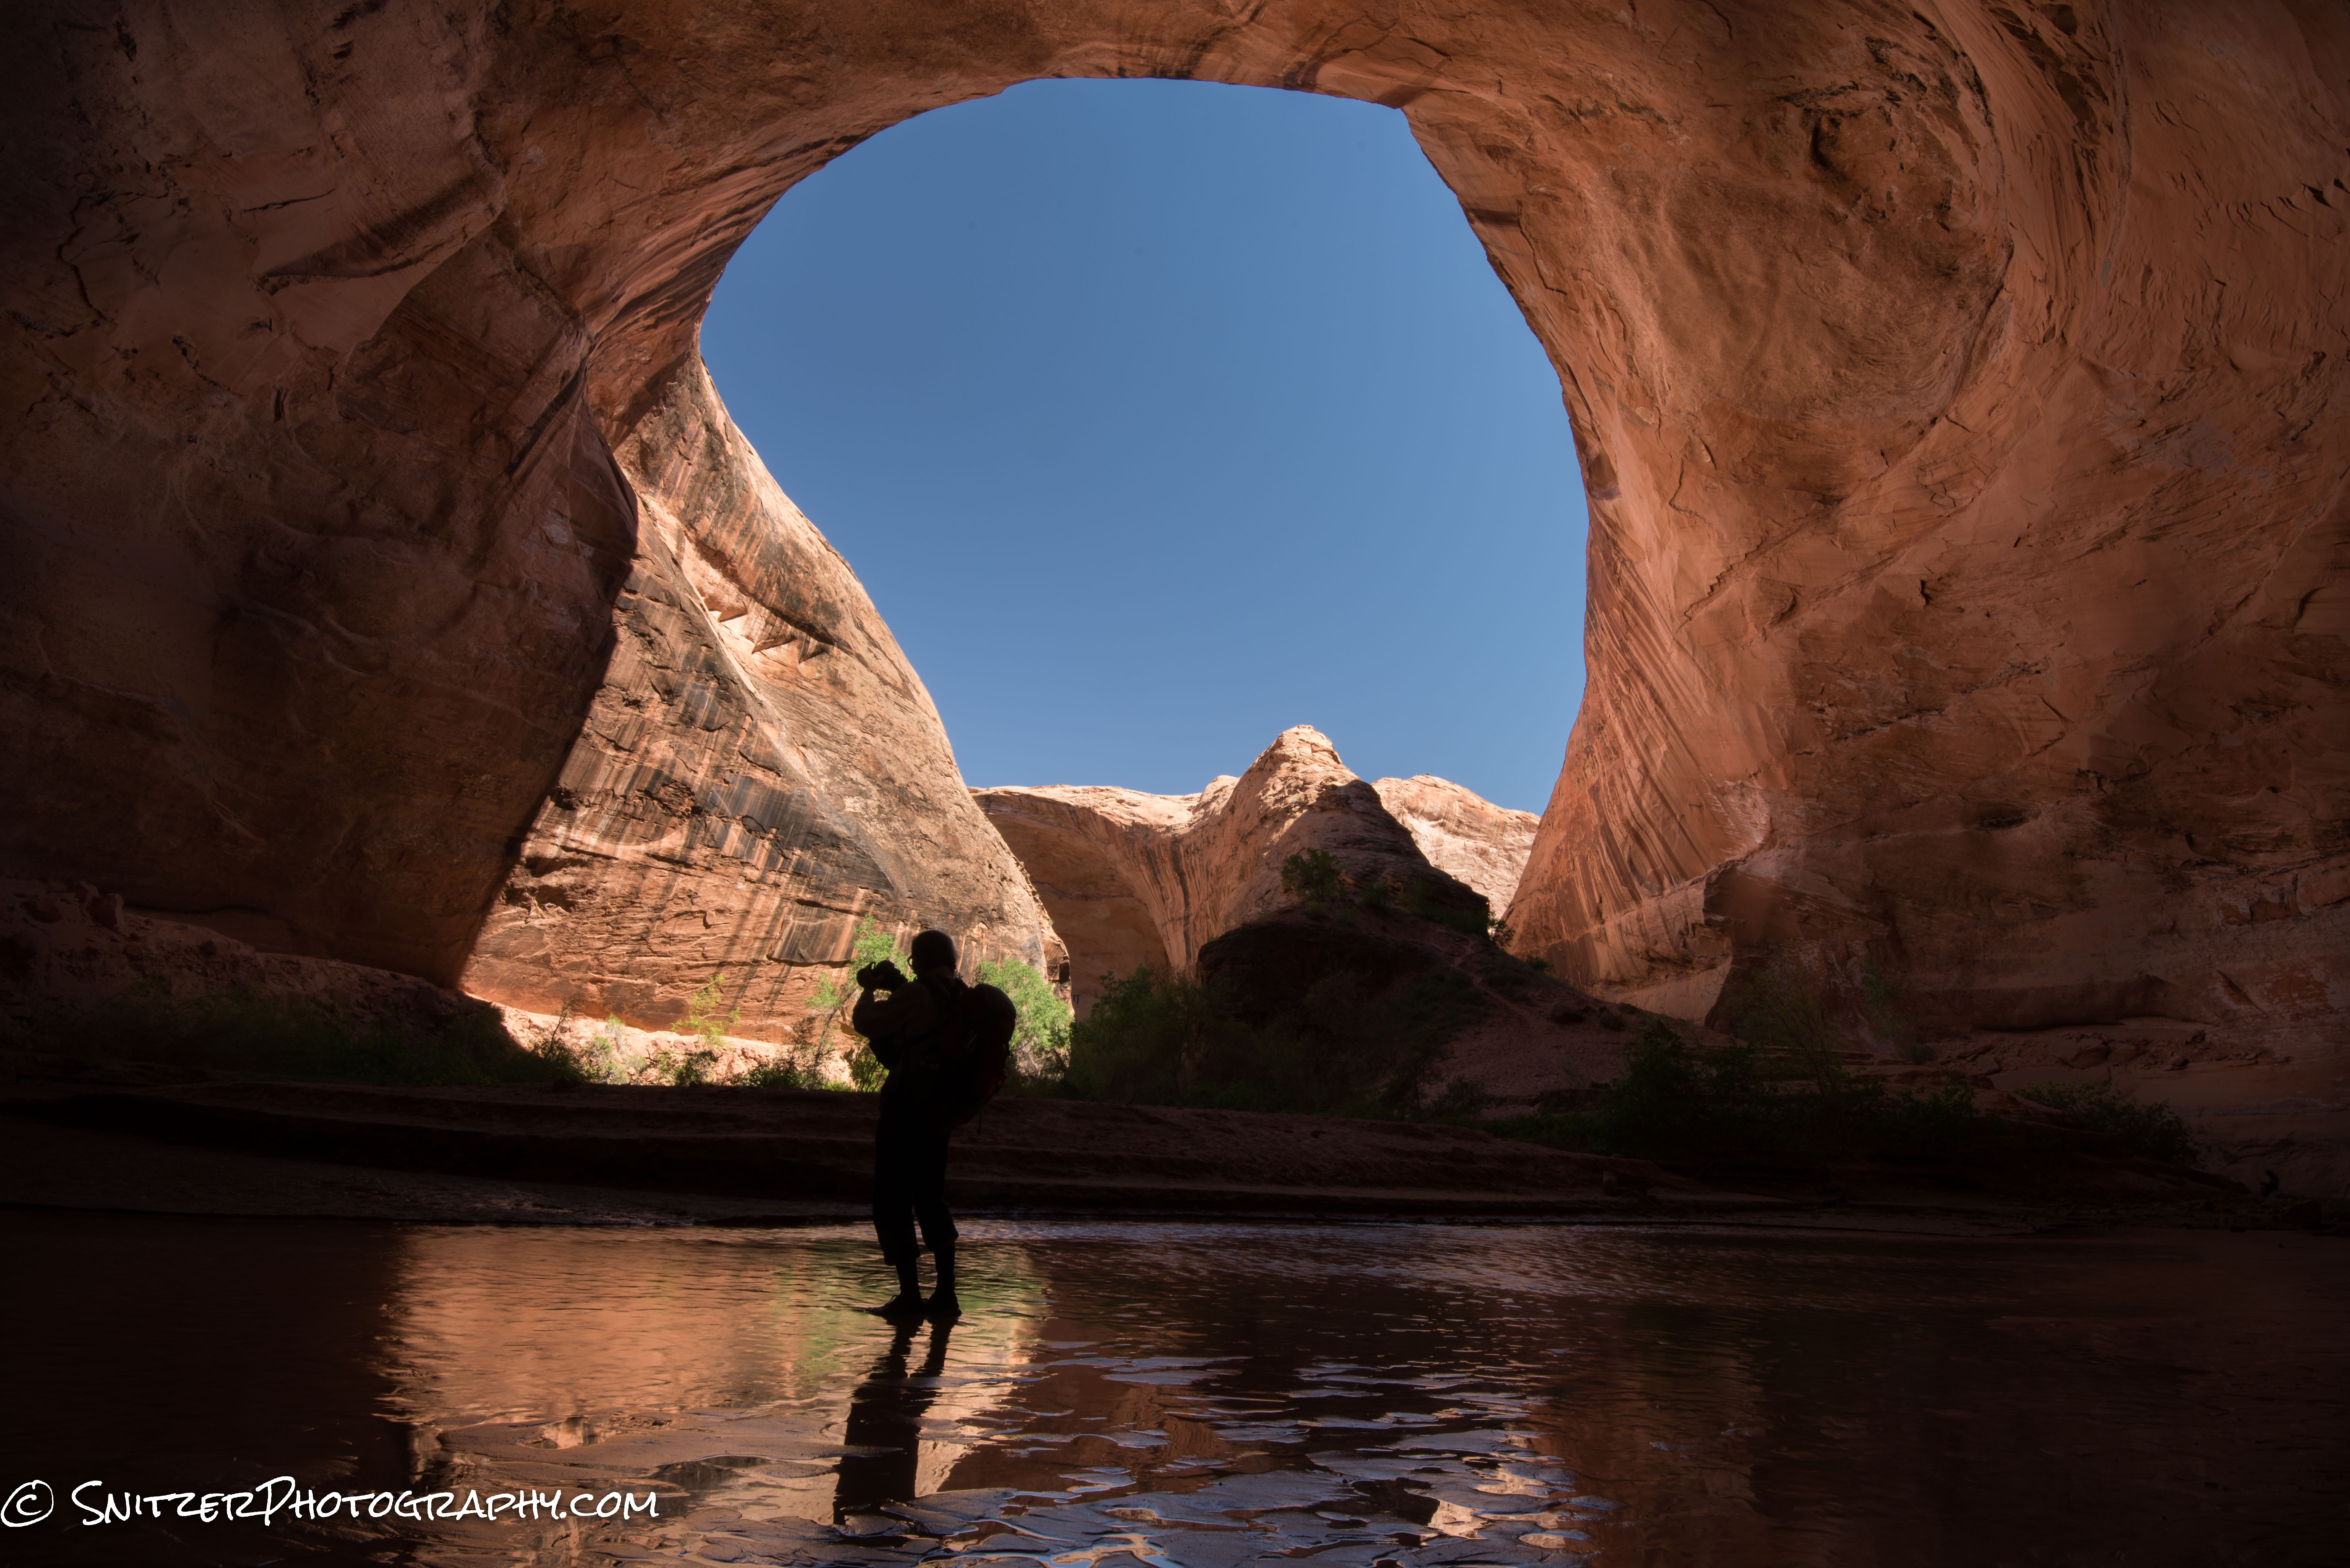
Tweaked image
Below is shown the location on the Lightroom Adjustment Brush panel of the attributes I changed:
As I mentioned, anything over exposed by more than one stop is basically unrecoverable white mush. The same isn’t true for under exposing as the example below illustrates.
The first photo is properly exposed using an ISO of 3200.
Let’s take the same photo, 5 stops under what the meter recommends (ISO 100).
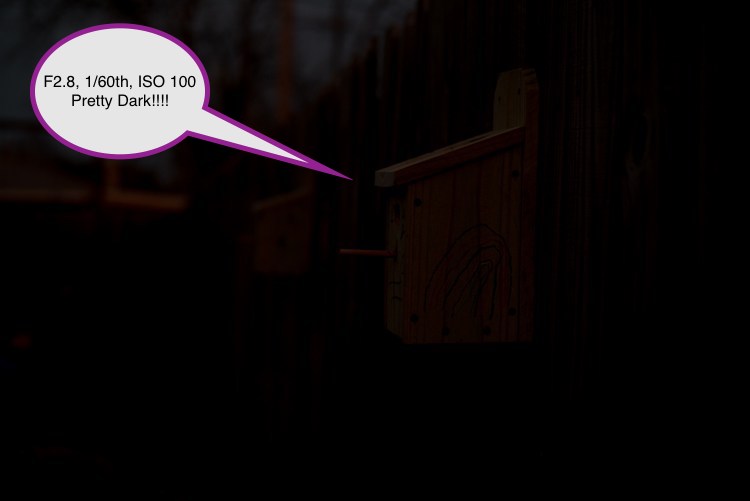
Amazing. After turning up the exposure slider in Photoshop…the photo looks great. With newer camera’s we can recover 5 or more stops! Even older DSLRs can recover 2-3 stops. Always better to under expose than overdo it.
High Dynamic Range Photography Advanced Tutorial
There’s a revolution underway allowing cameras to record the world as we see it with expanded dynamic range.
So what is dynamic range (DR) anyway? DR refers to the variation of light and dark values in a photograph. The wider the range, the bigger the objective difference between darkest and brightest areas of your image.
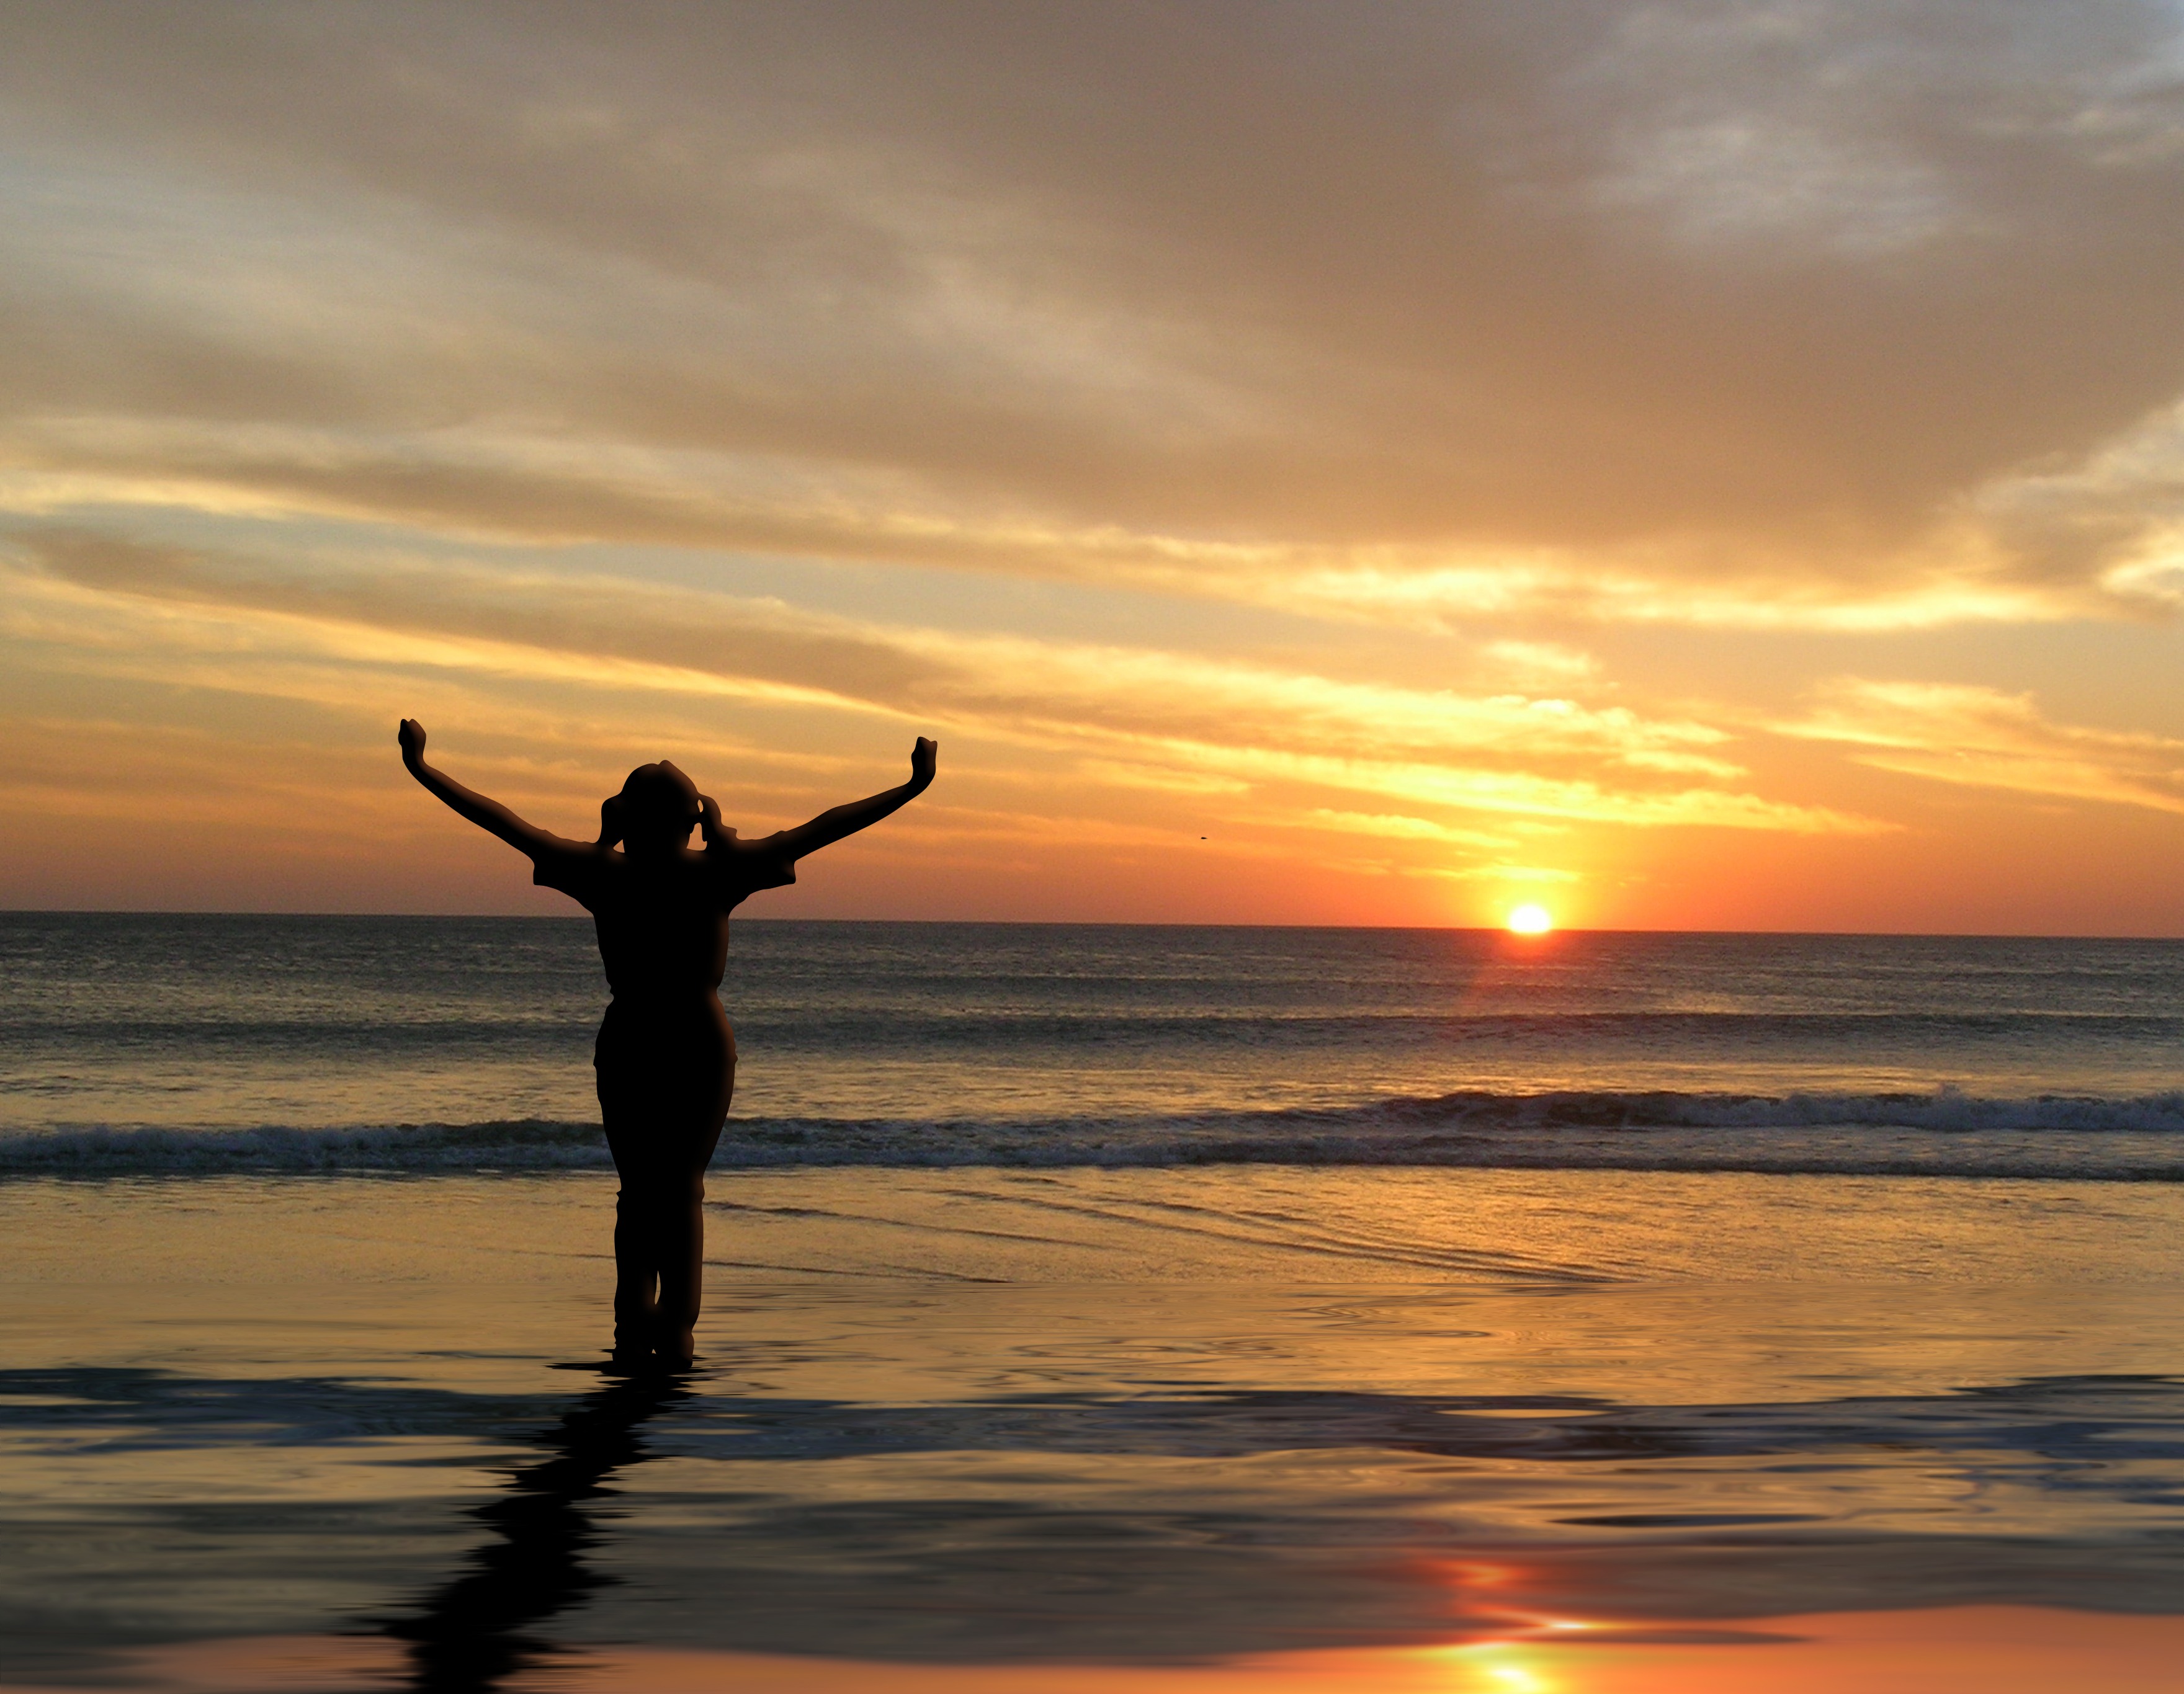
- While you can easily see people’s features at a beach sunset, until recently, most cameras couldn’t. Shots like the one below have been the norm, rendering the subjects features in silhouette.

You can see your friends on the beach; your camera can’t.
You have great eye sight!!! Most people can resolve between 18-20 stops of light. A huge “Dynamic Range”.
- We can typically see two objects; where one is up to 500,000 times brighter (each F-Stop a doubling of light).
- This remarkable range involves three components: 1. your optic nerve, 2. The ability of your eye to rapidly change aperture/field of view and 3. the brain’s internal HDR processing. Even if your optic nerve can’t resolve an image, the brain will often render it perfectly based on previous experience with similar objects.
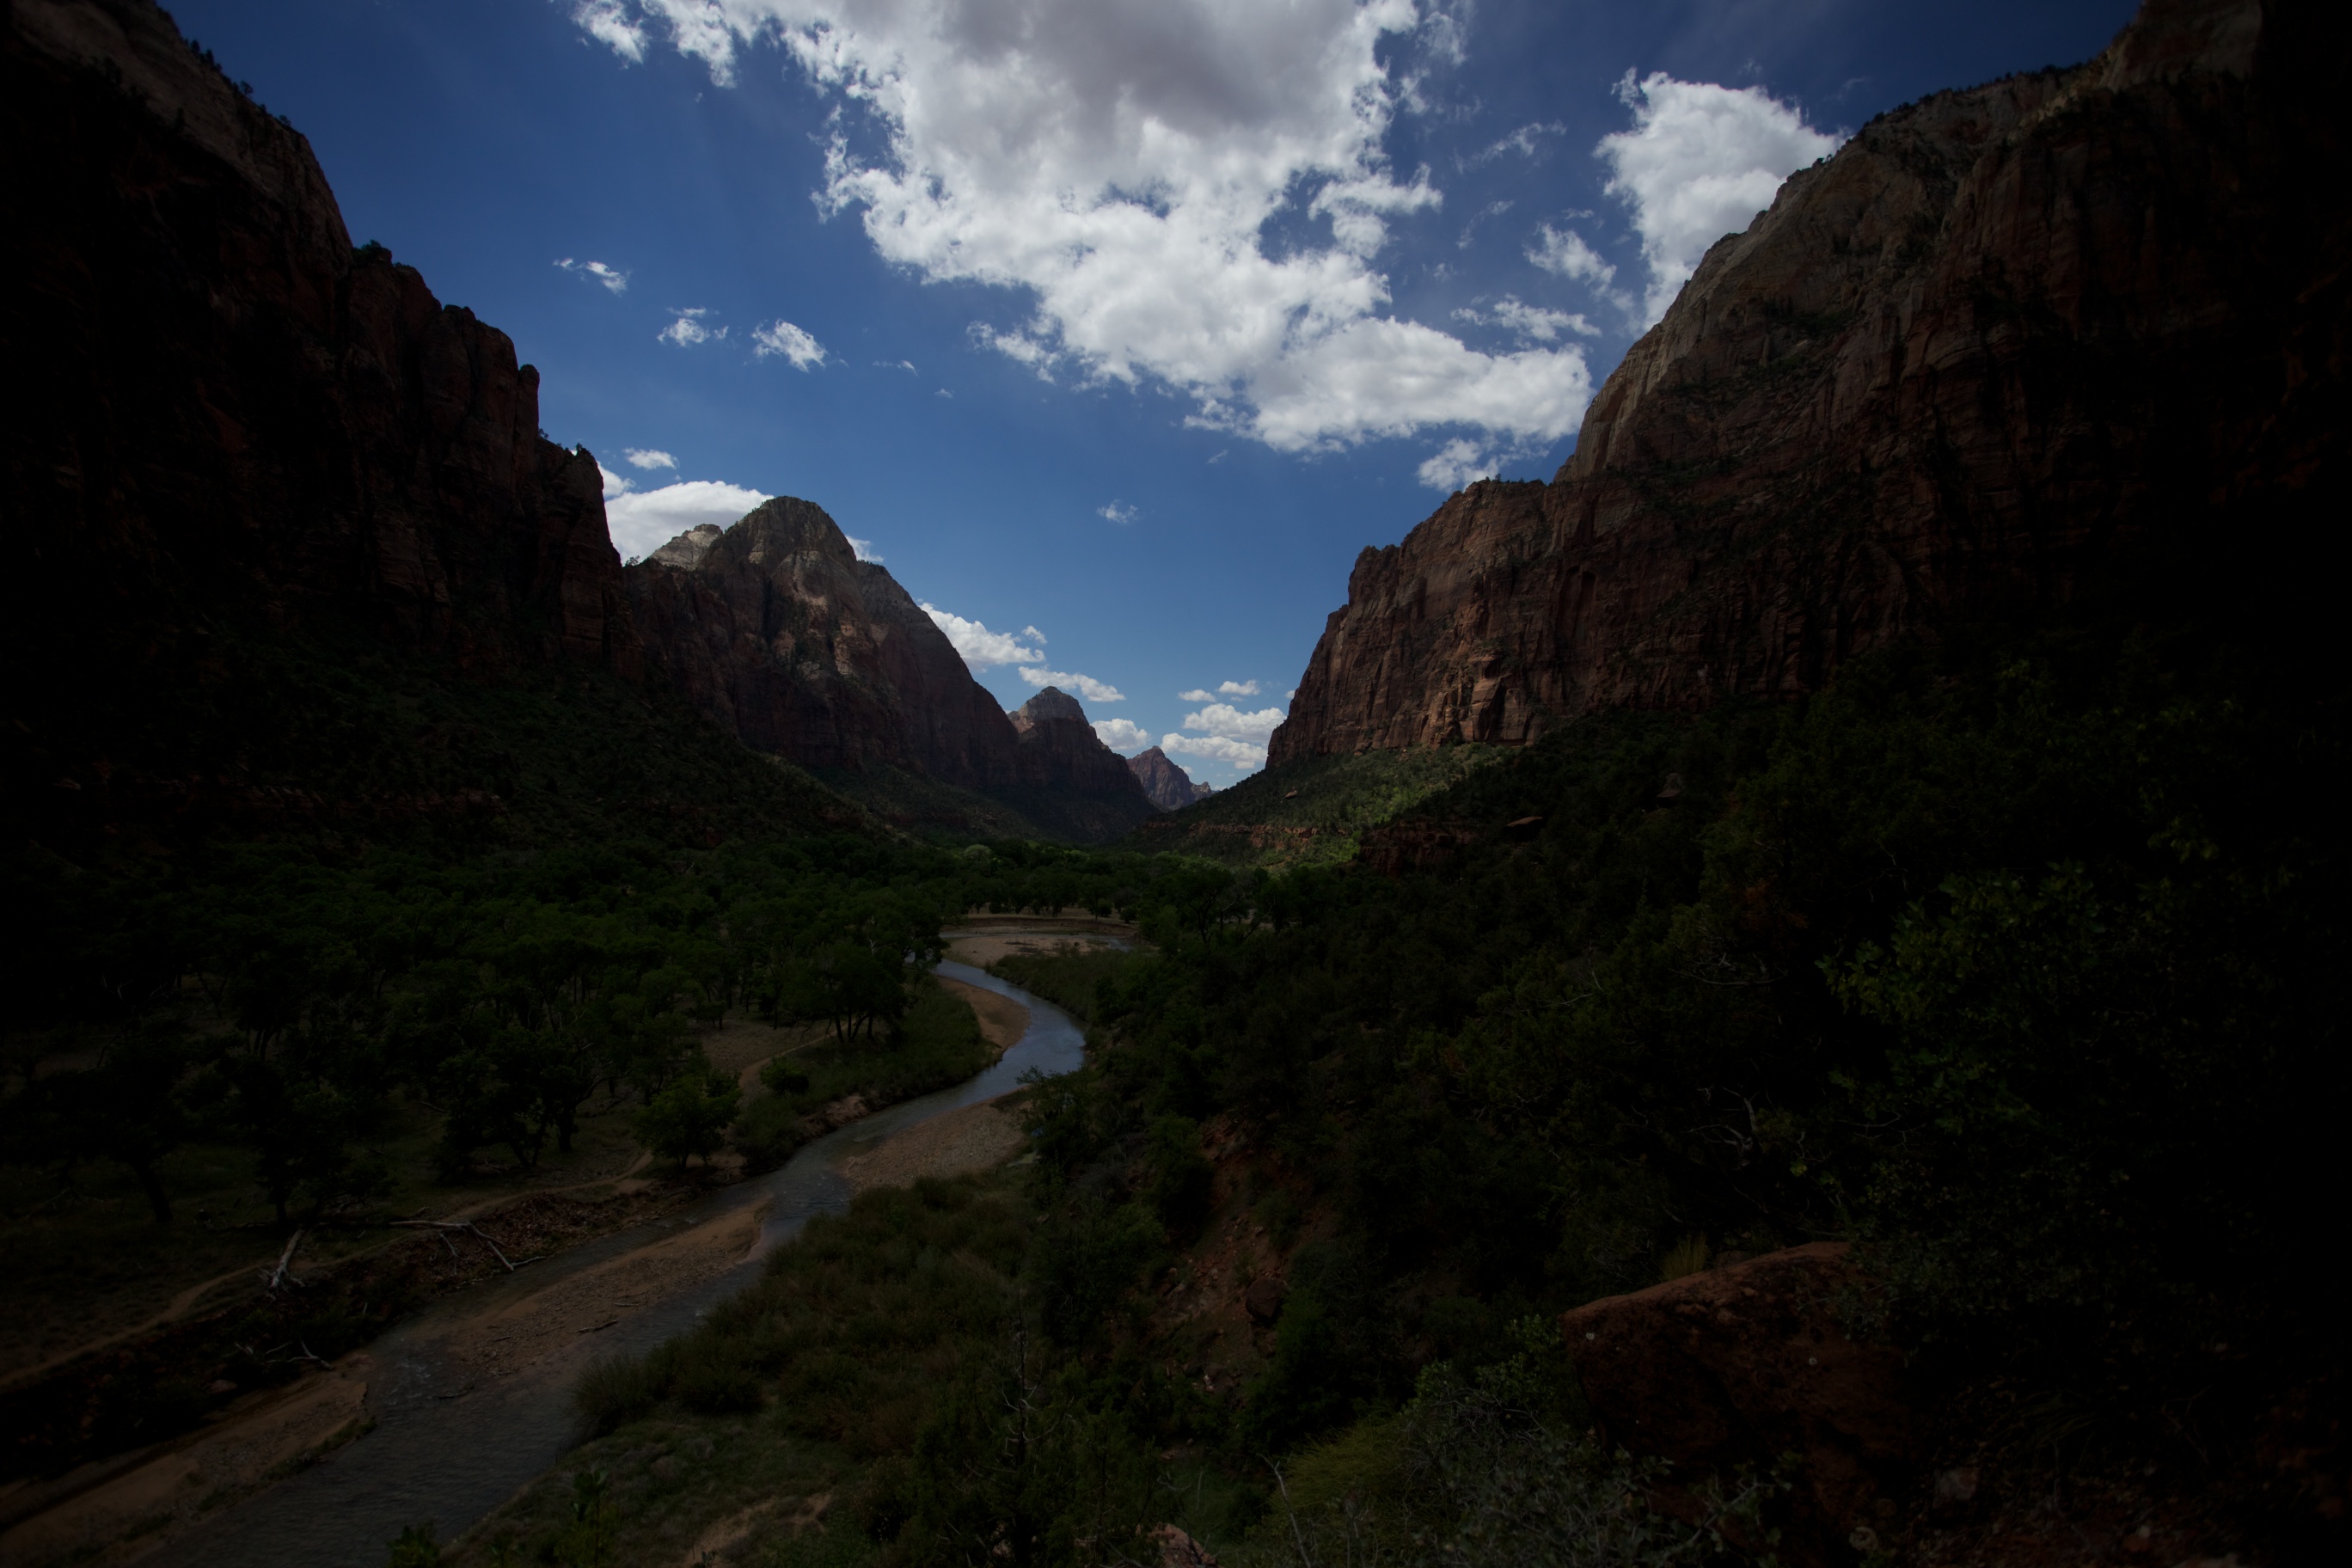
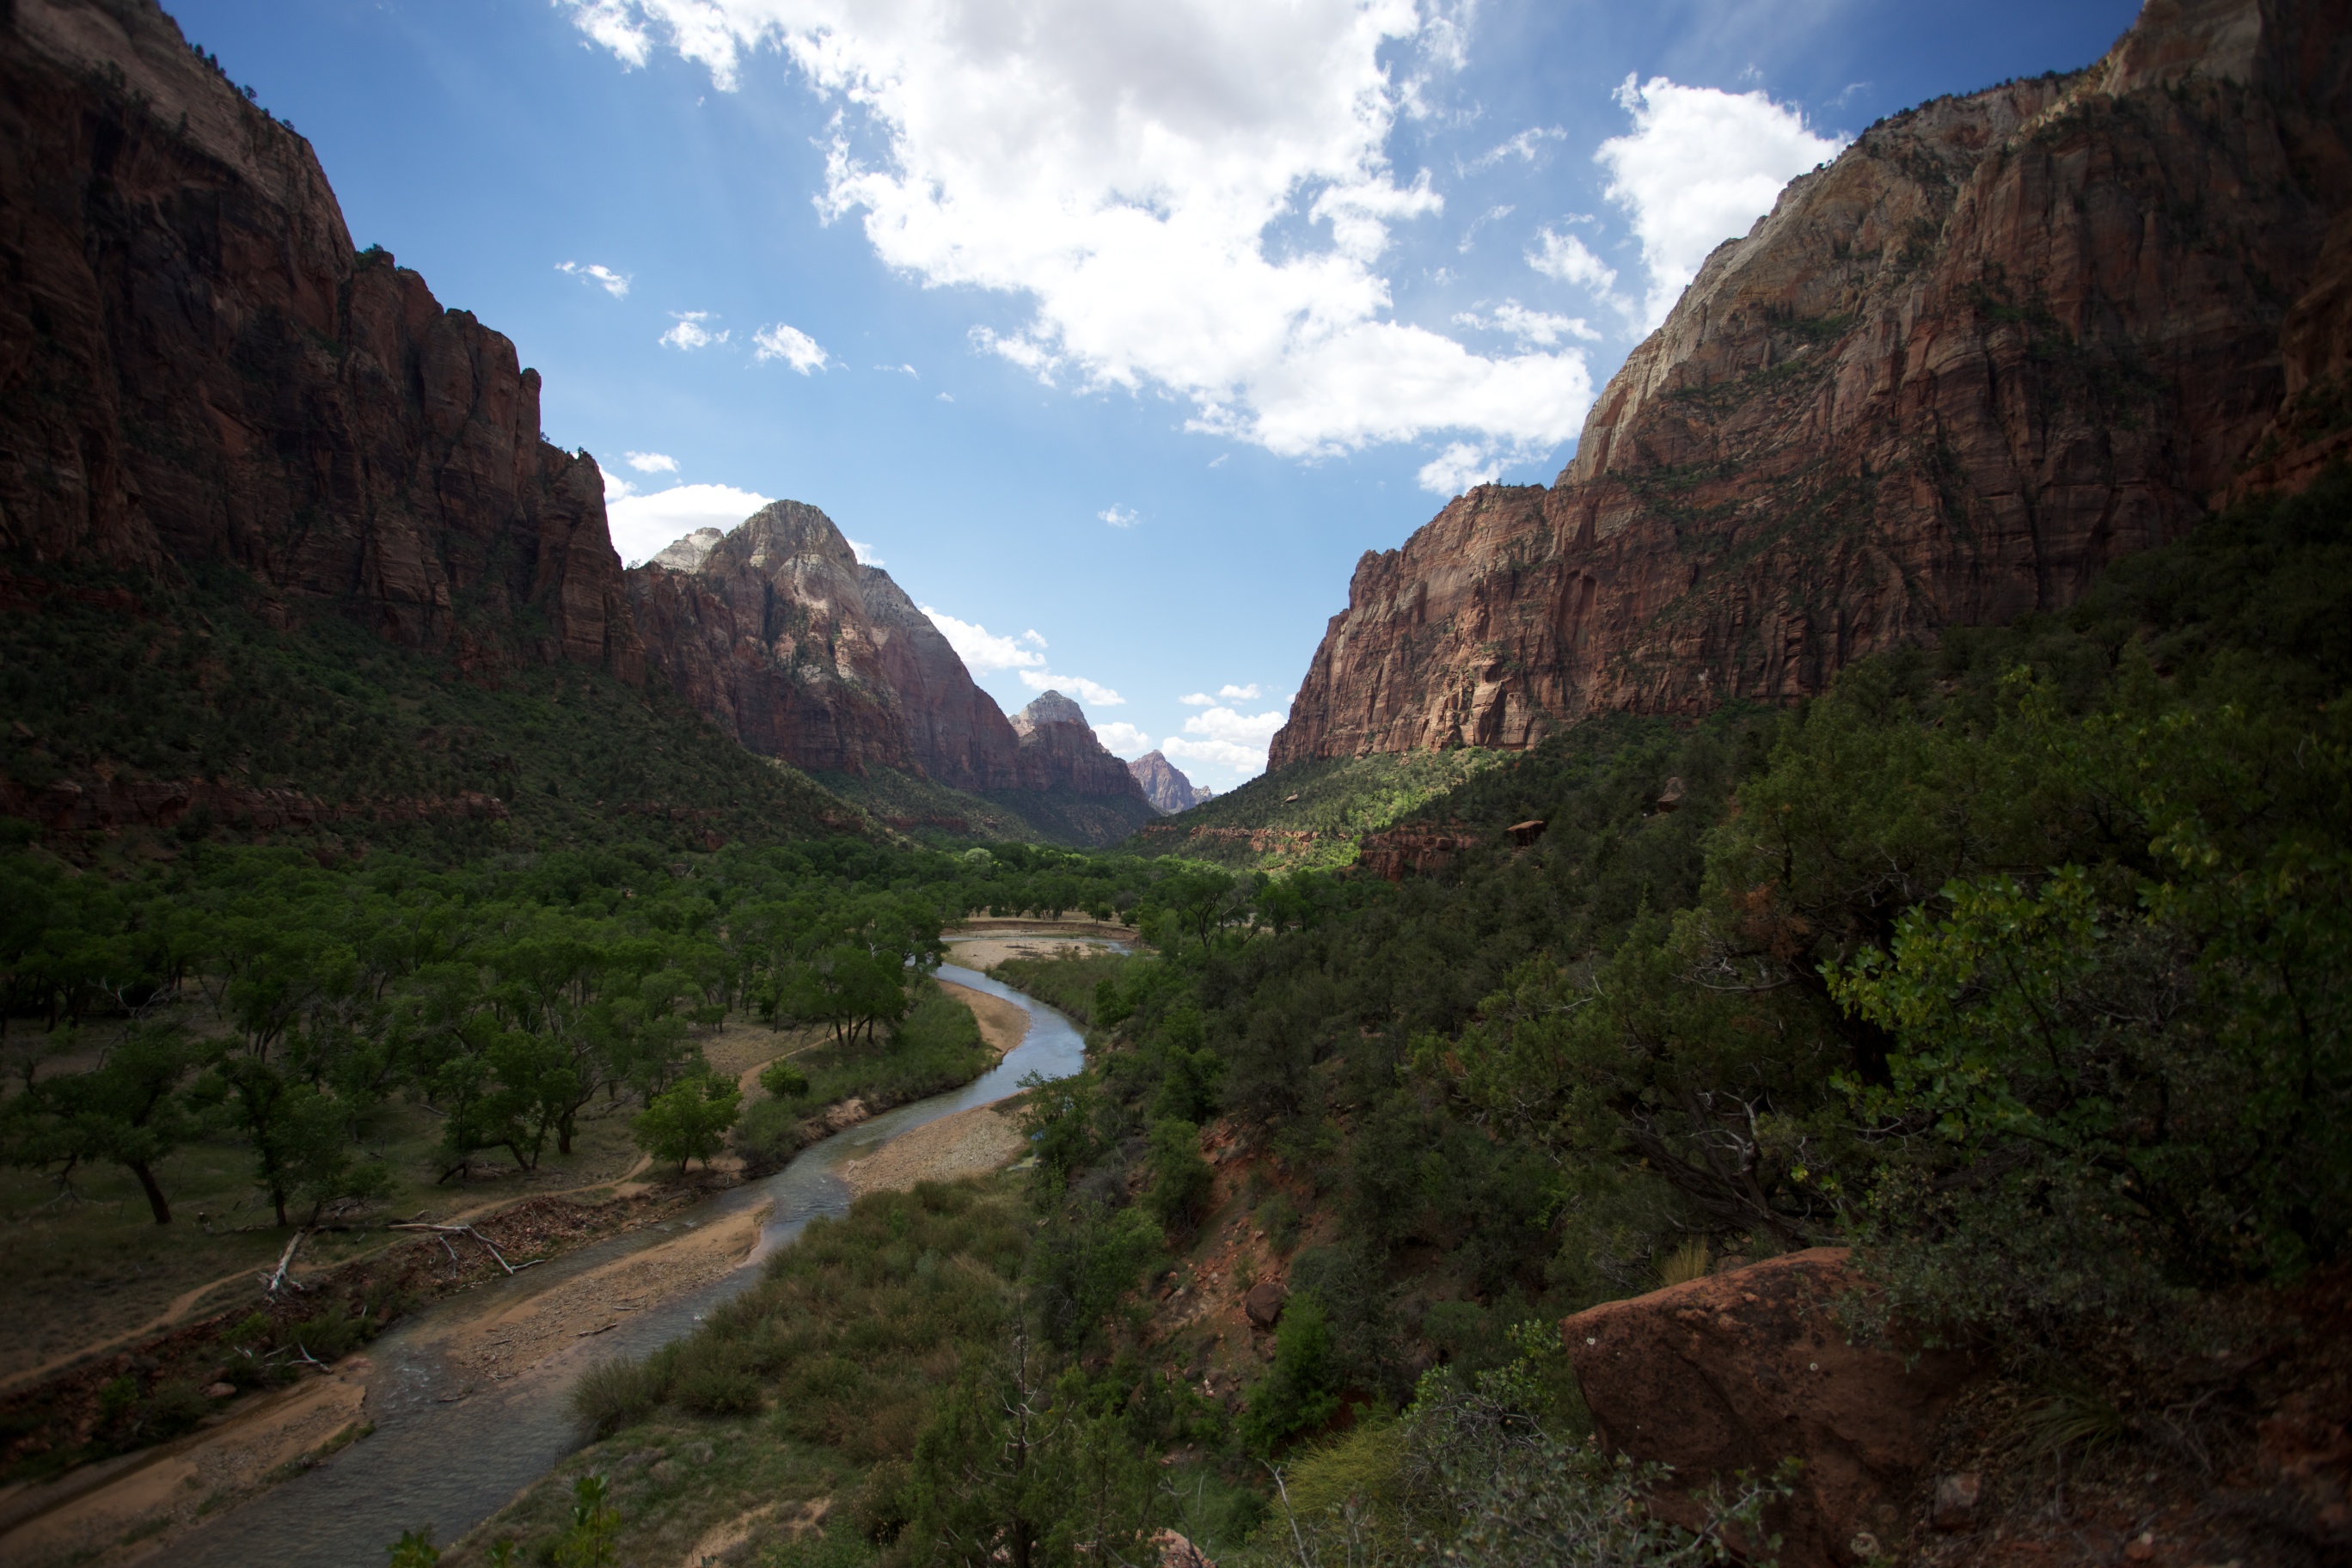
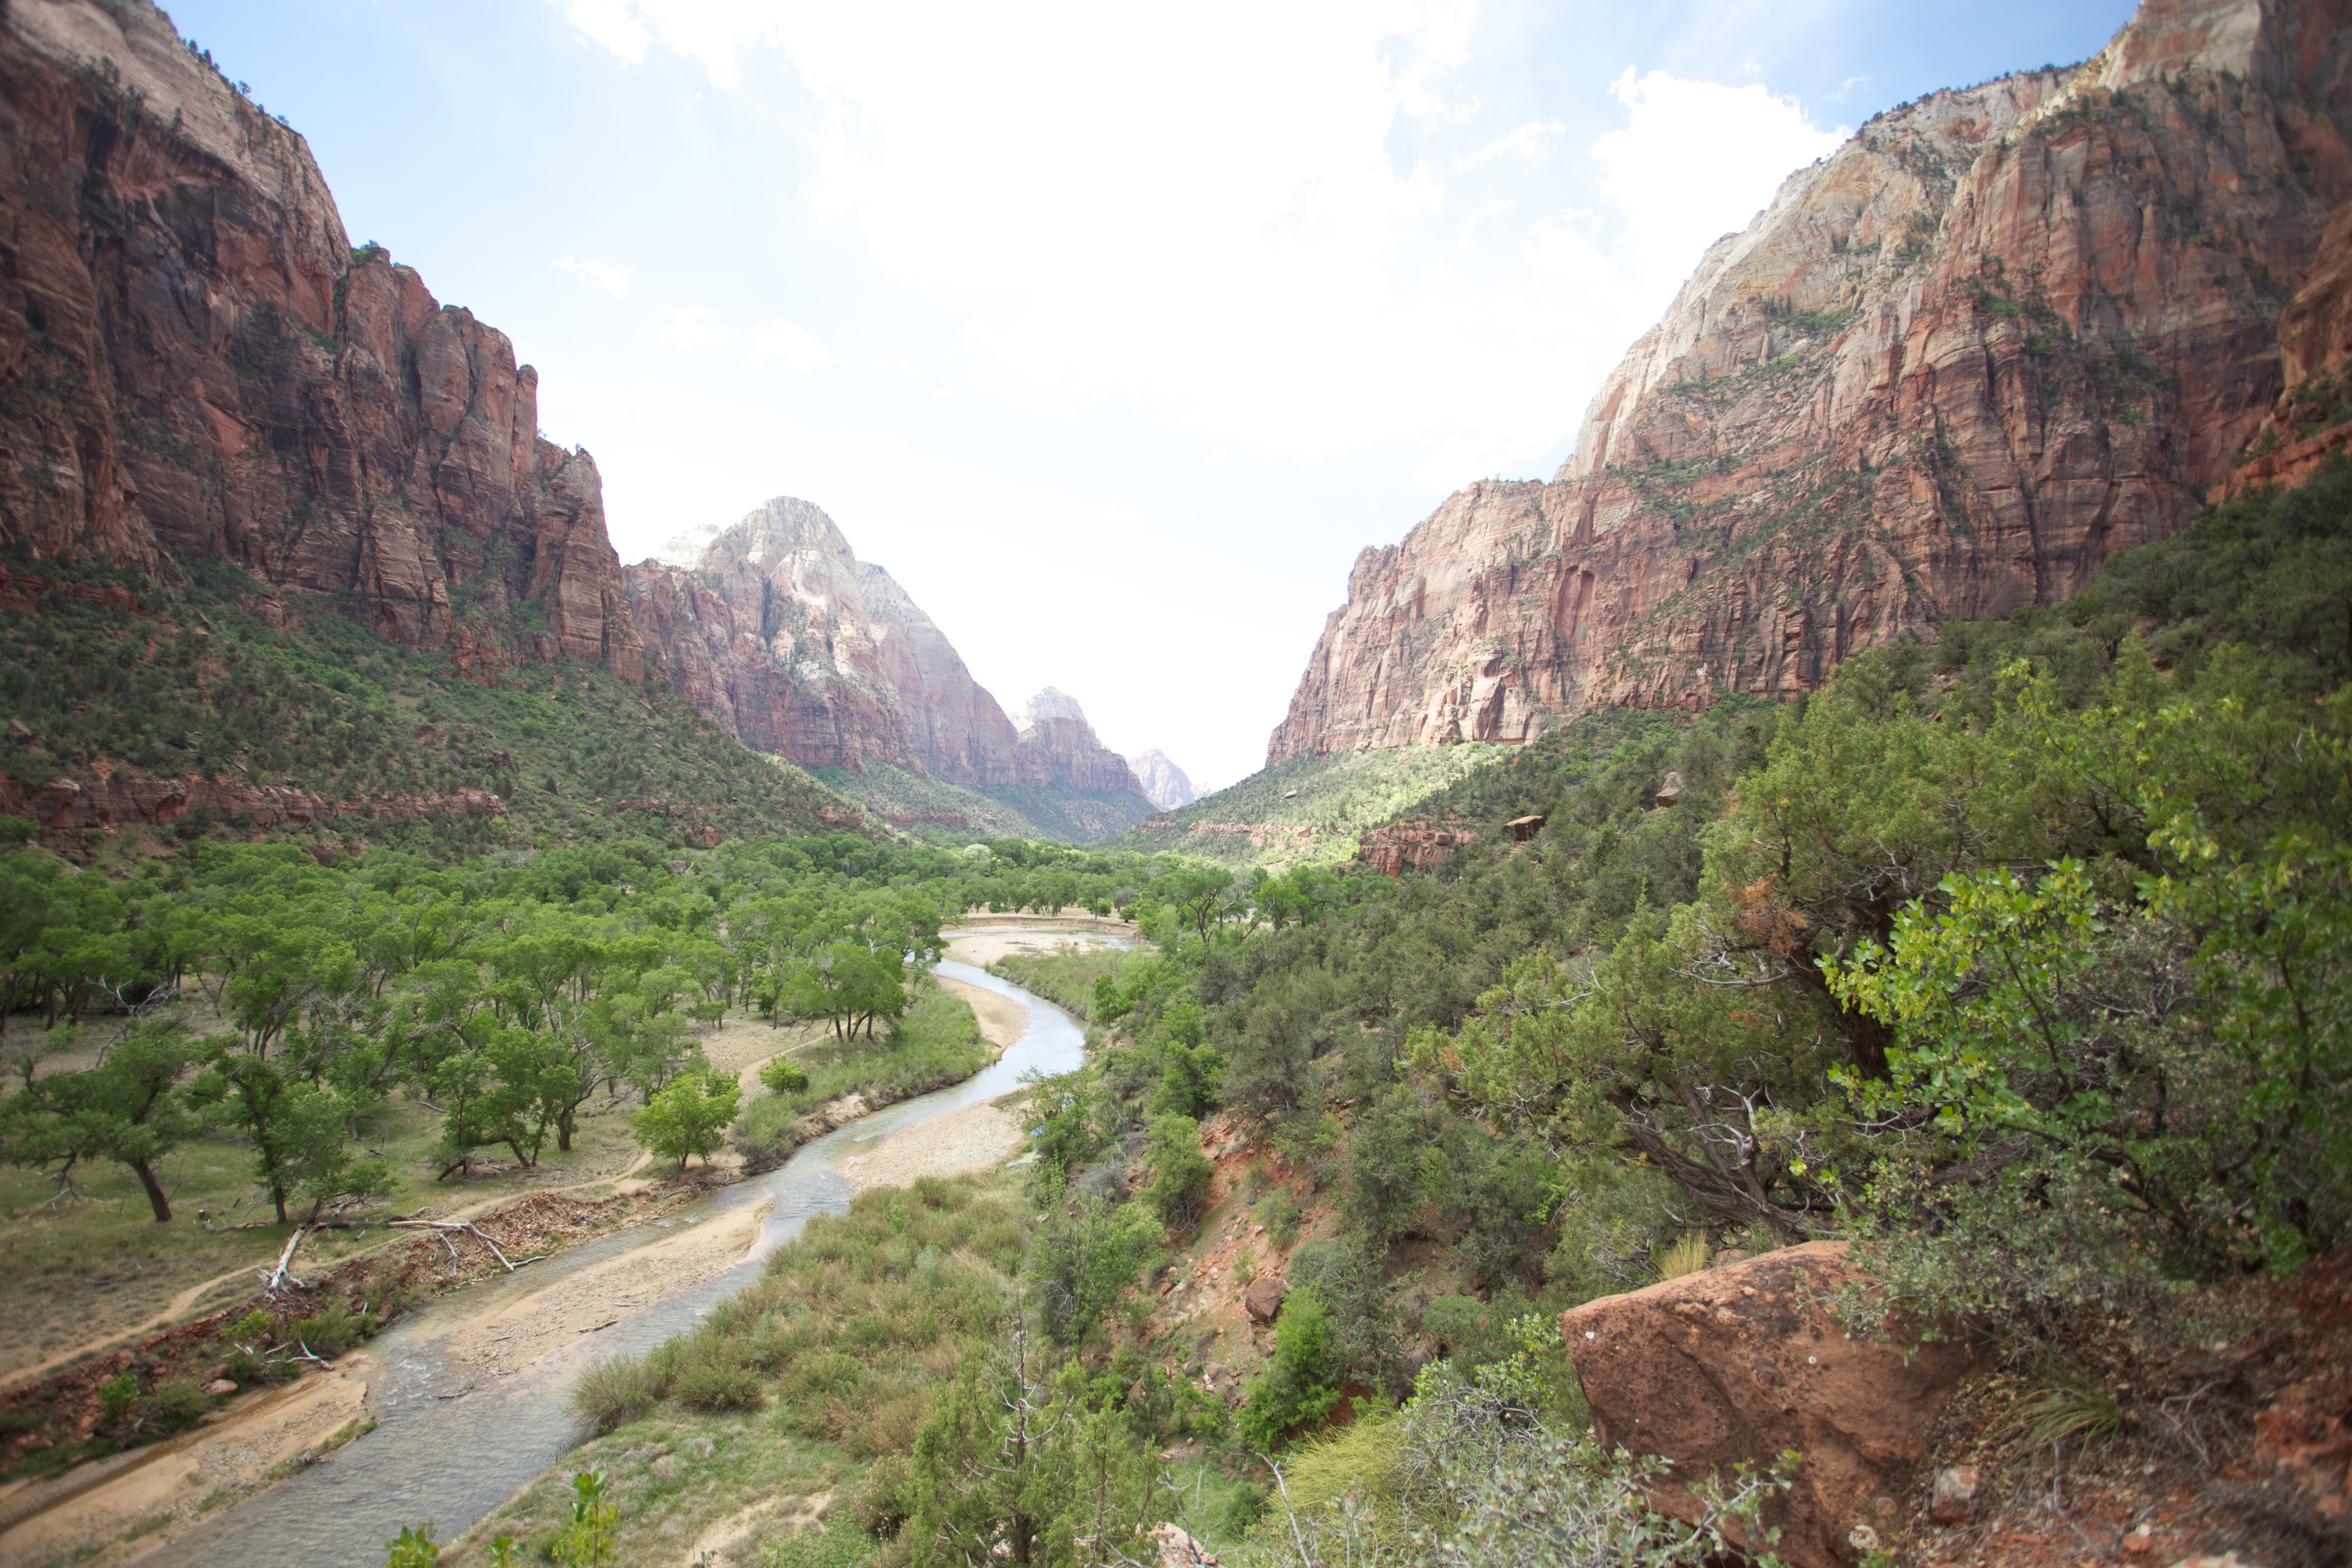
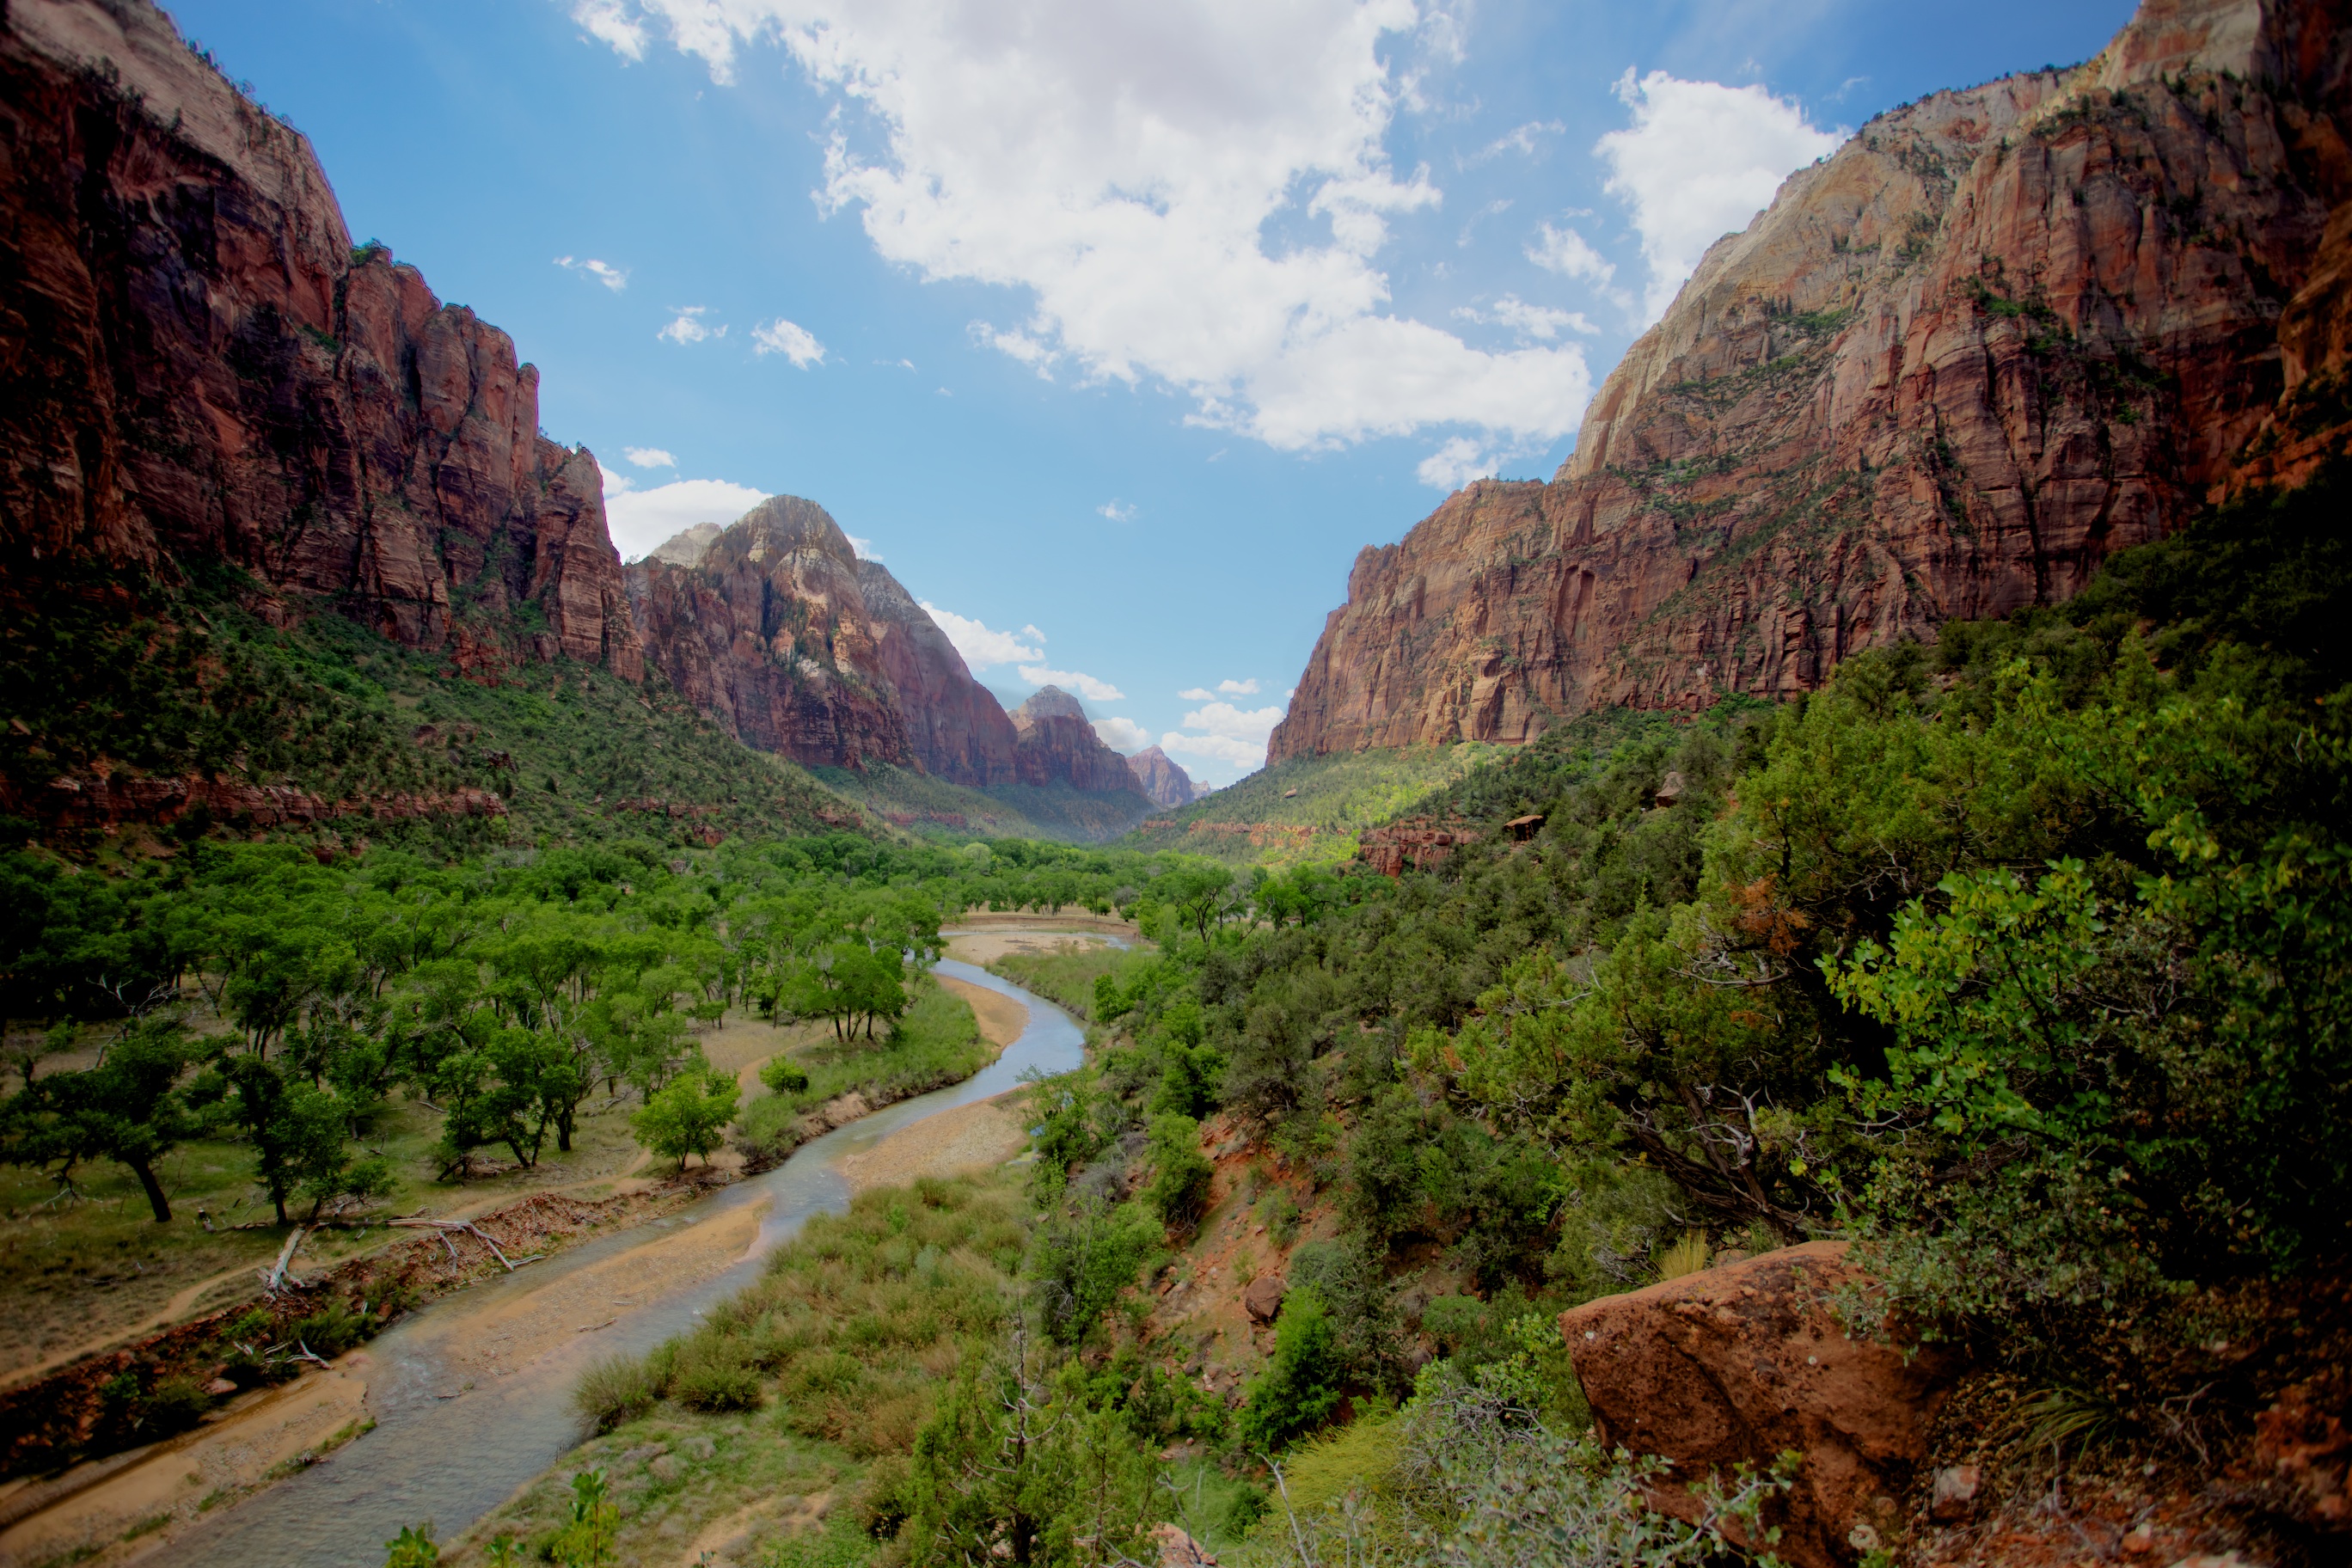
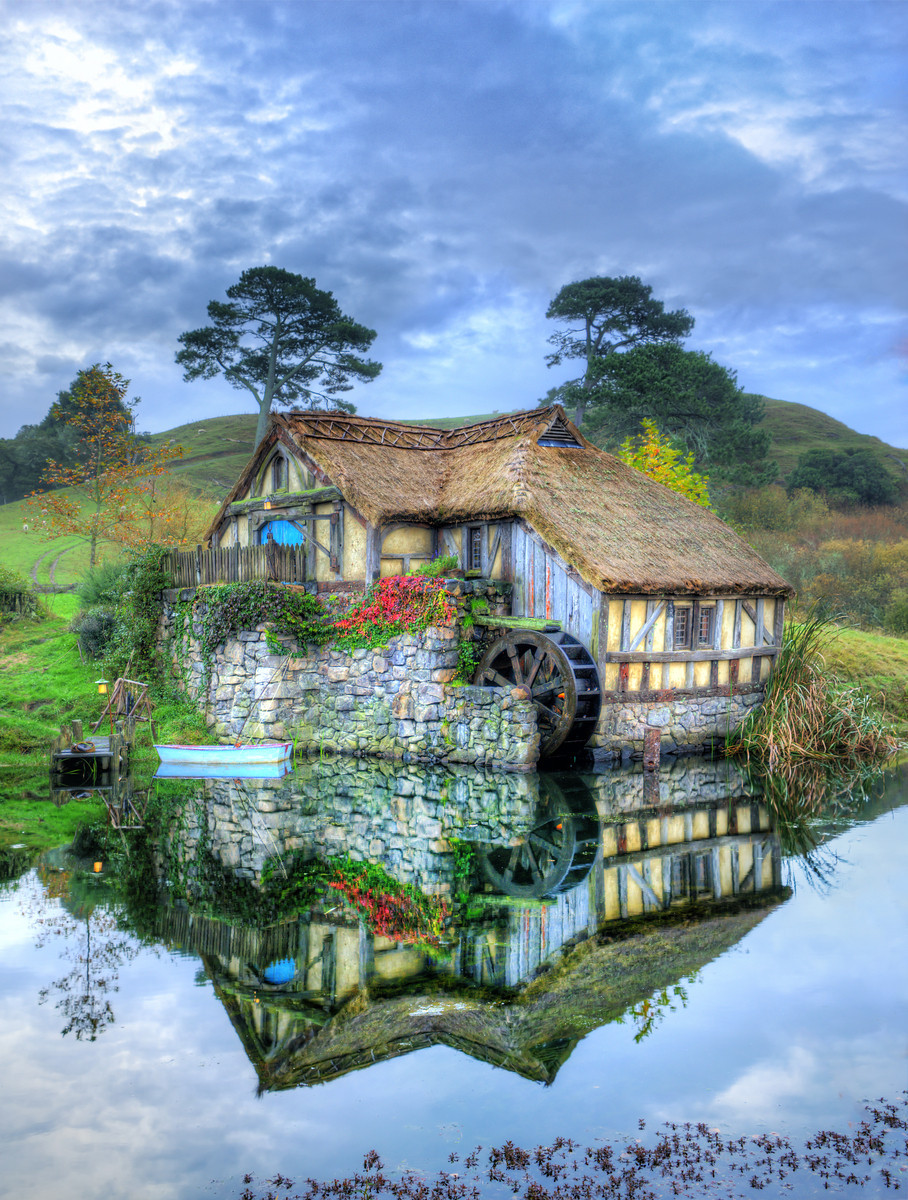
- The three photos below, taken at Zion National Park, illustrate how cameras often struggle to provide enough dynamic range to render an entire scene properly. The underexposed photo renders a perfect sky, but little else. Overexposing, in subsequently photos, provide the needed foreground detail, but sadly leaves the sky “blown out”. Our 2009 circa Canon 7D is unable to render all of the 14-15 stops of light required to resolve the image properly.

This photo is 2 stops underexposed rendering a perfect ski

The properly exposed shot, is rapidly losing sky details and is still too dark in the foreground.

This overexposed photo has plenty of foreground detail, but the sky is now stark white.
As you can see above, Cameras have more limited dynamic range then the human eye. The good news: camera technology is improving rapidly allowing you to capture more range.
- Film: Original low ASA color films had between 5 & 7 stops of dynamic range.
- DSLR:
- Compact cameras have about 5-7 stops of range.
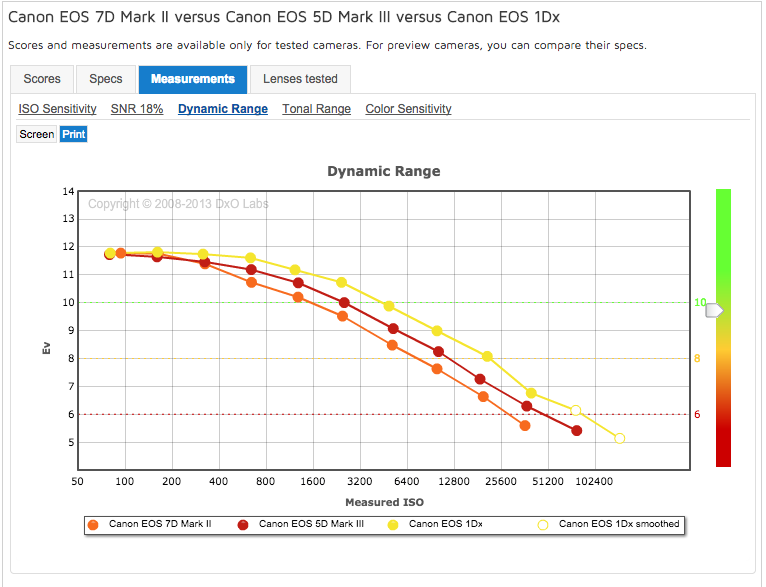
- Most modern DSLRs (like the Canon 7D which took the images above) have between 10-11.5 stops.
- Canon full frame cameras (1Dx, 5DMkIII, 6D) have between 11.5 & 12 stops. Their new 5D Mk IV has 13.5 stops.
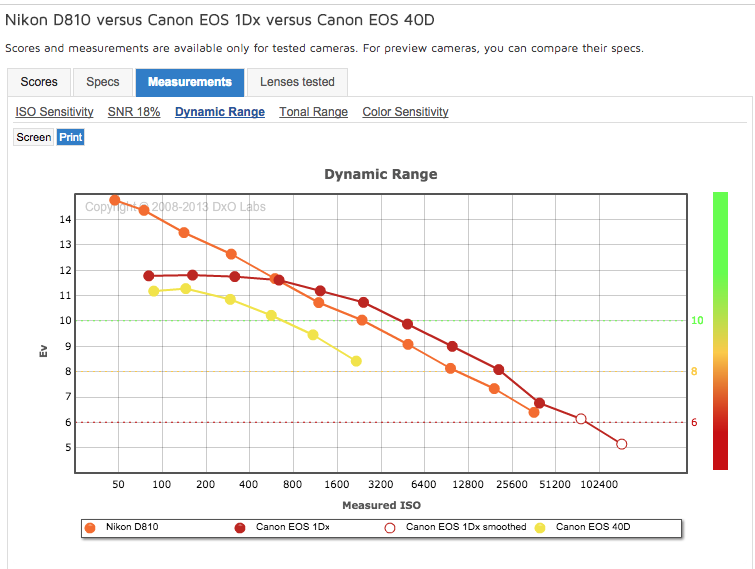
- Most Nikon camera have signficantly more dynamic range. The D7200 (crop) and D750(full frame) offer 14.6 stops and the D810/new D850 has 15 stops! That’s approx 8 times more light than Canon DSLRs (except the 5D MkIII @ 3 times).
- Sony’s new A7r III now shares top honors (also 15 stops)!
-
- Increasing ISO reduces dynamic range. To take advantage of your camera’s full dynamic range use the lowest ISO possible for HDR situations!
- DSLRs dynamic range deteriorates differently over the ISO range (depending on brand/model).
- The charts below illustrate how dynamic range drops with increased ISO. High ISO photos appear contrasty as a result.
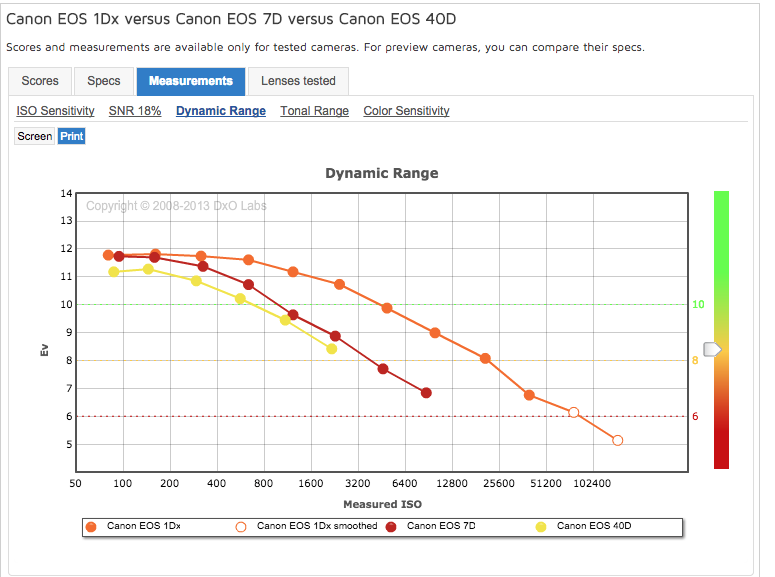
How earlier Canon DSLRs compare to the new 1Dx.
Some newer Canon DSLRs
- Shooting in RAW mode also preserves the greatest dynamic range. JPEGs, in contrast, reduce range by approx. 3.5-4 stops.
Before moving on…did you remember your polarizing filter?
- Cuts glare, improves skies, improves color saturation. Great for controlling amount of reflection for water features.
- Watch out: focal lengths under 24mm (sky distortion)/effect best at 90 degrees from the sun.
- No good into or directly away from the sun (direct sunrise or sunset). Doesn’t help, diminishes colors.
Is it better to over or underexpose?
- Overexposing is bad….very very bad. Bad bad bad! Anything overexposed by more than one stop will be useless white mush in post-processing.
- Underexposing, on the other hand, is far far easier to fix. Lets start with a properly exposed photo (ISO 3200).
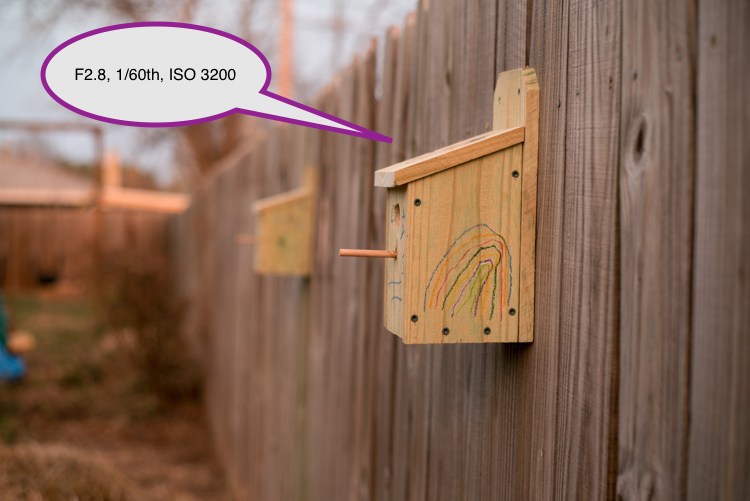
Properly exposed
- Here’s the same picture underexposed by a full 5 stops! We’ve reduced the ISO to 100.Looks pretty dark…beyond recovery…Right? Let’s try bringing this into PhotoShop and turning up the exposure slider by a full 5 stops.

5 stops underexposed. Looks practically Jet Black.
- Holy Cow! Incredible. Looks just like the original. Woooo!!! New light sensors exhibit ISO Invariance. Ergo they have a remarkable ability to recover underexposed images. The newest crop of cameras can recover 5 or more stops, older models 2-3 stops.
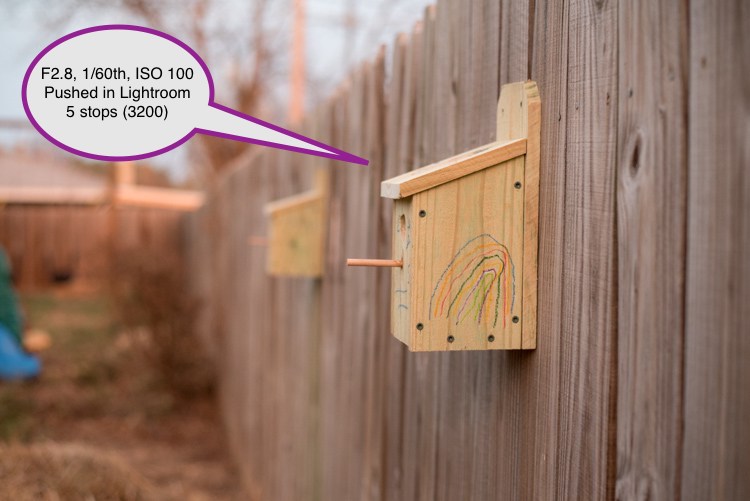
Underexposed photo recovered in post-processing
Remember…always better to underexpose…NEVER OVER EXPOSE.
Therefore, getting the exposure right essential to using your camera’s full range (& to avoid overexposing). Shoot in manual mode & rely on your histogram & overexposure indicator (blinkies).
- Your camera’s histogram is showing the range of a JPEG image(shows smaller dynamic range). The RAW image utilized when post-processing in Lightroom/Photoshop provides 3-4 stops of additional dynamic range (1.5 stops minimum on the right and left side of the histogram).
- IMP to use all the available range. If your in-camera histogram/blinkies are starting to show clipping (on the right) you can still increase exposure safely by 1.5 stops.
- Some photos involve special situations (clipping isn’t always a bad thing). This photo from Big Bend National Park works because certain parts are completed “blacked out”. I wasn’t concerned about clipping on the left side of the histogram. I wanted to make sure I was able to render the lighter tones properly. Mission accomplished!
Having some areas underexposed and clipped works in special situations
While there’s clipping on the left side of the histogram, the lighter tones are all perfectly rendered.
Different approaches to capture a photo with high dynamic range:
Solution #1. Always best to capture the entire range in one shot, then adjust brightness/exposure levels, etal in Lightroom/Photoshop. If you’re lucky enough to shoot with one of the high DR Nikons (D7200, D540 or D810) or the Sony A7r III, your need for HDR software drops significantly.
Work flow suggestion: If you have a bright sky as an important compositional element in your photo, trying metering on that(expose for the sky). Take a test shot. If your histogram looks ok, you’re done! You can bring up the foreground elements in Lightroom or PhotoShop.
If you are underexposed and are showing clipping (underexposed areas) to the left in your histogram…you can always turn up your exposure slider (in post p). You have 1.5 stops of additional exposure available once you start seeing the blinkies or clipping on the right portion of the histogram. Again, that’s because your in-camera histogram is using a Jpeg image…at home, you’ll be processing the RAW image with much greater dynamic range.
Example: Here is a photo properly exposed (metered on sky). Many of the image’s elements need adjustment. Since none of the darker image values lie outside the histogram’s range (not underexposed) they can be recovered/tweaked in post-processing.
Orig image. Properly exposed but needs adjustment.
Here’s our image after tweaking. Looks pretty darn good!
Tweaked image
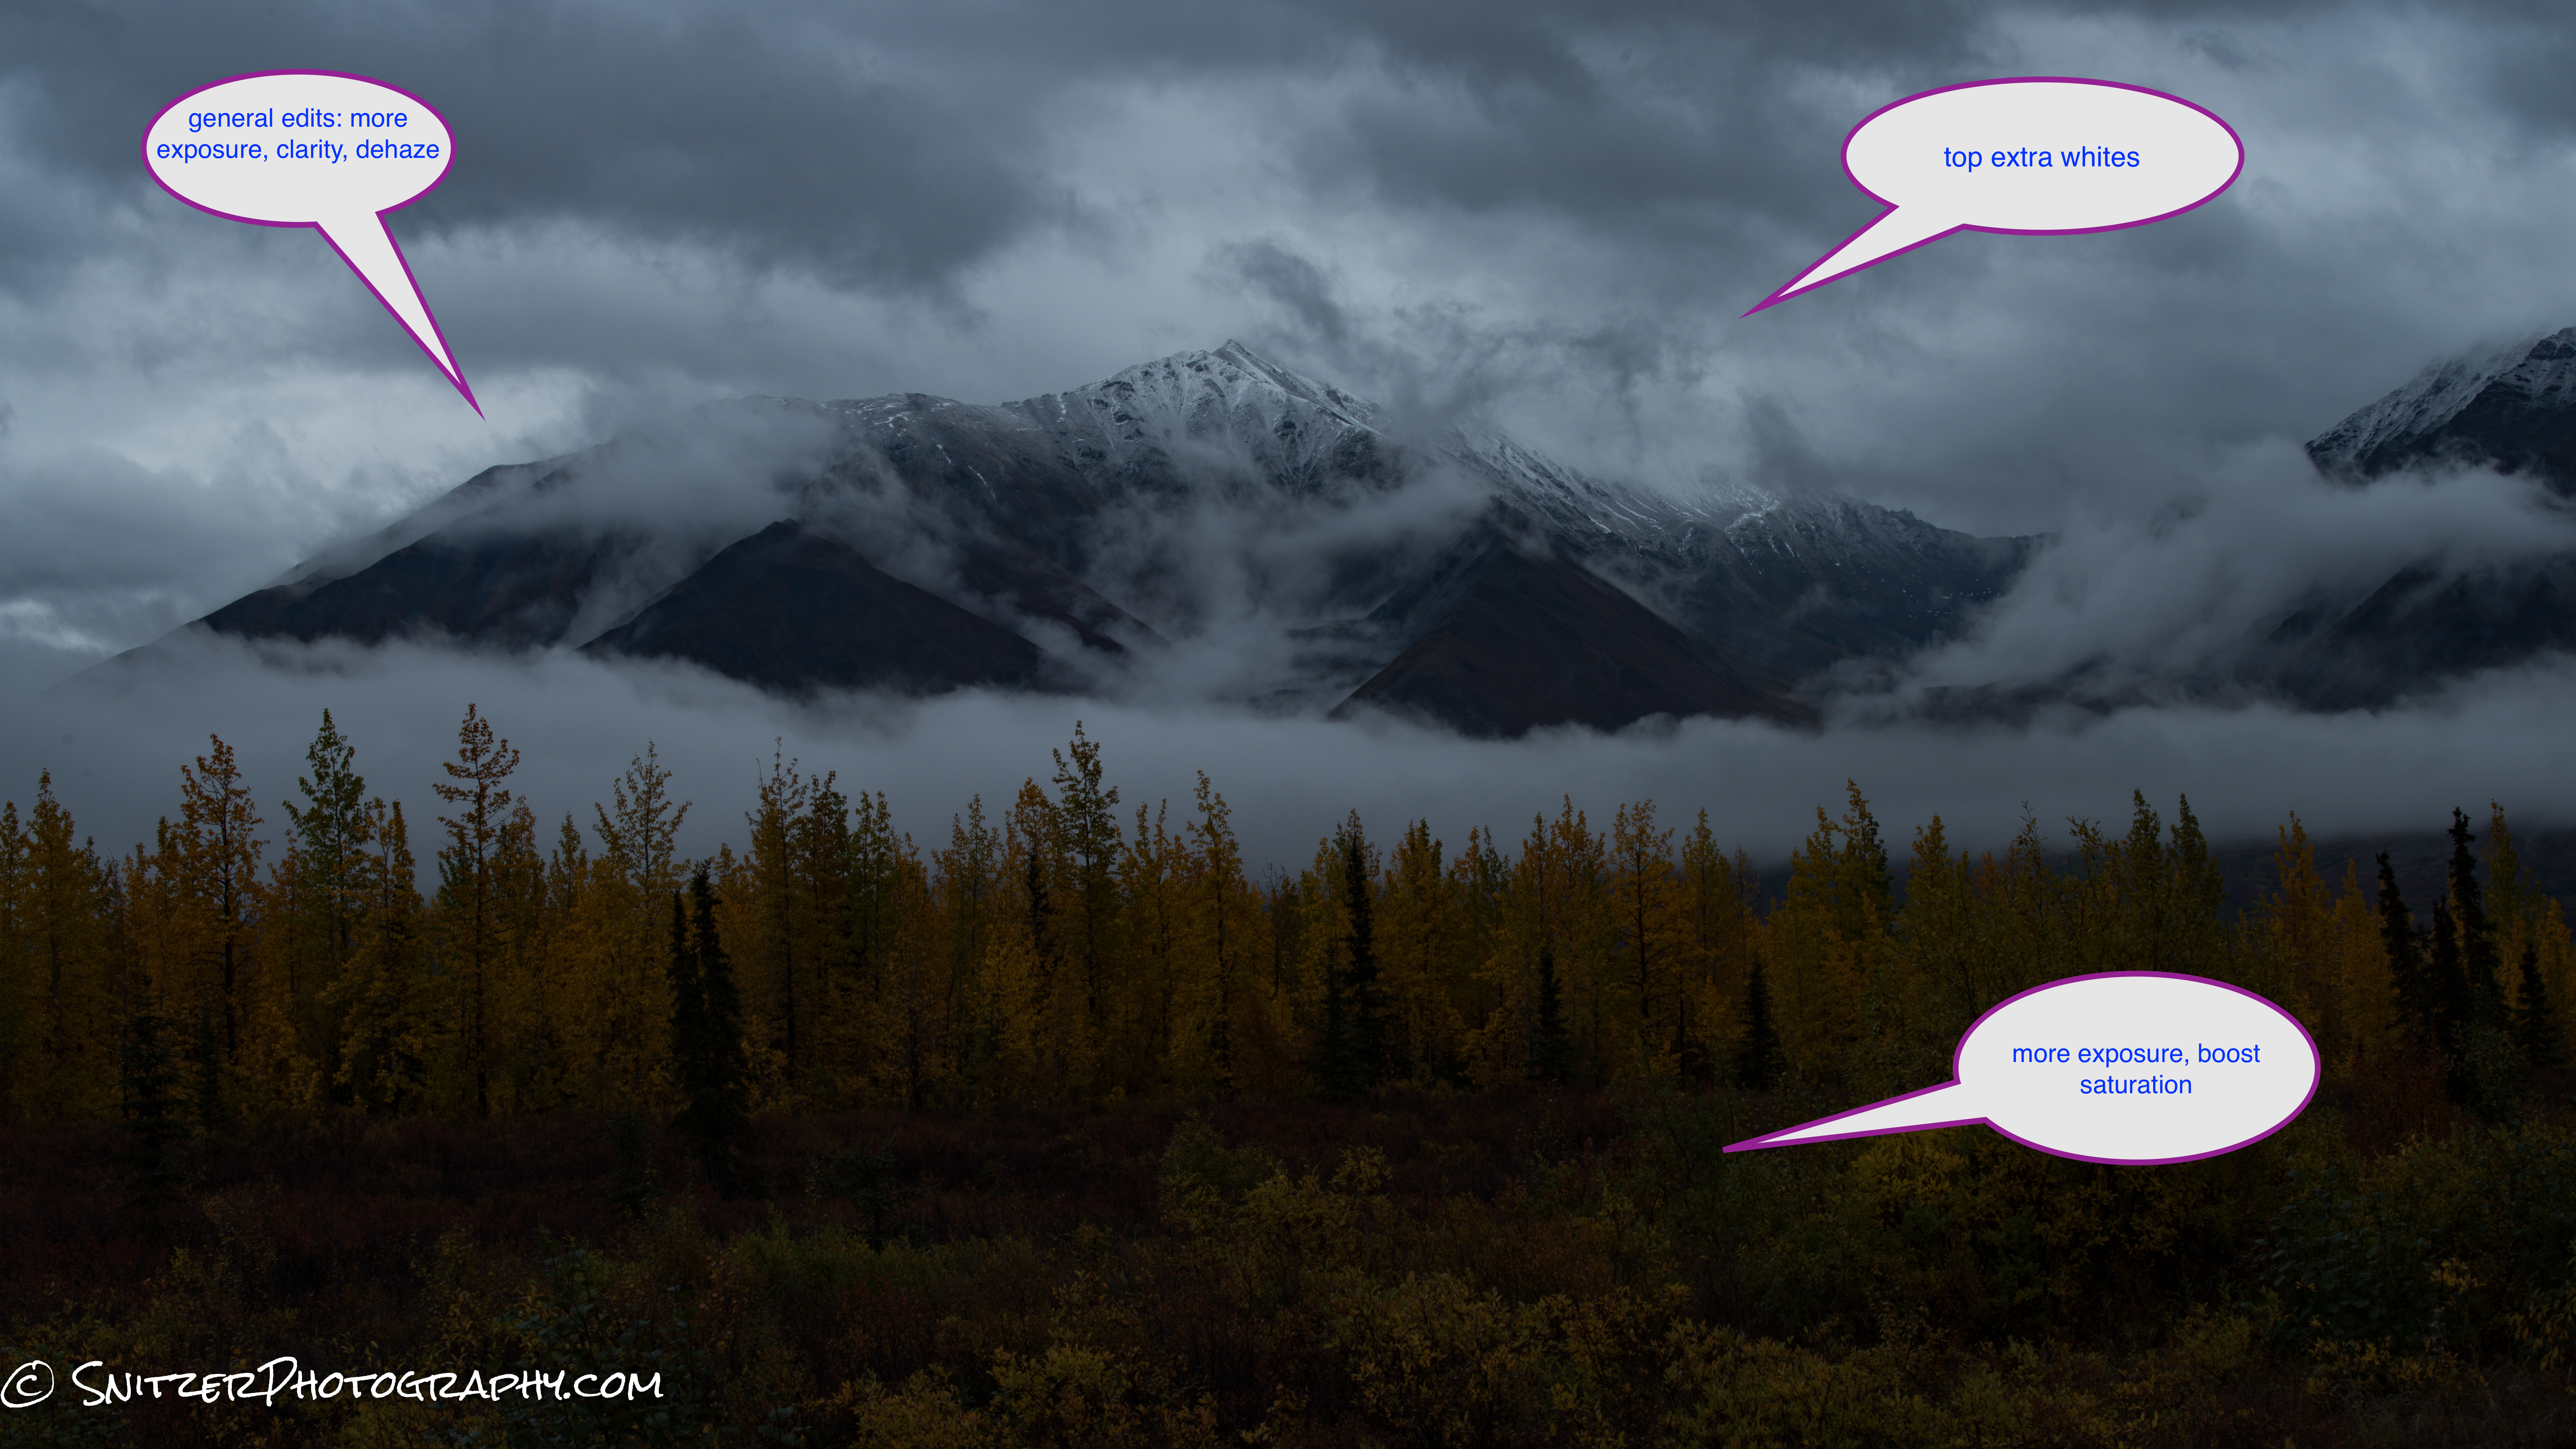
Remember that you have great latitude to recover even underexposed/dull photos in post-processing. In this base we’re going to boost the exposure, clarity and dehaze settings globally in Lightroom. Then we’ll use selective brushes to enhance further. The top section gets more whites, the bottom portion more saturation and exposure.
Pretty grim photo until we tweak
Holy Cow…this the same photo?
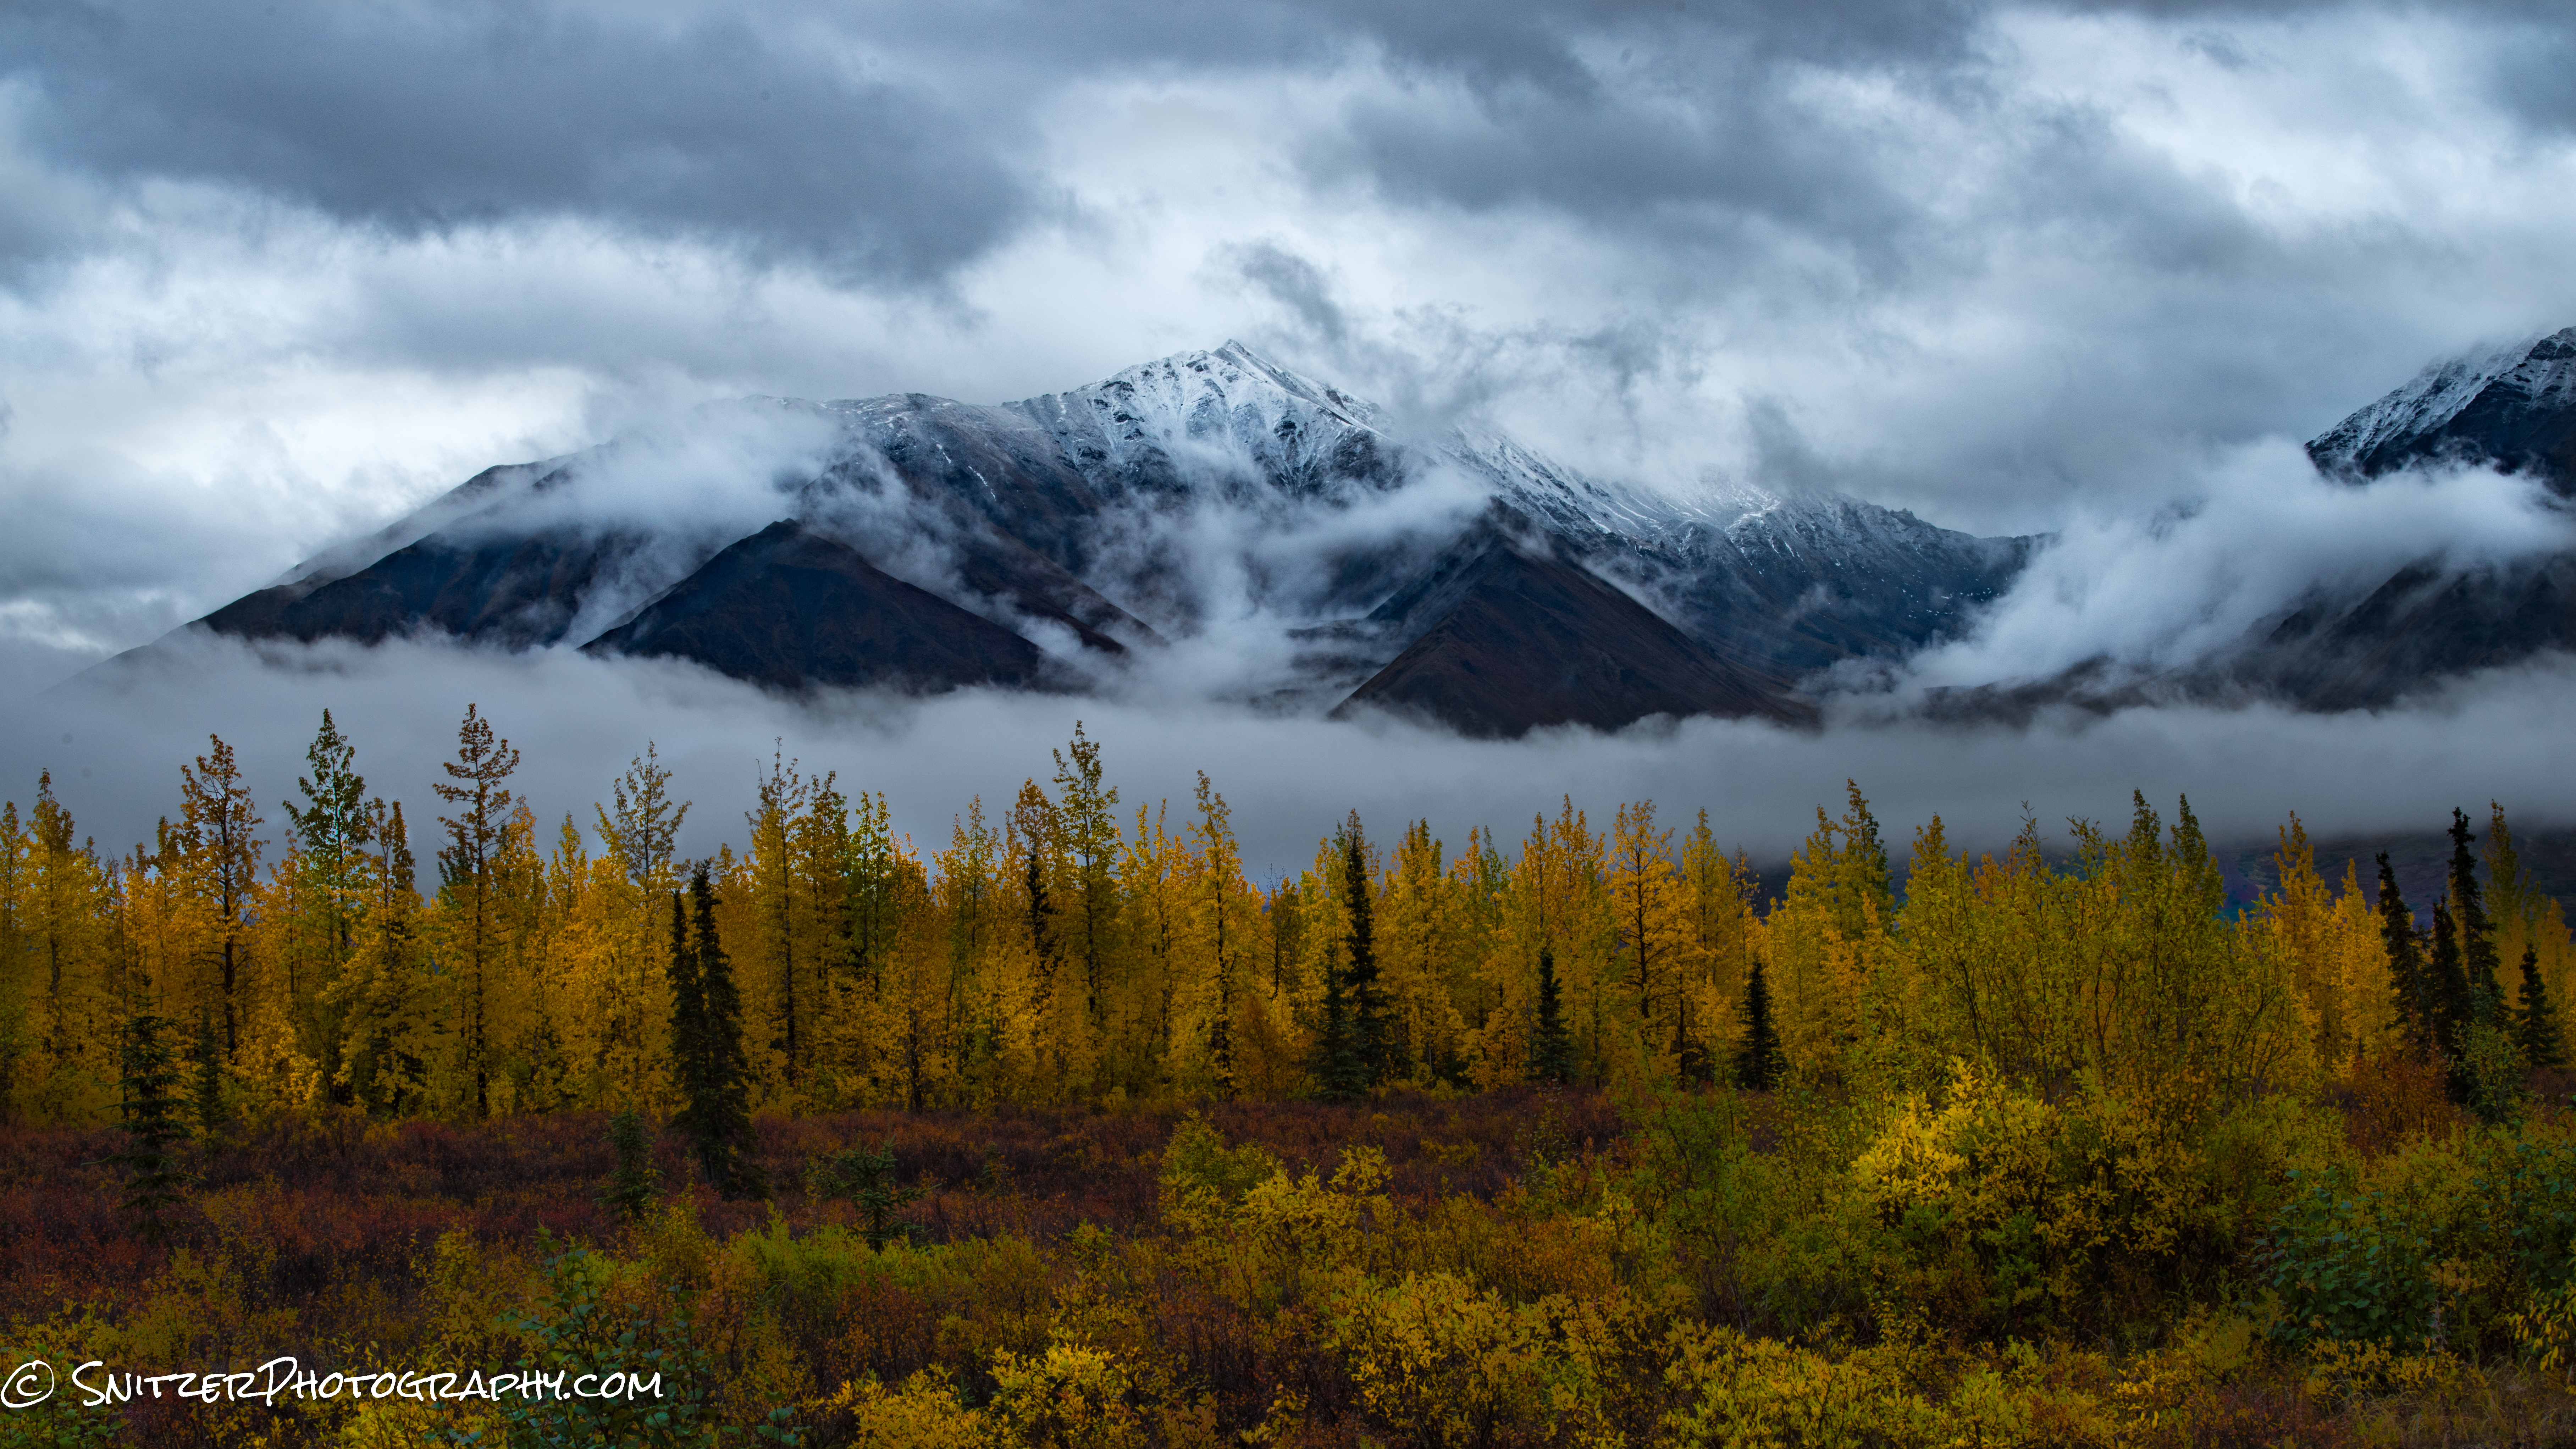
Wow…Looking good!
Solution #2
- Sunglasses for your lens, avail in 1,2 or 3 stop varieties. While straight line shading isn’t great for many situations (ex. mountains, complex photos with bright areas toward the interior), for shots involving a flattish horizon or water, they can’t be beaten.
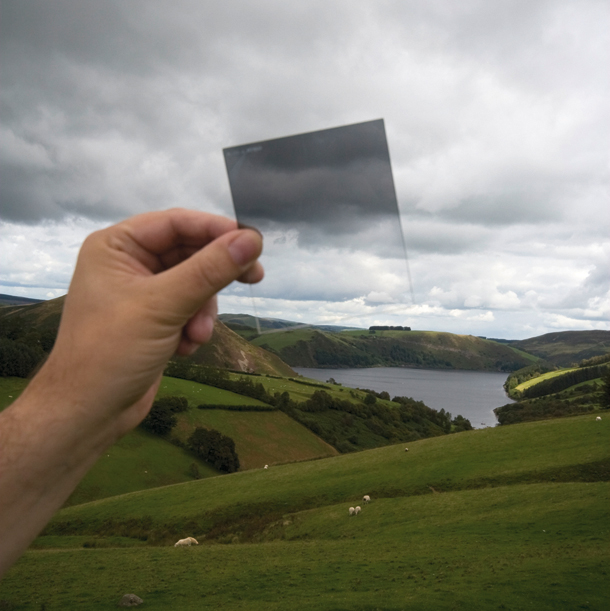
Grad ND filters are sunglasses for your camera that allow you to selectively shade areas of your photo
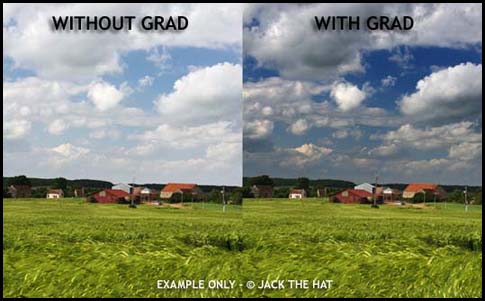
The affect is to provide properly rendered skies. Unfortunately the correction comes only in a straight line.Solution #2: Higher dynamic range camera Nikon 810.
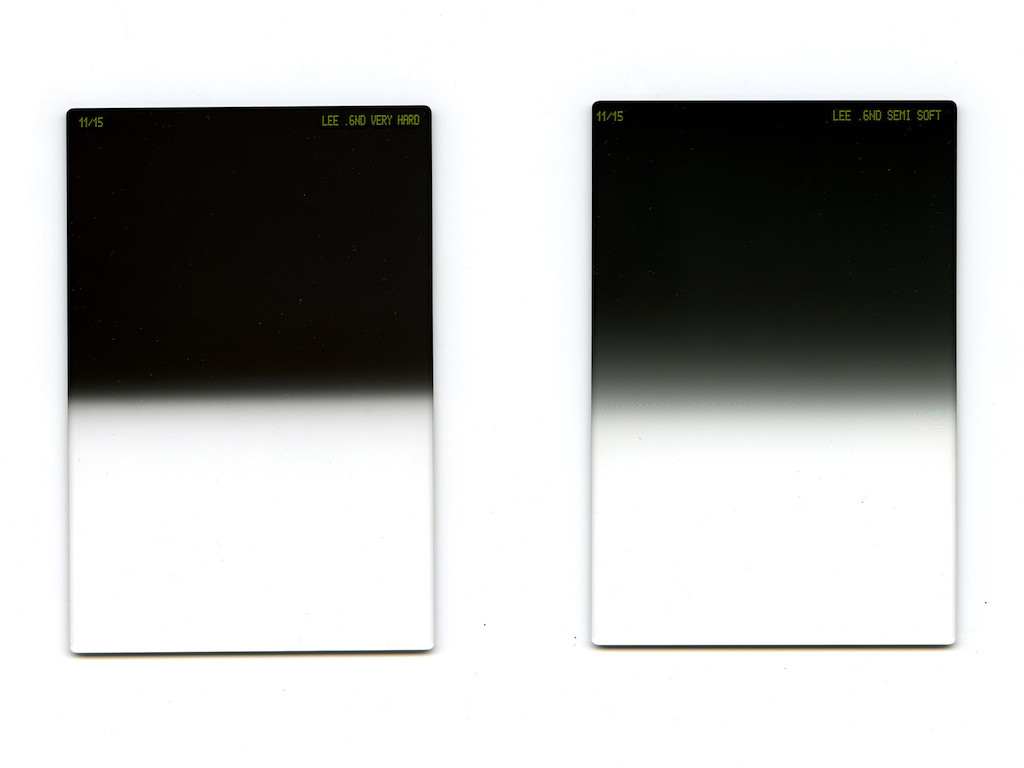
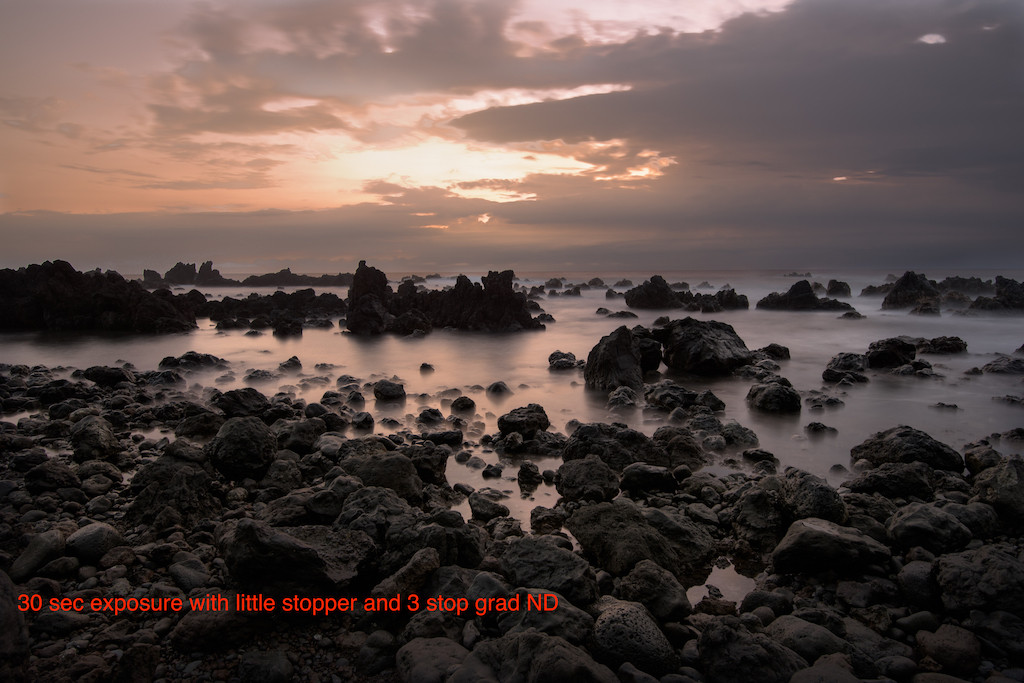
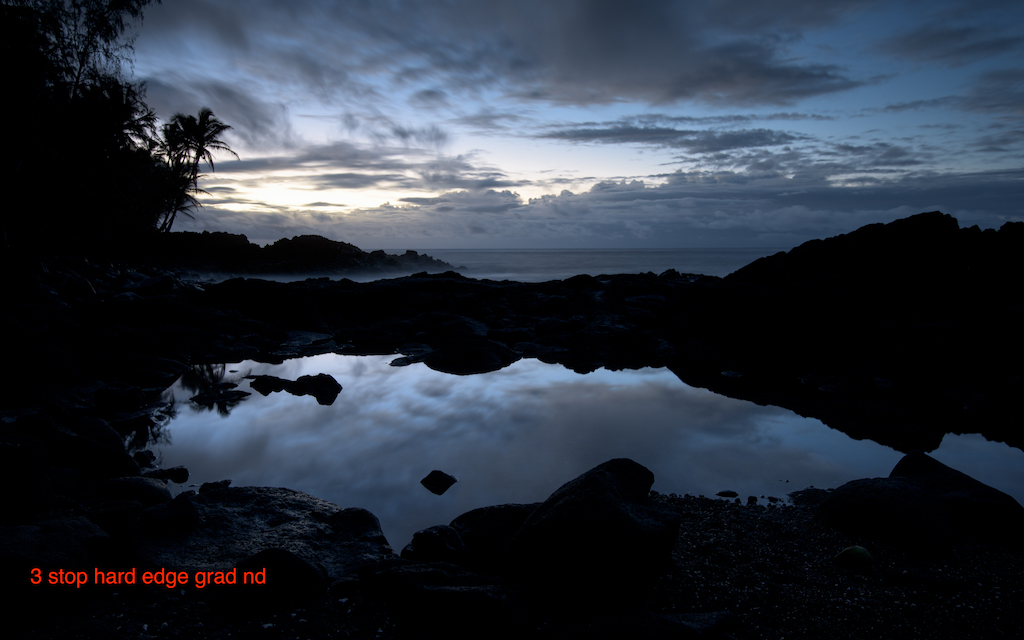
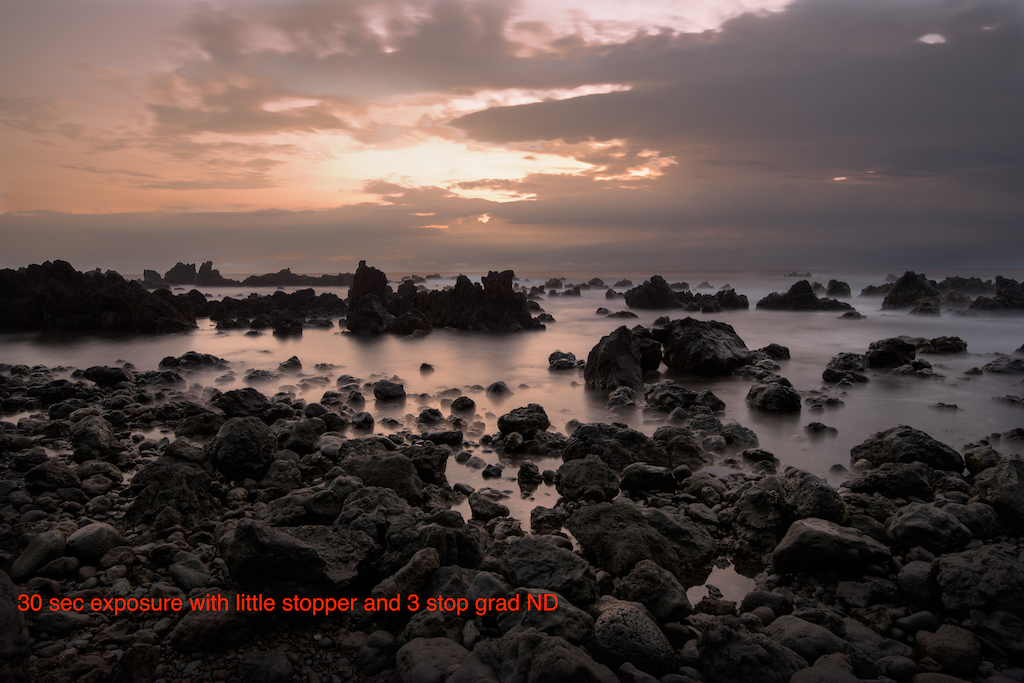
The filters I use most frequently: 3 stop hard grad (below left), 3 stop soft grad (bleow right) which can be used in conjunction with a 6 stop Little Stopper (solid ND filter for blurring water…etc). Hard filters are great for photos where the line between bright/darker areas is pretty linear. Soft grad filters work great with mountains, less linear objects.

3 stop hard grad ND is my tool of choice
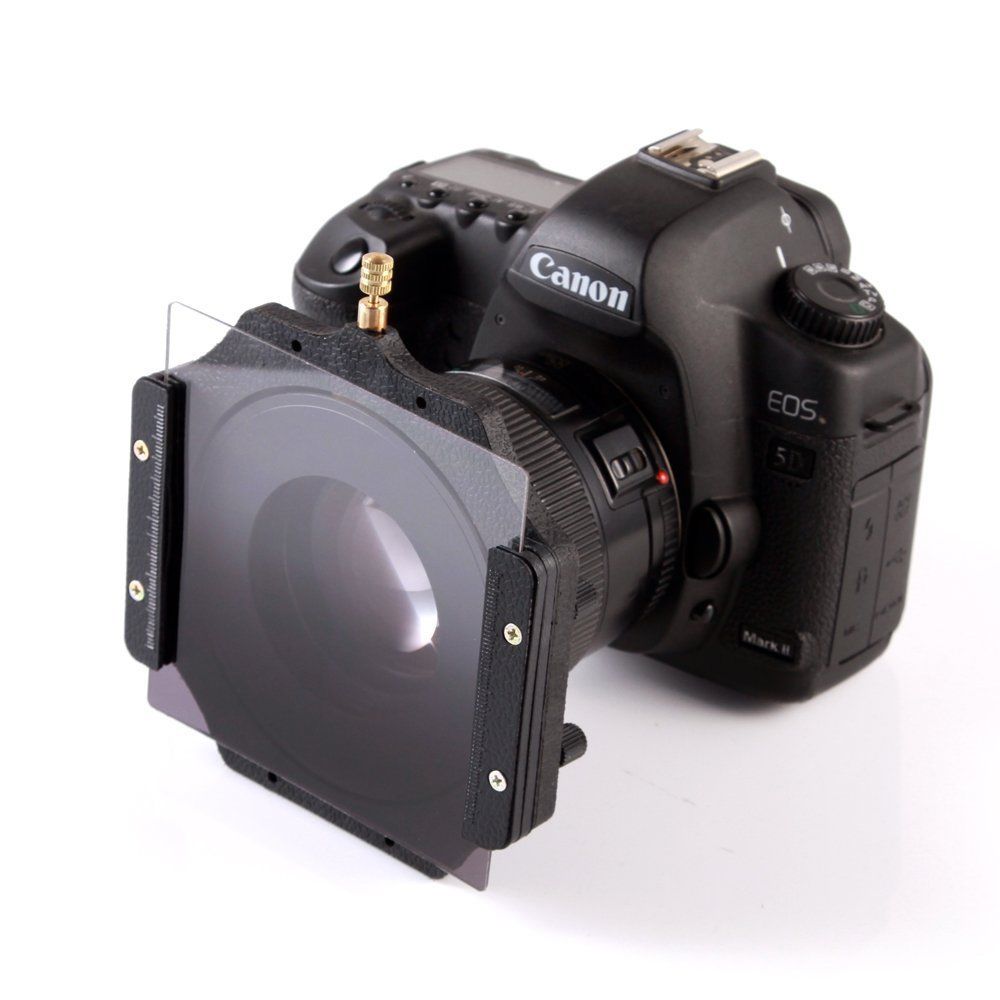
Shown below is the Lee Filter system which consists of an attachment ring that screws onto your lens, a filter holder and the filter itself. There are several other Grad systems available. I recommend Lee Filters! Best bang for the buck. Cokin while cheaper are pretty low quality…not good results. Hi-Tech has suffered quality control issues and Singhray are 2x the price.

filter holder attached to lens w filter in place

Lee filter ring screws on lens, filter holder attaches to such
The photos below were all taken with 3 stop hard grads to balance the sky and foreground elements. Works like a charm.

3 stop hard grad
3 stop hard grad
3 stop hard grad
3 stop hard grad
Grads also work great for mirrored reflections. Typically the mirrored reflection is 2.5 stops darker than the sky. I usually use the 3 stop hard grad…and darken the water slightly (1/2 stop) using a selective brush in post processing to make sure it looks realistic.
3 stop hard grad
Solution #3 Exposure Blending. You can also accomplish the above results by taking two images exposed three stops apart (one for the sky, one for the foreground) and combine in PhotoShop. Ergo use the “good” sky with the “good” foreground…masking as required. This works great when you have a tricky foreground subject that’s uneven…mountain range with peaks for example. I usually prefer the HD Grad route when possible since it saves time in post processing and makes it easier to spot that special “winning” photo when you’re shooting several images of a scene.
Solution #4: HDR Software approach (when you can’t fit the range into one shot). As you recall from above, our scene from Zion taken with a Canon 7D demanded more range than our camera could handle. We needed a little help from HDR software to merge the best parts of our over and under exposed images together. Shown below is a scene shot two stops under exposed, normal and two stops over.
This overexposed photo has plenty of foreground detail, but the sky is now stark white.
Industry standard: Photomatix $100 has been used to merge our three shots (-2, proper and +2 over exposed photos). Quite an improvement!
The merged photo is a big improvement over any of the three earlier images
- http://www.hdrsoft.com/
Unfortunately, Photomatrix can often look a little “fake”, with surreal looking colors, halos and a rather gamma like feel. Many pro nature photographers have been reluctant to use HDR software for this reason. An example of an “overcooked” Photomatrix image prominently featured on the ever popular “Stuck in Customs” Website below.
What planet was this taken on?
What’s supplanting it: HDR Expose $100. The image below merges our earlier Zion photos with better results.
Better looking HDR rendition of our Zion scene.
- http://www.unifiedcolor.com/products/hdr-expose-3
HDR Expose provides more natural looking images, no ghosts or strange lighting effects. This photo taken in the Zerkel National Forest doesn’t look HDR.
Aurora HDR has just released it’s latest 2018 version with results that are on par with HDR Expose. Both products have a free trial to test drive. You can’t go wrong with either…hard to recommend one over the other…both great.

Aurora HDR 2018 does a great job equal to HDR Expose!
But wait a minute. How about Lightroom’s in house HDR processing! Let’s try the same three photos and see how LR does! Errr….it’s looking pretty flat. Certainly not as attractive to look as HDR Expose/Aurora’s results. But hold the phone, let not give up yet.
Let’s try some Lightroom processing. Increase the contrast, saturation, add in a little dehaze and clarity.
Now that’s more like it. In fact the results now match the quality produced by those expensive third-party software options. Conclusion: Lightroom HDR when processed correctly holds it own with the competition, provides more control and saves you $100!
By the way, HDR done well is impossible to detect. The photo below looks 100% natural (but it’s HDR).

- HDR processed images are notoriously noisy in the dark areas (especially when processed with Photomatrix). HDR Expose, Aurora HDR & Lightroom each have the ability to avoid this noise. HDR Expose does it by offering a processing option for static photos (ergo. those taken on a tripod).
HDR check list when shooting
- Test shot: Get exposure right. Clipping appearing in the histogram?
- Set camera to auto bracket. Bracketing must be done by changing shutter speed not F-Stop.
- Depth of field issues typically appear with F-Stop bracketing.
- Select number of bracketed shots (typical 3, 2 stops apart). Extreme situations 5 shots (more advanced cameras offer this autobracketing option).
- If hand held, set the camera to highest frames/second. Depress shutter until bracketing complete. Shooting 5 bracketed shots typically can produce slower shutter speeds (hard to hand hold)
- If tripod, remember to activate mirror lockup option to reduce shutter induced camera vibration (Imp for exposures between 1/20 and 10 seconds). Turn off vibration reduction on your lens!
- Allows very low noise production during post-processing.
- Great for small F-Stop shots for max depth of field (slower shutter speeds).
- Lightweight tripod great when hiking. Slik Sprint Pro II $89, 2 lbs., $89.
- Don’t forget cable release.
An example of a super high dynamic range shot requiring 5 shots.
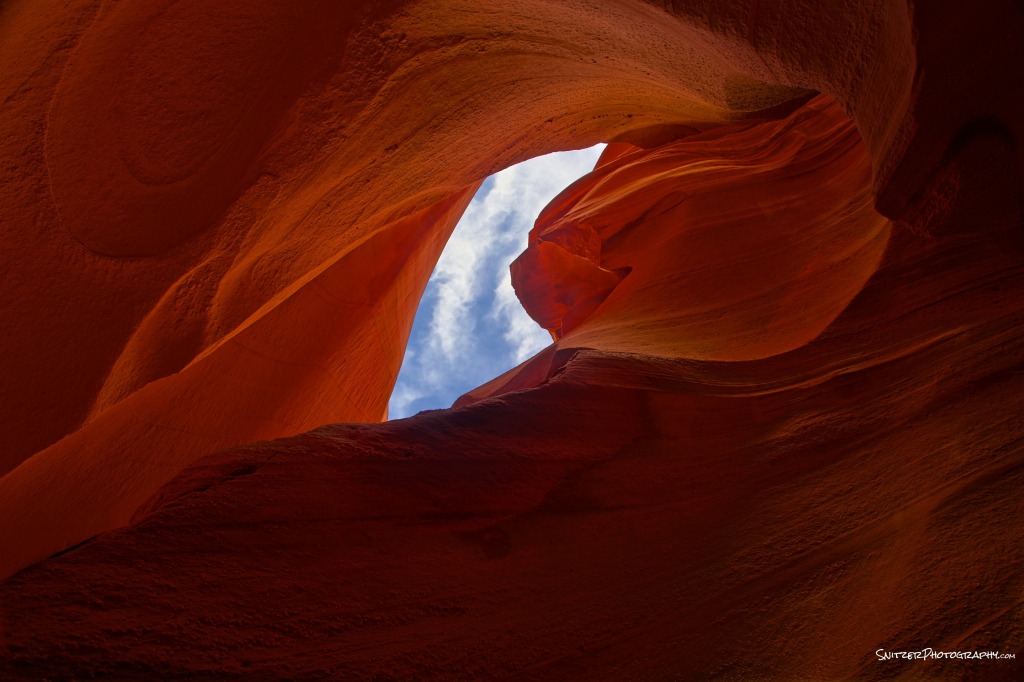
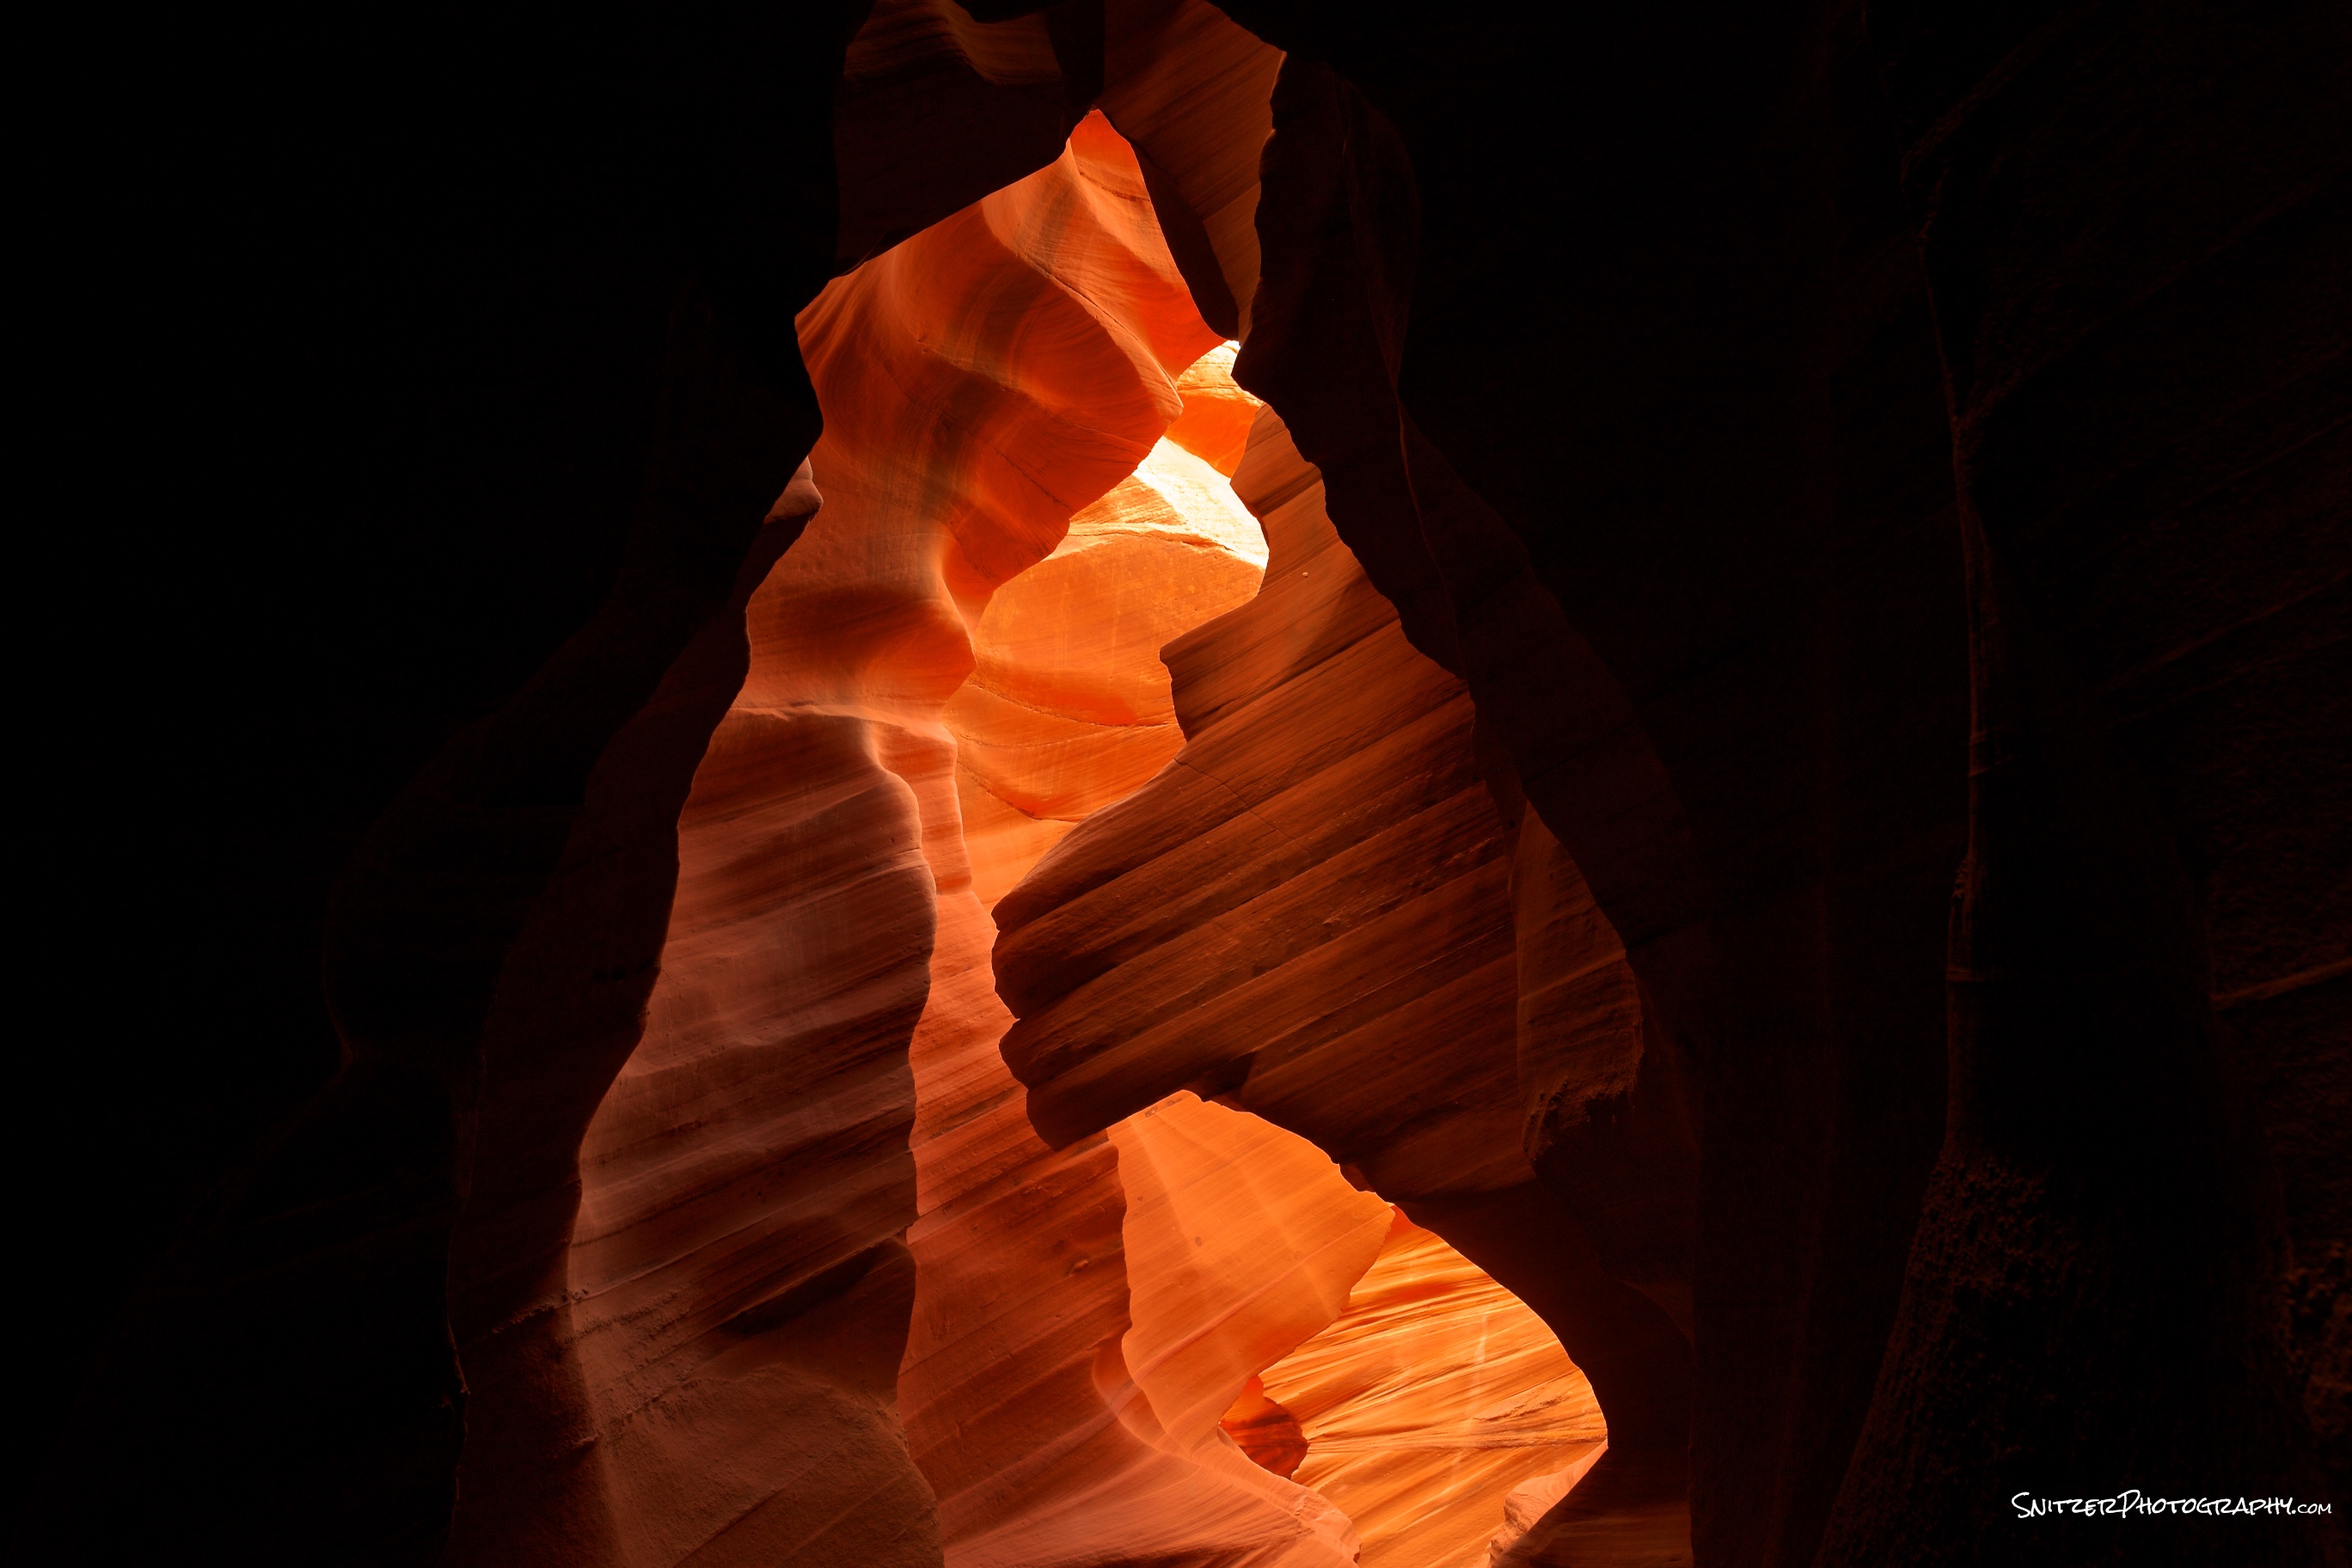
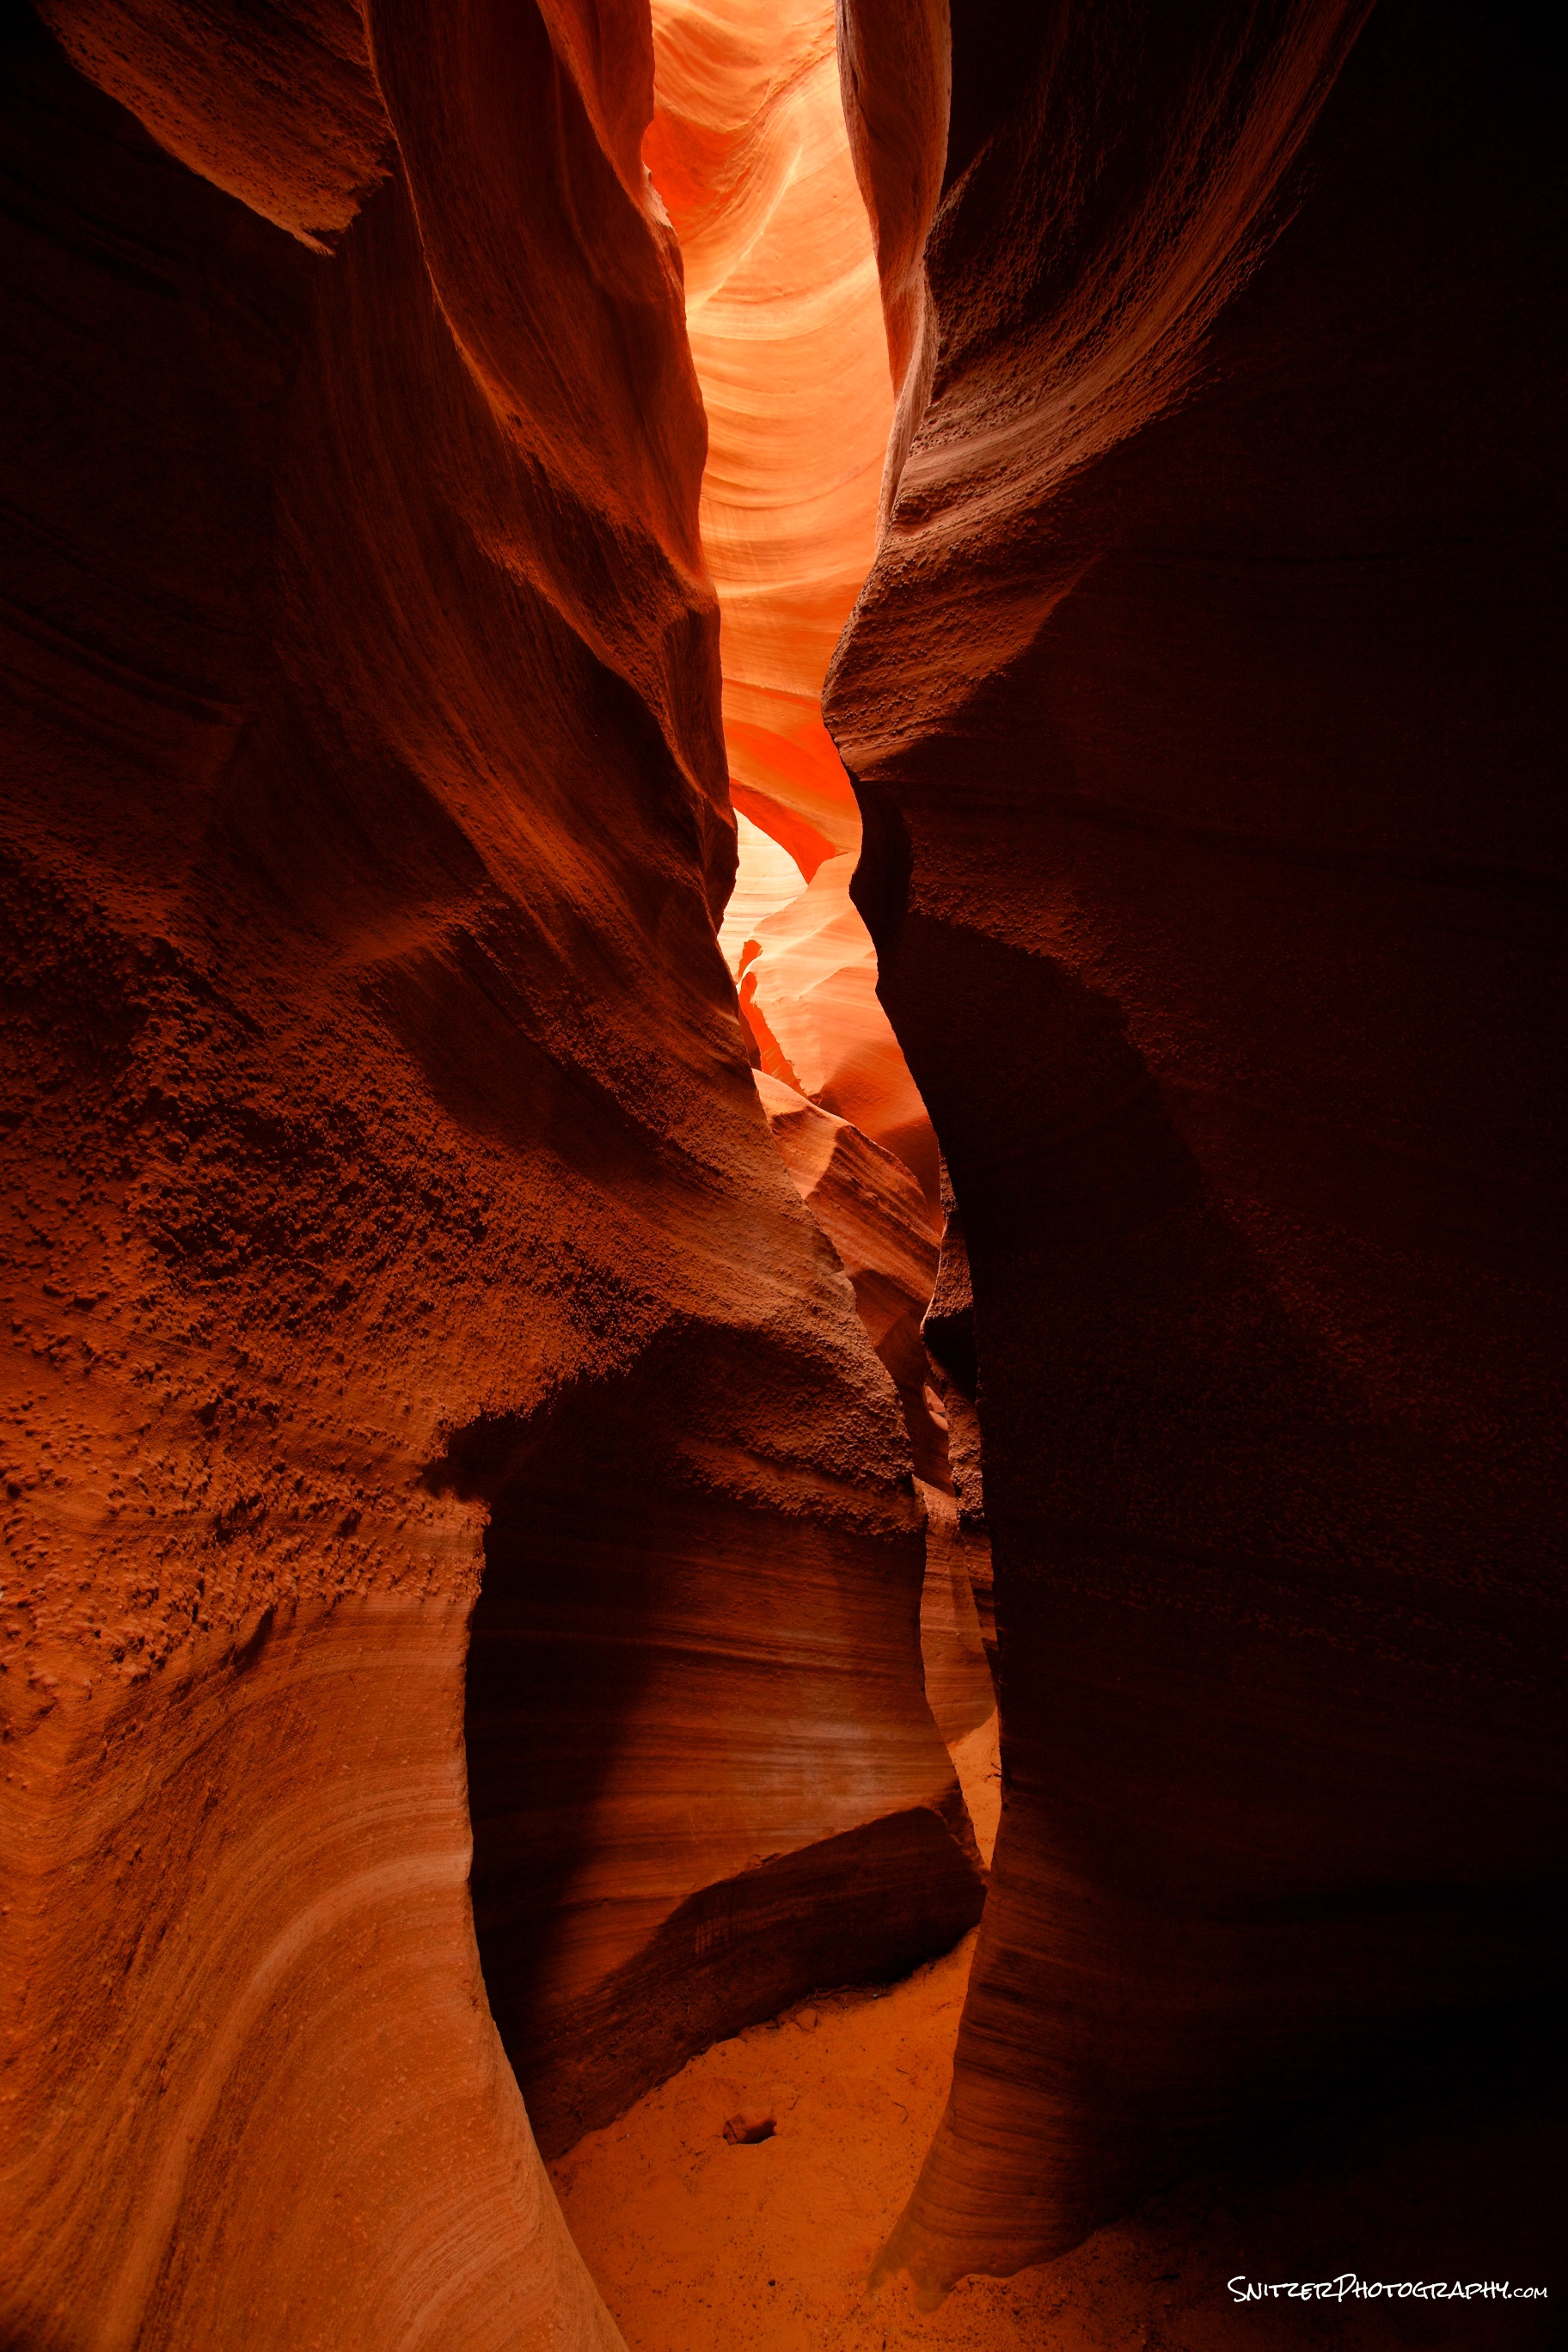
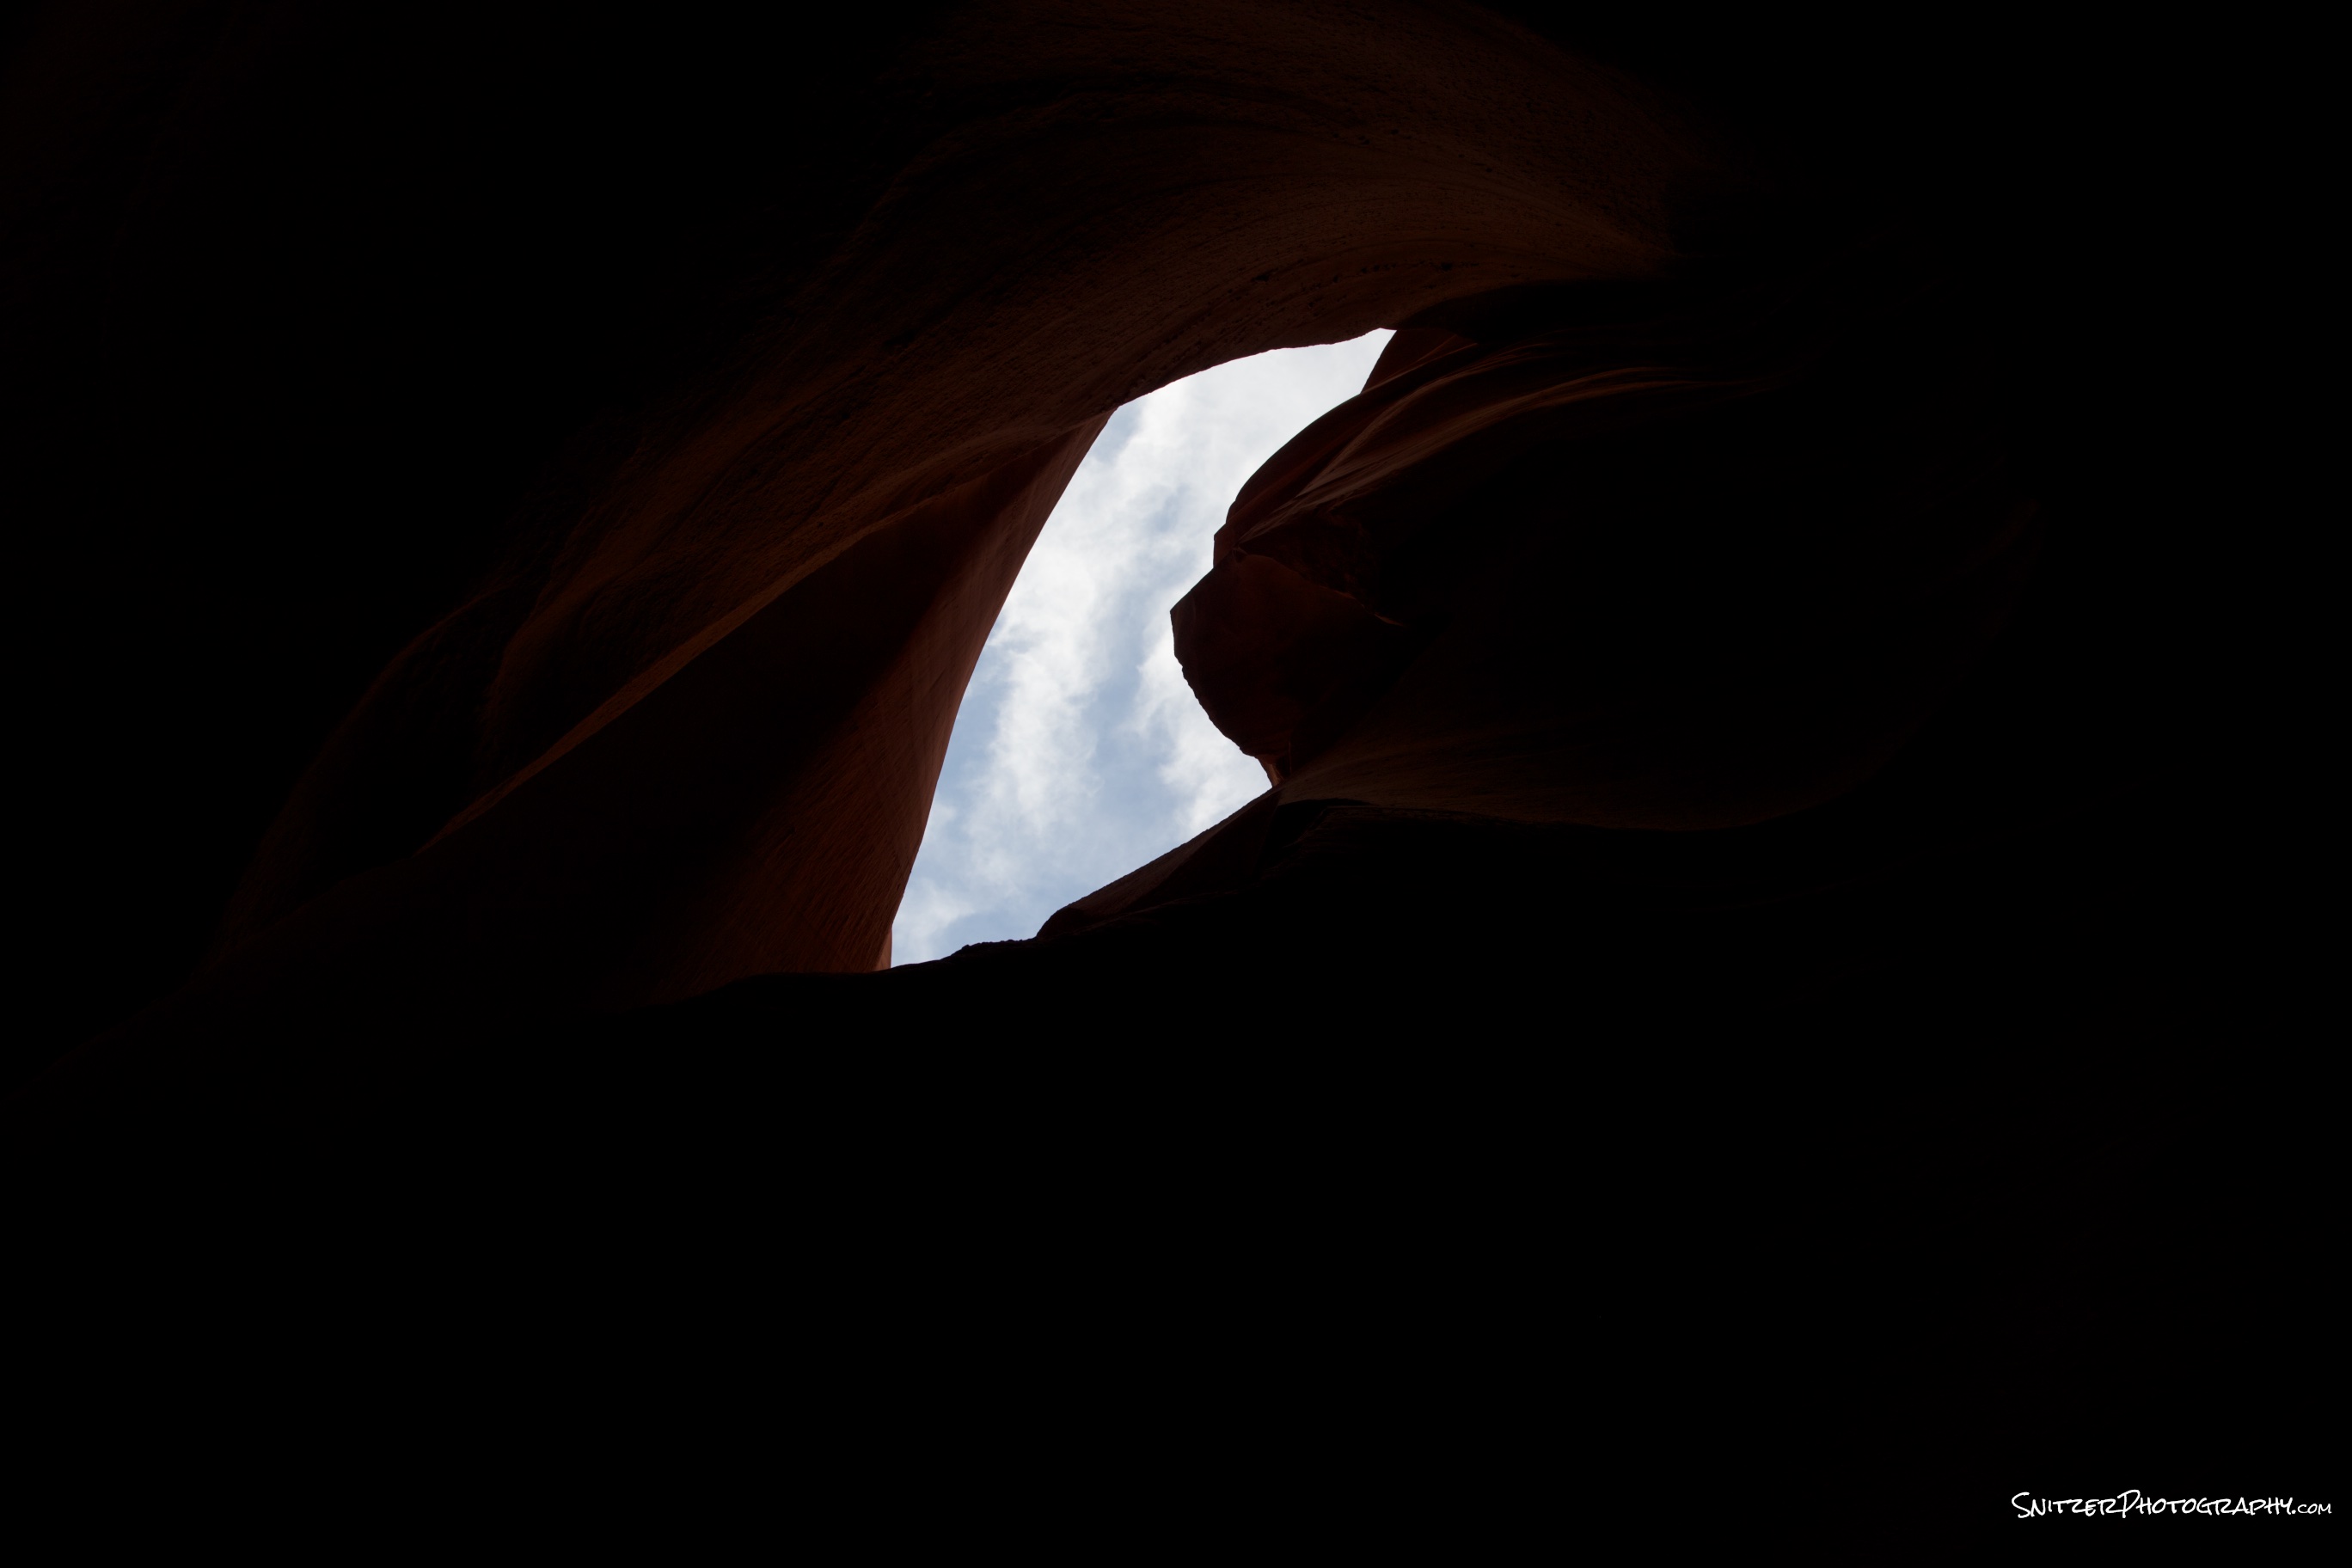
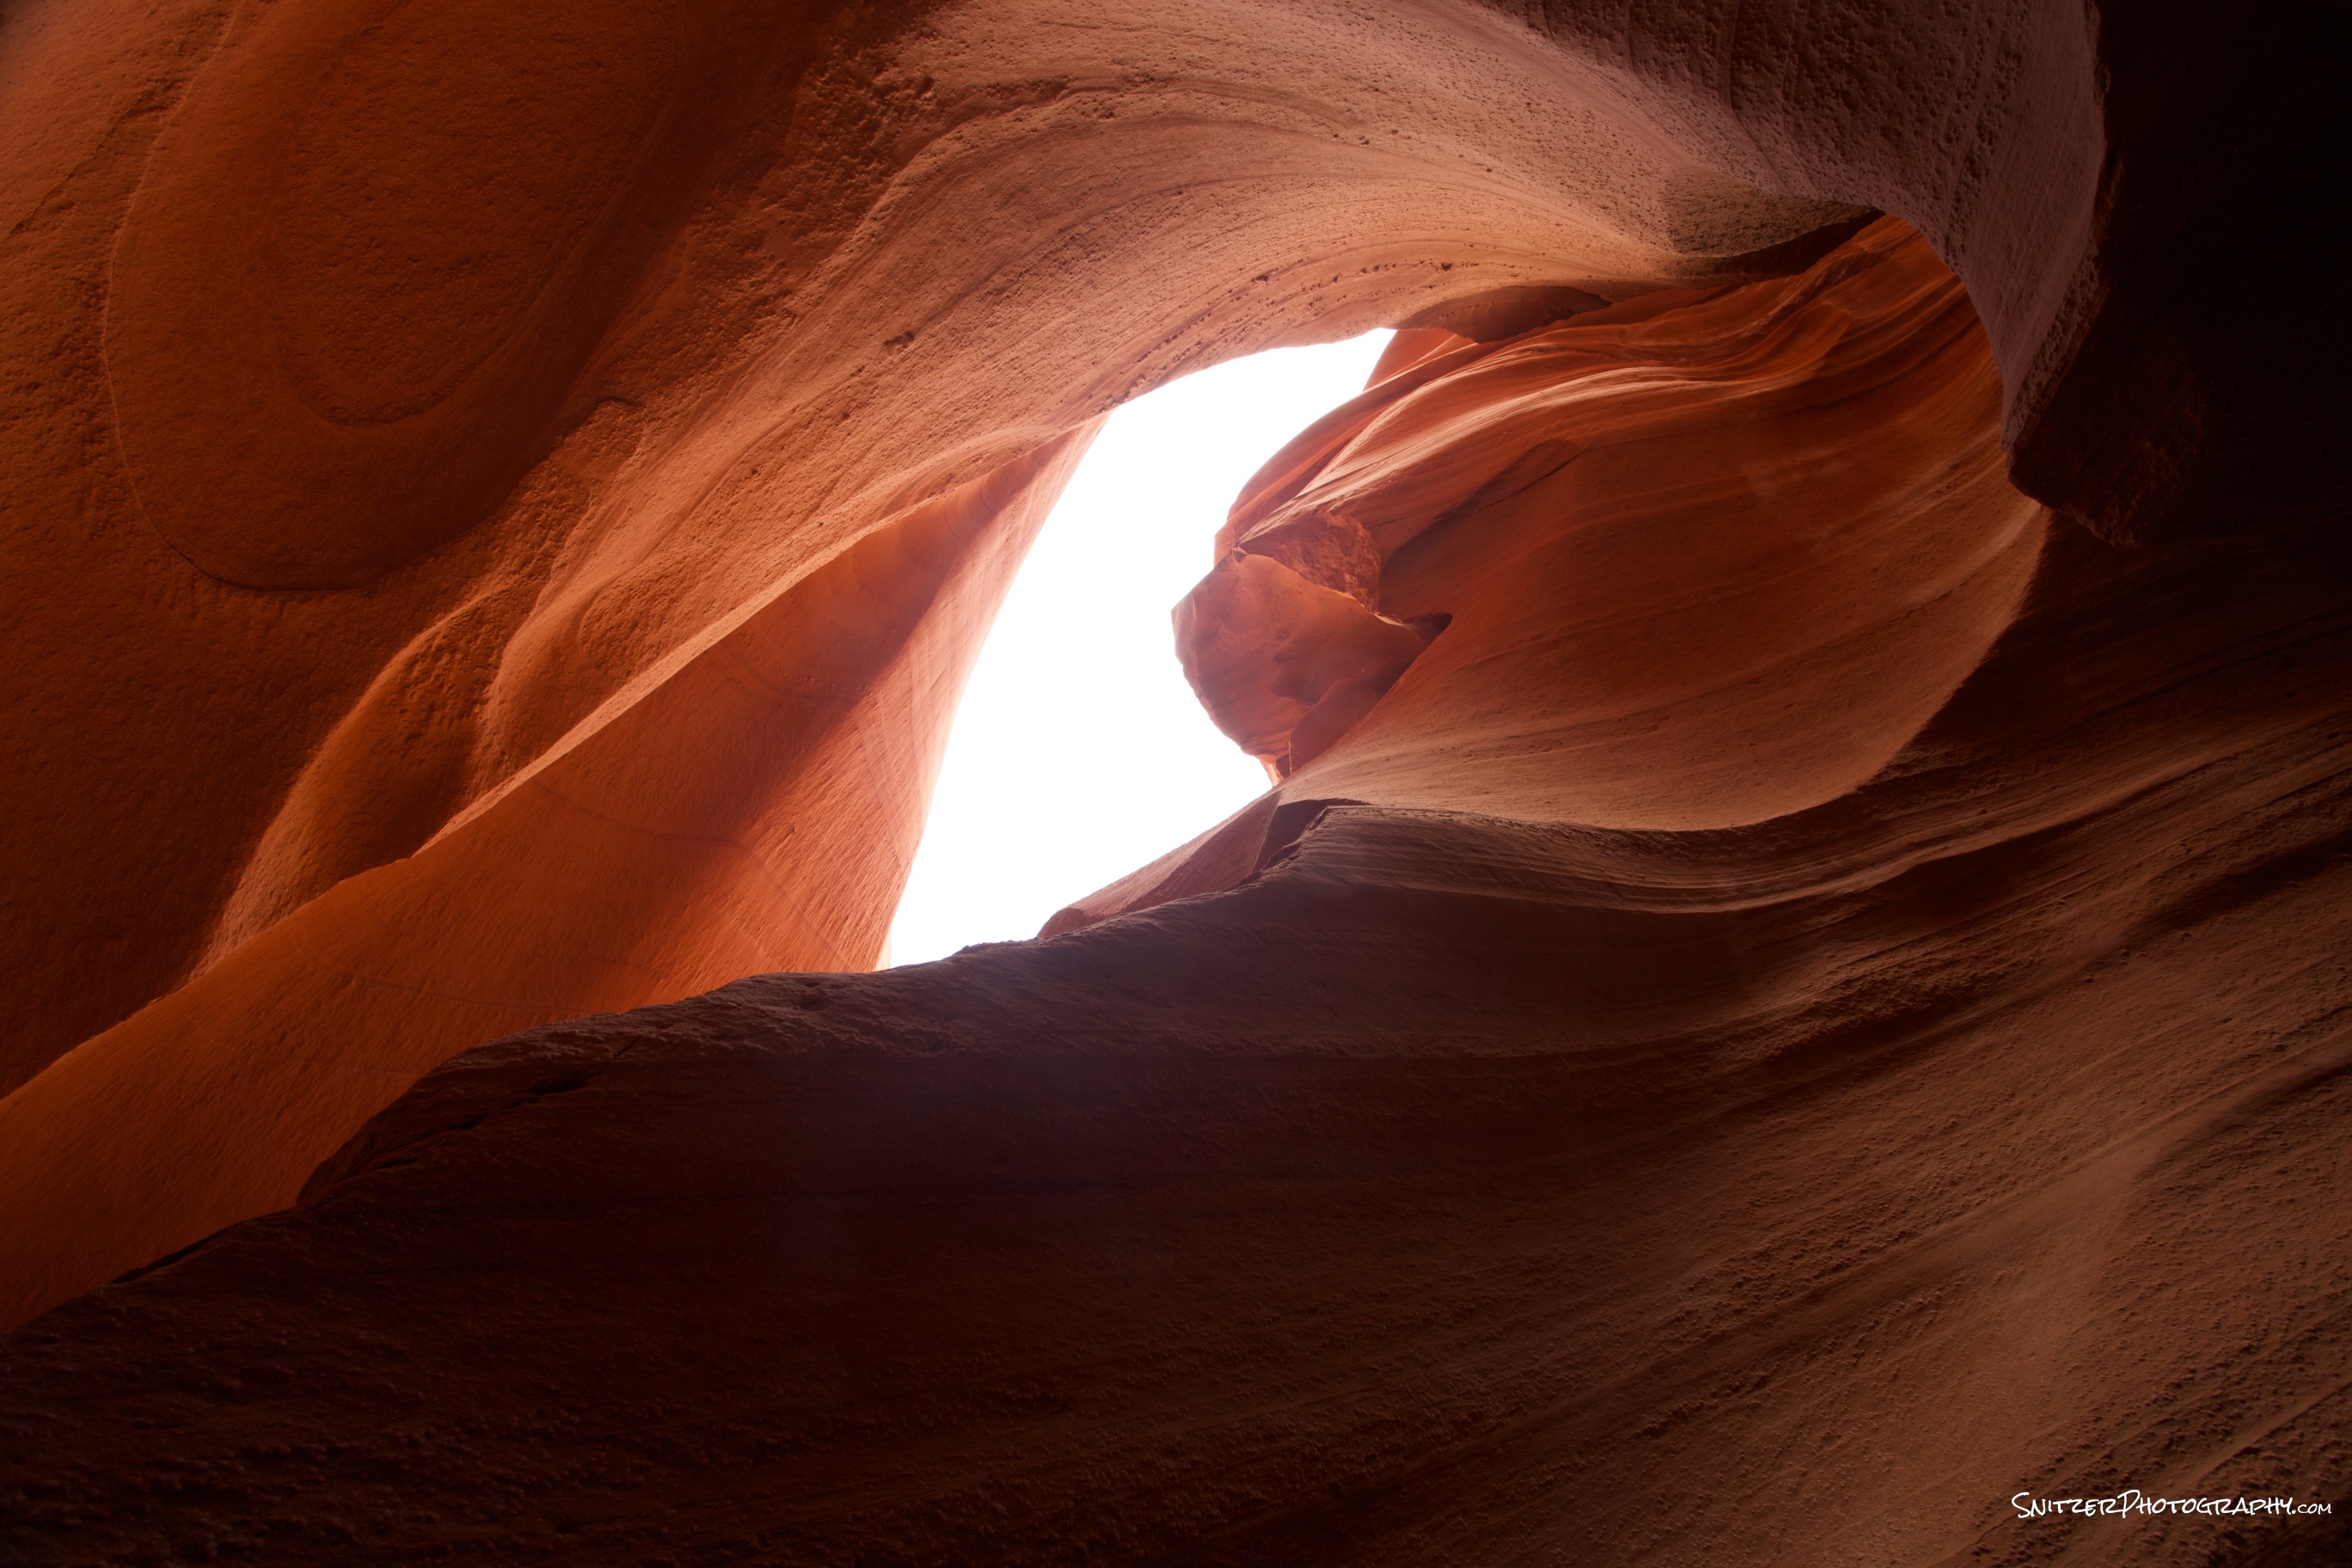
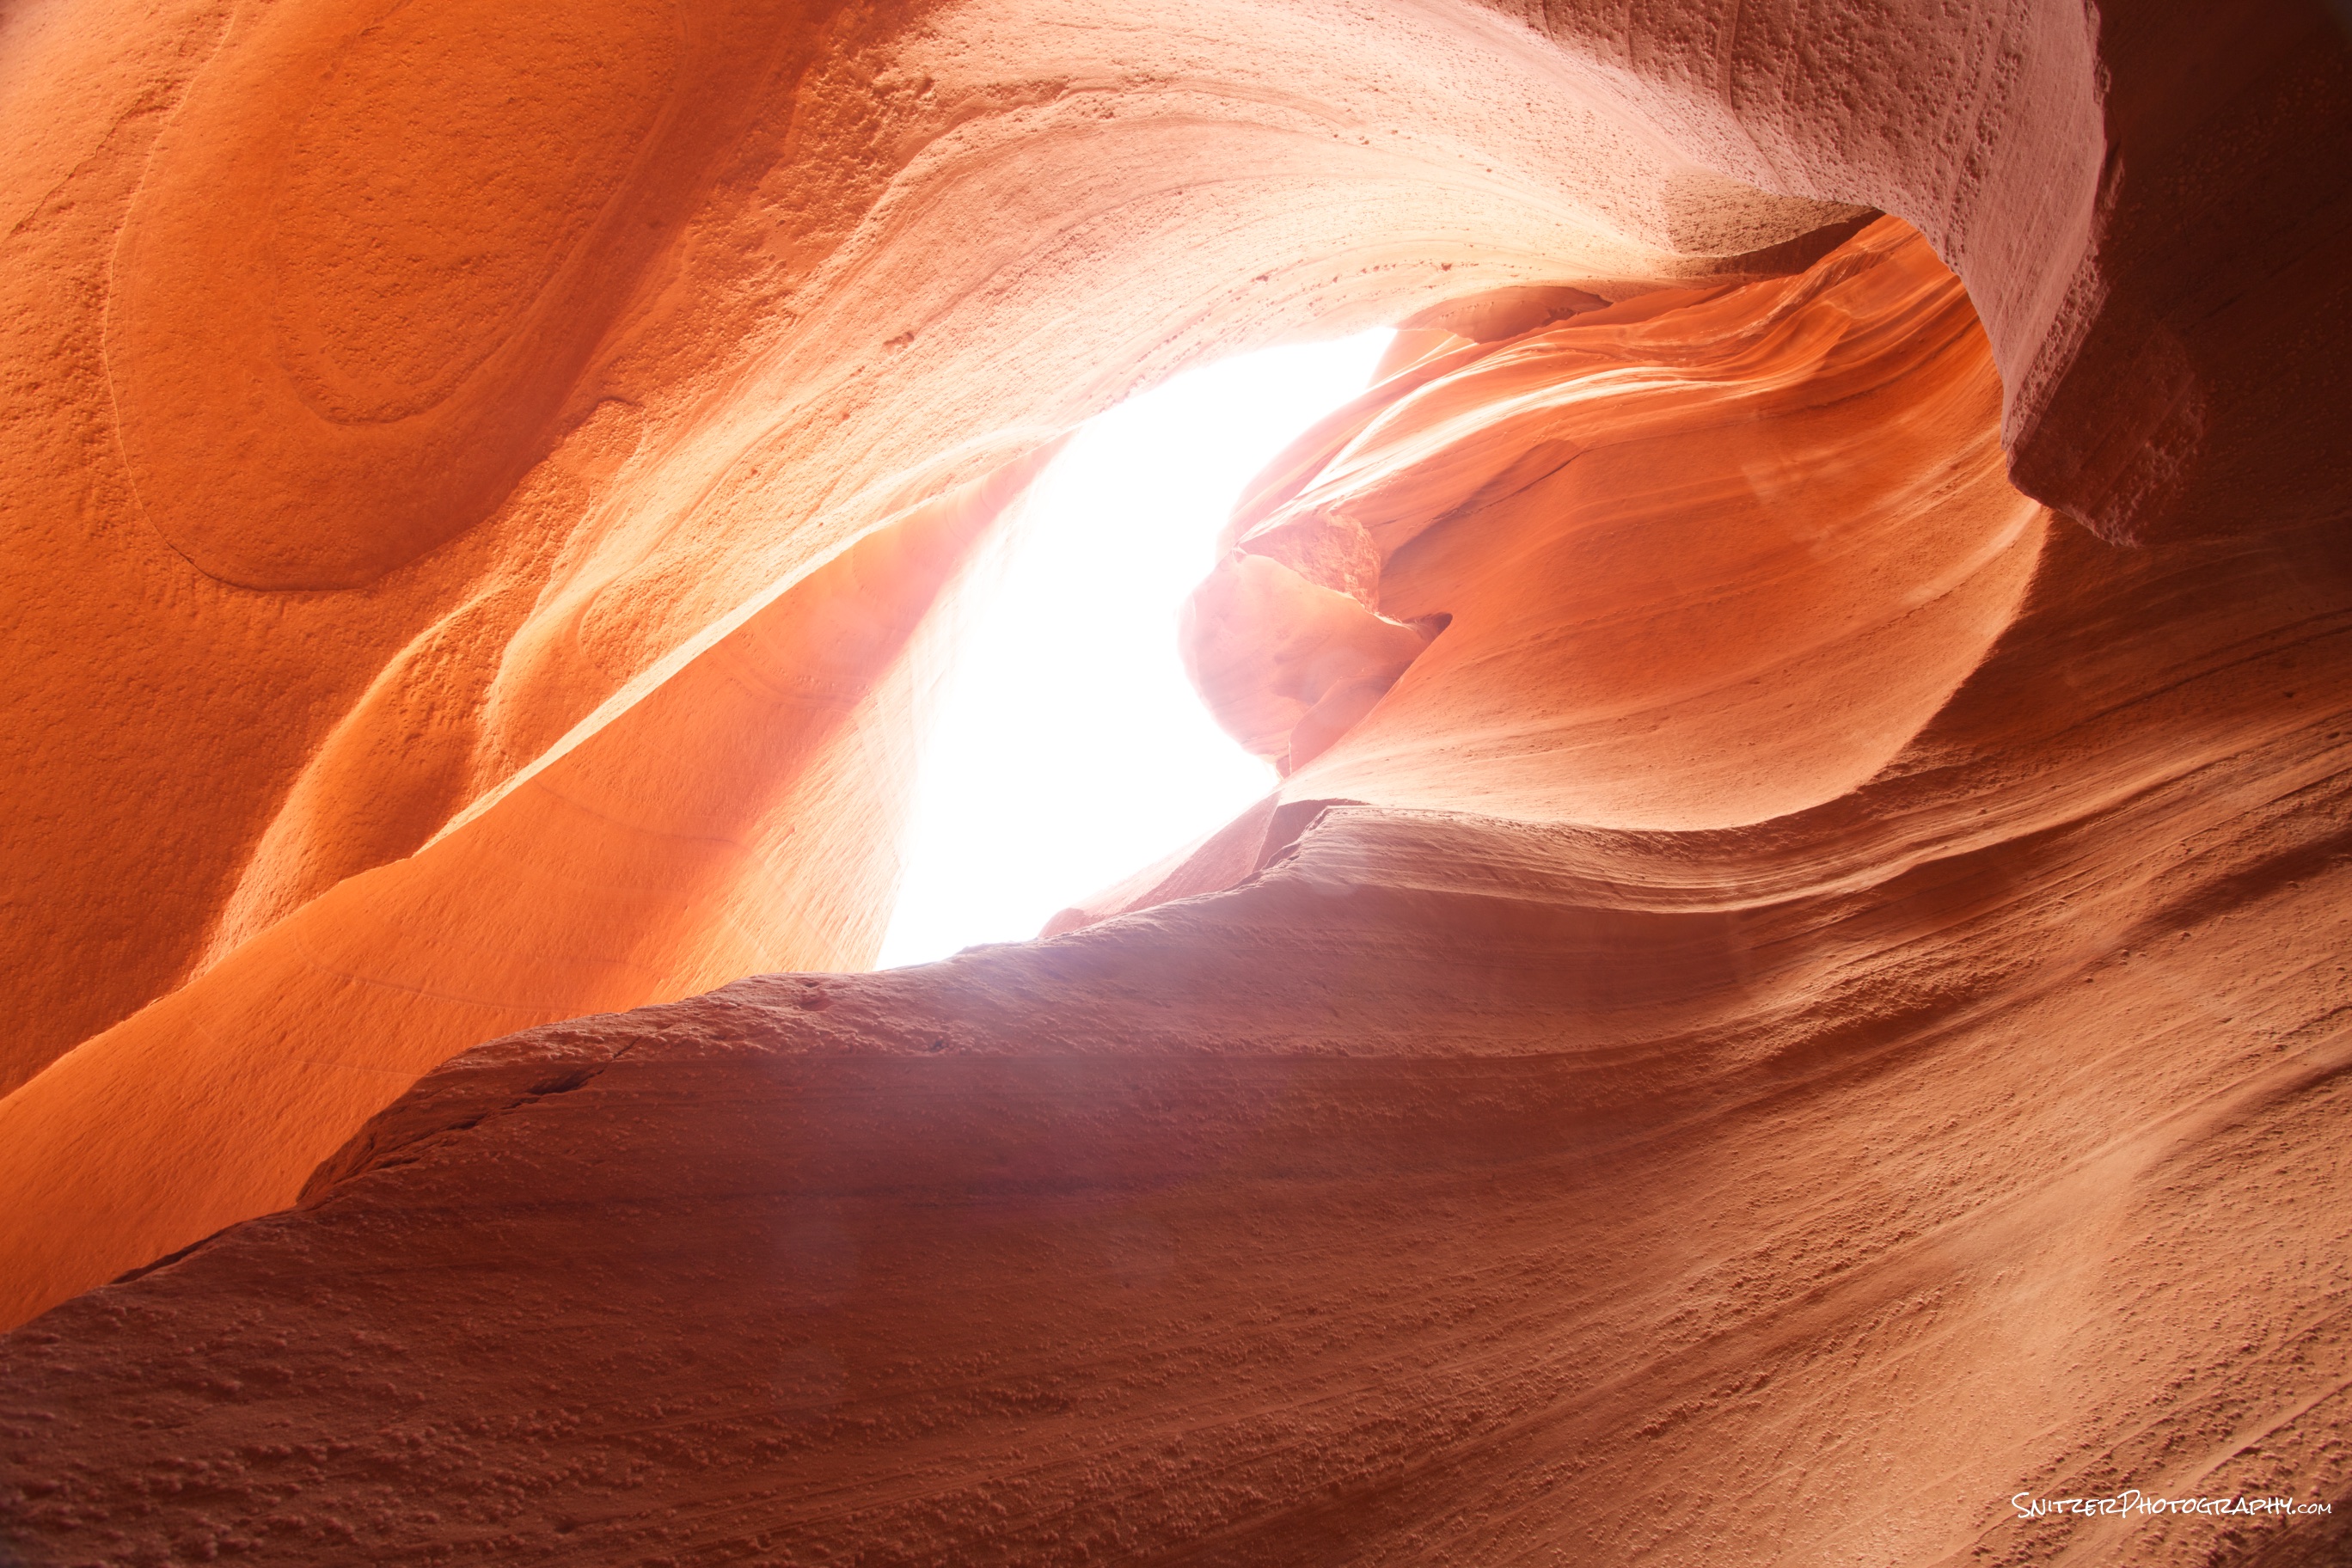
- Visited the Iconic Antelope Canyon is Arizona. Most of my photos captured the typical imagery that’s been portrayed for decades in this local.
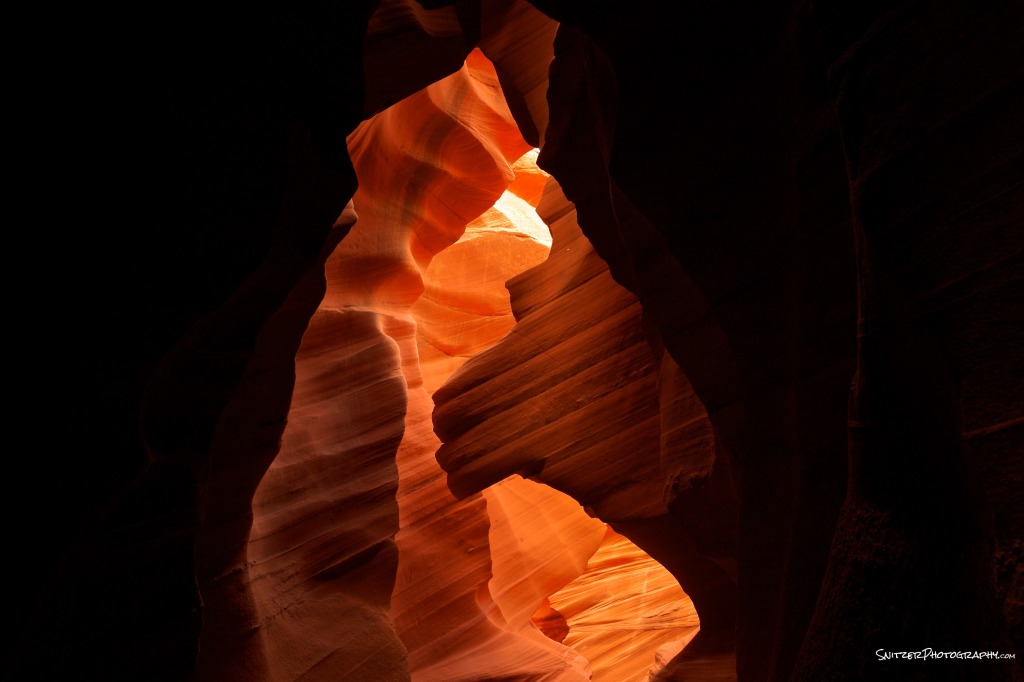
Great shot…just like everyone elses?

Nothing wrong with this pic?
- I was hoping to convey the relationship of the sky to the canyon below. Ergo the source of light that provides the wonderful illumination effects. I set up my camera pointing up and fired off 5 bracket images (2 stops apart).
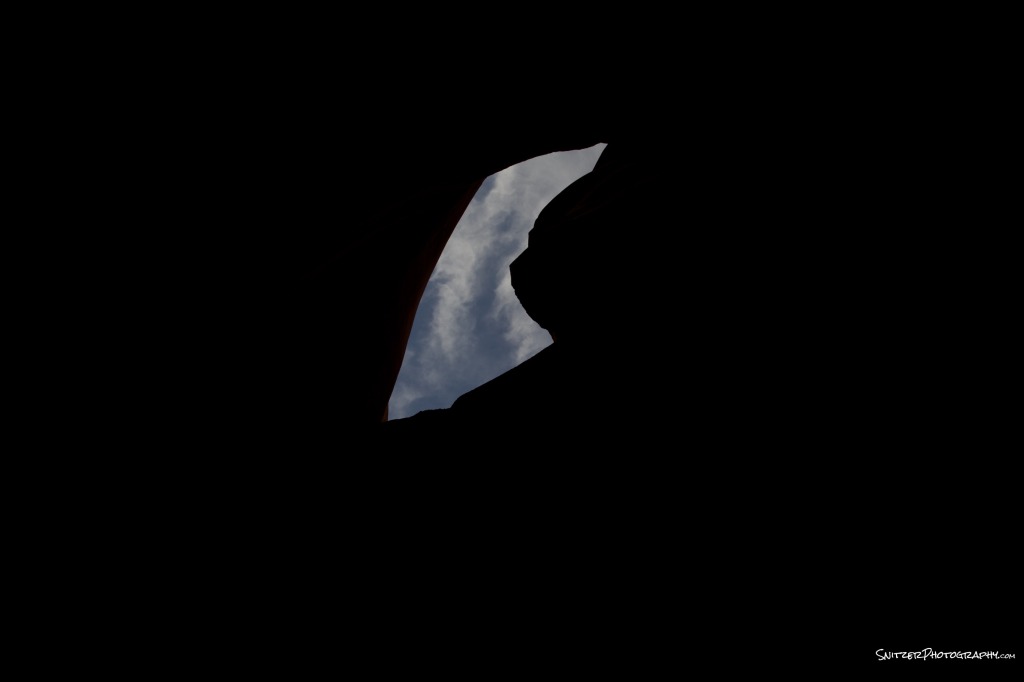
4 stops under.
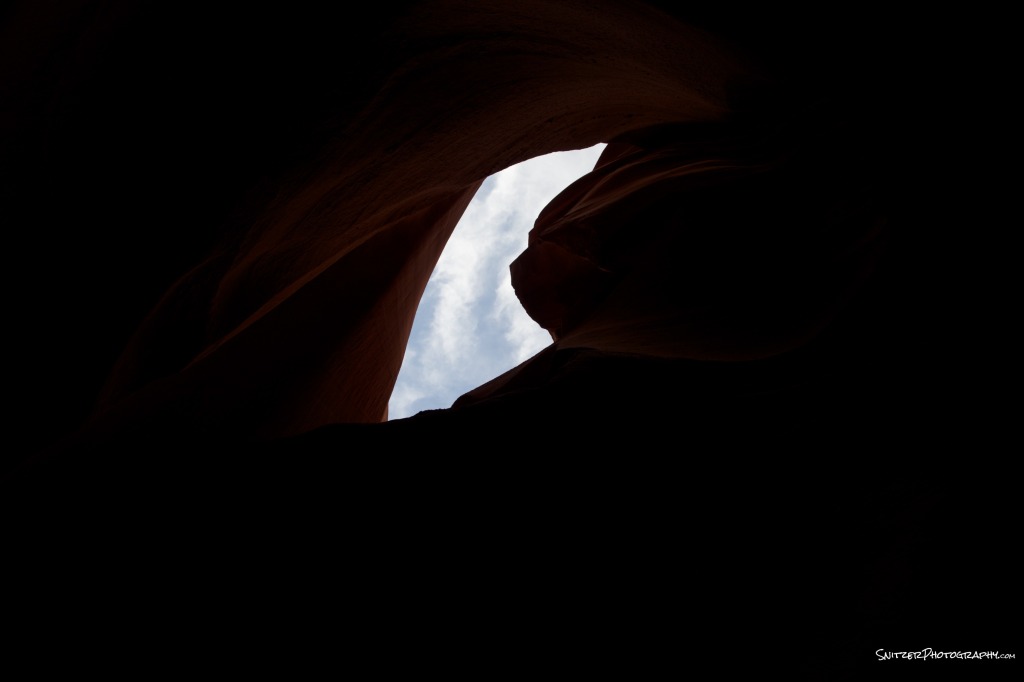
2 stops under
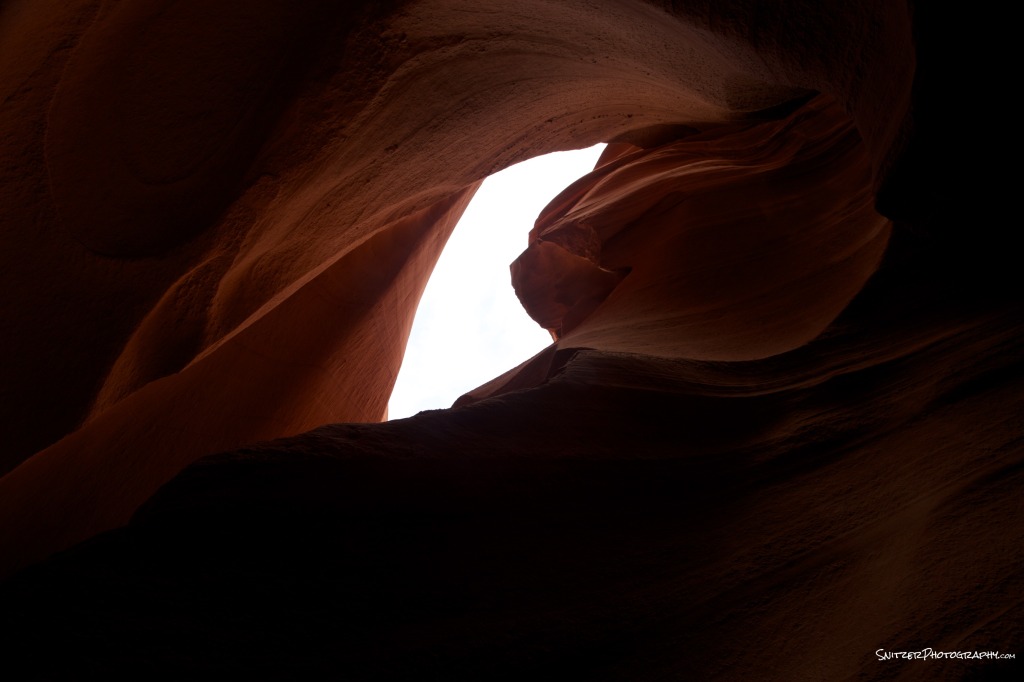
neutral

2 stops over

4 stops over
- And our merged image combining the best pixels of the above 5 shots!


HDR post processing (in HDR Expose).
- Do HDR merge of your photos before post processing in Lightroom or Photoshop.
- Remember to select “static image option” if photo taken on tripod. Reduces noise, best image quality.
- Video tutorial page offers lessons to fine tune your photos. Some areas of special interest include “ghost removal” for merge of moving objects, removing of “veiling glare” for shots taken into the sun, basic controls/presets to control amount strength of HDR processing.
- Things best left to Lightroom/Photoshop (not HDR Software). Black point, highlight, color temp, vibrancy/saturation adjustments.
Becoming a “Water Ninja”…how to shoot the wet stuff!
Typical Beach Shot Ex.: Nice to look at, but the water isn’t “adding” anything to the shot.
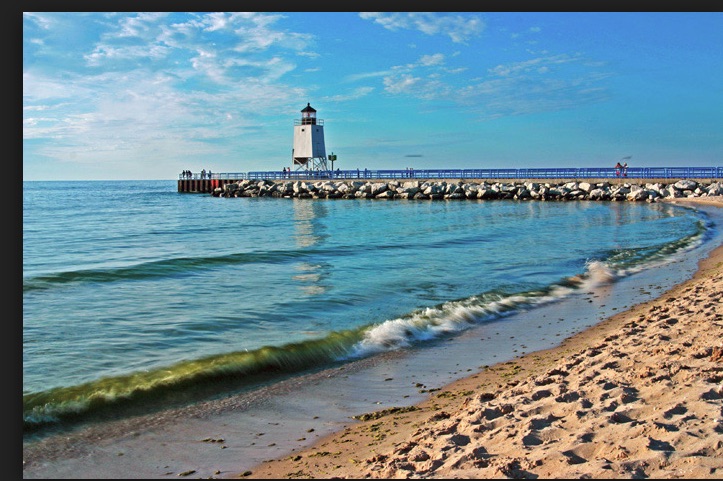
Nice beach shot…but the water isn’t doing anything to “add” to the photo
Let’s explore some tools to make water “work” for you!
Blurring water the “Old School Way”. Many different types of water features can be presented better using long exposure photography. The three composition variables that impact the proper length of exposure: 1. speed of water flow 2. vertical decent (how far/fast is water dropping) 3. what features exist at the bottom of these drops, how do they shape water flow.

slow moving water, small vertical decent

slow moving water, moderate 12 ft drop

Slow moving water, multiple cascading drops
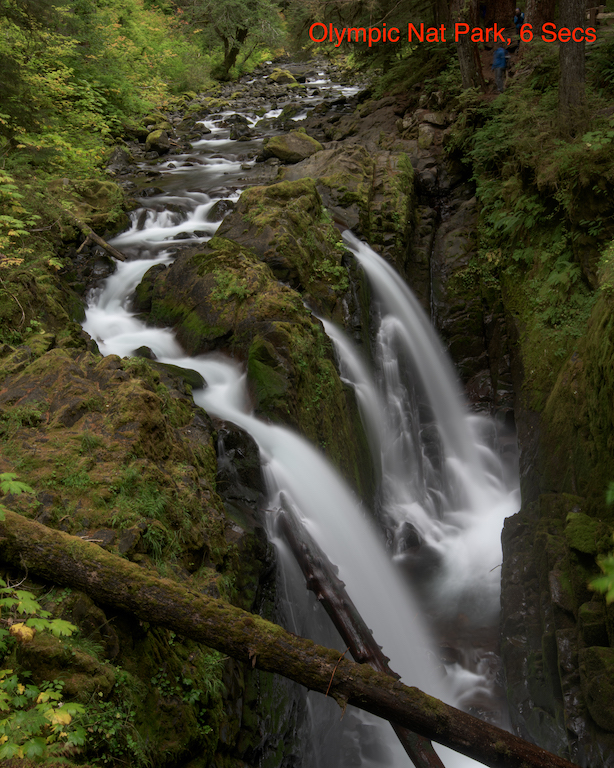
Fast moving water, large 30 ft drop
- Slow, medium & fast moving water (can require different shutter speeds to properly blur).
- Tripod provides stability for long exposure (w remote shutter release). Remember to turn image stabilization off (note some new lenses allow)!
- Your shooting in RAW…right! Always shoot in RAW!
- Water shoes can come in handy for certain strategic camera locations…puts you in the “thick of things”.
- Mirror lock up engaged for SLRs. Nikon has electronic shutter option (even better)!
- Polarizer benefits:
- 2 stop ND filter
- Allows removal of leafy reflections/glare
- Dial water reflection “on” or “off” to show bottom features or not.
- Typically shooting on cloudy day/dusk/dawn…crop out sky (which is often “blown out”).
- Goldilocks: Too much blur, too little…Just Right!
- Aperture Priority (start with test shot at lowest ISO, F18).
- ISO: Lowest setting helps slow shutter speed.
- Canon that’s 100 (option to cut to 50),
- Nikon 100 or some 64 (option to cut to 32).
- Review test shot to see if exposure compensation (+ or -) is required. Use LED image, histogram and “blinkies” as tools. Typically camera adjusted auto exposure is ok (in diffuse light…easy for camera light meter to get “right”).
- F18 is the smallest aperture that won’t create significant distortion.
- Try shooting at F16, F11, F8. Each successive larger aperture will shorten the shutter speed and reduce the “blur”. Pick your favorite. Don’t go less than F8 (you’ll loose depth of field). Simply raise ISO if you need shorter shutter speeds after F8.
- If you need to lengthen the exposure (F18 won’t do the trick) you have the option of trying a smaller F stop (f22 …) or adding an additional ND filter (sunglasses for your lens). Note that when stacking a ND & Polarizing filters on your lens…focal lengths under 24mm will vignette.
- Rules of thumb: river: 5-20 seconds, small waterfall 3-10 seconds, fast moving waterfall 1-6 seconds. Experiment…break rules…hard to generalize.
- If going over 20 seconds, cover the viewfinder opening!
- Post processing (getting water right v surroundings):
- May often incr color temp slightly to “warm”.
- De-saturate water, often boost green sat, hue.
- Dodge reflective water surfaces (don’t overdo).
Blurring water and showing sky

To blur water on brighter day I add ND filter
- On a moderately brighter day I may need to add an additional ND filter behind the polarizer to sufficiently slow down the shutter speed, blur the water. You can often bring out the sky in Lightroom/Photoshop by using selective brush (burning in).
- You can also try HDR. While the shutter speeds and blurring differ among shots, the merged image looks fine!
Stopping water in its tracks (strobe like photos)!
offers great way to isolate water illuminated in sunlight against dark background.

water looks entirely different when “stopped” in action
small flow offers op to isolate droplets
- Water is actually not solid. It’s made up of thousands of droplets.
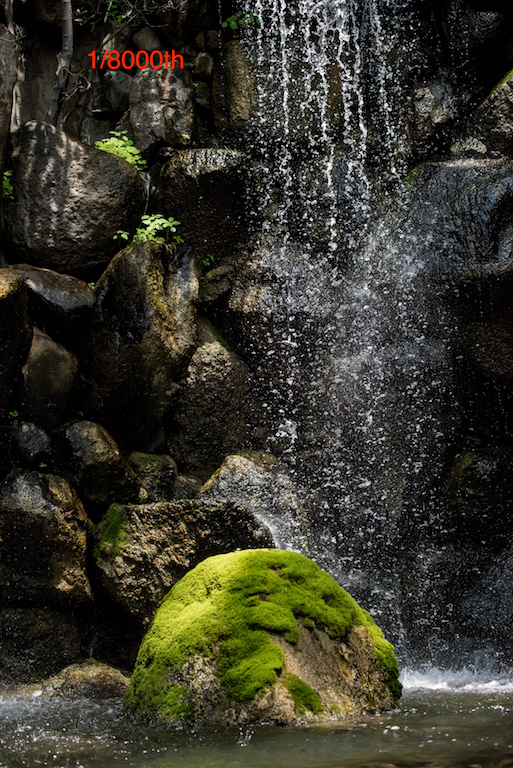
- When using a shutter speed of 1/8000 the water appears to separate…magic results. Slower shutter speeds don’t work!
- Great for shooting water in direct sun.
- Typically requires ISO 800+ and large aperture (not great depth of field) to support 1/8000th shutter speed.
- Remove polarizer (you can’t afford to lose 2 stops).
Blurring water in direct sunlight (Multiple exposure). For more detail, see my dedicated blog post on Multiple Exposures.

Multiple exposure…3 photos, stacked atop of each other in one in camera digital image
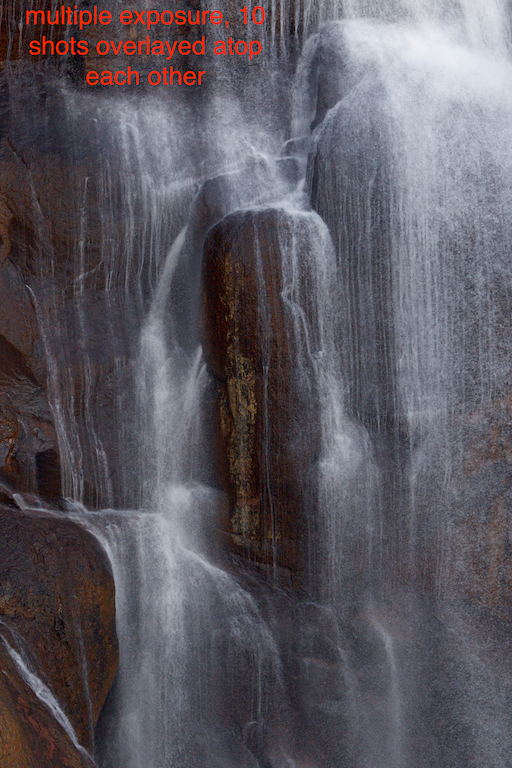
New: Blurring using multiple exposure.
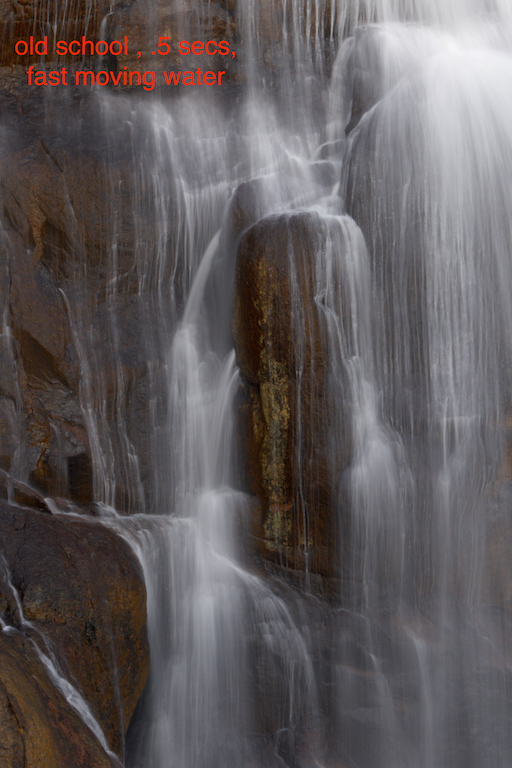
Old school blurring with long exposure (.5 sec)
- Overlaying multiple shots (on top of each other) creates the illusion of blurred water (plus shows individual water droplets)
- Mount camera on tripod with remote shutter release.
- Take test exposure @ 1/400th of a second (shoot in manual mode). Adjust aperture exposure + or – as needed to get right.
- Activate “multiple exposure” on your camera.
- Select a “series” of photos (turn off when you’re done)
- Select “10” as the number of shots. For Canon “9” is the max.
- Turn “auto gain” off. Ergo…each shot will overlay atop the previous one (making the image successively brighter).
- Set the drive to high speed continuous. Set the shutter speed to 1/4000th (10x faster than test shot).
- Depress shutter release. The camera will bang off 10 shots (9 for the canon) & automatically stop.
- Review your handiwork. Adjust exposure if required.
- Note: If your camera can shoot at 1/8000th, try dialing in your test picture at 1/800th (for maximum droplet effect).
- Hold on there. Did you check your camera’s color space? sRGB (256 colors only) can create trouble, you may want to choose AdobeRGB(especially if your using Lightroom?). Otherwise your multiple exposures may have a magenta tint!
Using a polarizer to adjust reflection on lakes.
polarizer turned so lake is a giant mirror.
Rotating my polarizer to show bottom detail in Glacier Nat Park
Lake above Banff, Canada
Lake showing bottom features of shoreline
- Sometimes tweaking the ratio of reflected surface to bottom visible can enhance the photo.
- Early am (pre sunrise) is a great time for still water…means reflections.
- Don’t forget to consider a fun foreground element. Small F stop/big depth of field (tripod may be required in low light…if lens image stabilization can’t handle).
Clouds are your new best friend shooting coastal scenes.
Clouds can help diffuse a bright sun to create wonderful sunset/sunrise ops…reflections of sun off water!
Earlier morning creates great light and still water for great mirror images. Interesting foreground elements make a good pic great!

Clouds create the op for spectacular color just before sunrise or after dawn. Window of op can be only 10-15 mins. Be ready!

Openings in clouds create great shot ops during midday sun
- Clouds create ops for spectacular color (sunrise/sunset) and diffuse direct sun (allowing better exposure).
- Shooting when sun is “in the sky”. Direct sun is hard to shoot. Starbursts are overrated? Clouds make a great diffuser.
- Polarizer? No need…shooting into the light…no impact.
- Shooting when sun is below horizon: Best ops for “color” are often just before sunrise, just after sunset (colors may only last 10 minutes at peak or less/be ready!).
- HDR vs ND Grad (Cokin or Lee).
3 stop hard grad ND is my tool of choice
Here’s how filter and holder attached to your camera

Filter holder easily detaches.
- Three stop hard grad ND is my fav tool of choice.
-

I used the grad ND to darken the sky . Now you can see the foreground!
- Throw in a Little or Big Stopper for even longer exposures!
-
I combined a 3 stop grad ND and a 6 stop little stopper to get a 30 second exposure. That blurred the wave action to create the surreal imagery.
- Remember to cover up viewfinder opening!!!
- Blur clouds, surreal water scenes…great in rough seas!
- How to set exposure: Use the included table or a phone ap.
-
- Polarizer will vignette @ less than 24mm.
- Post processing: Often useful to dodge (lighten) reflective surfaces. Be careful not to overdo…can look overcooked.
Don’t forget those night shots!
- Stars out? Crescent moon low in the sky light paints background with stars reflected off water. Woooo!!!

Reflecting stars off the water!
Snitzer Photography 5/30/16
In-camera Multiple Exposure (to blur water)
Most new SLRs have the ability to create “in camera” multiple exposures. Ergo, that taking multiple shots and stacking one atop of the other in one image file. The image below is an example. Previously the only way to create this effective digitally was to combine imagines outside the camera in a photo editing program (Photoshop for example).
Multiple Exposure Example
Now it’s easy…your camera does all the work!
We can use this new “in camera technology” to create the illusion of blurred water. Essentially recreating the look of a “long exposure” photograph while providing additional details (shows water droplets frozen in time).

Old school: Blurring water using long exposure .5 secs.

New Approach: 10 Shot Multiple Exposure!
Here’s the workflow to create a multiple exposure photograph.
Step One: Place your camera on a tripod and hook up your remote shutter release. Set your drive mode to high speed.
Step Two: Take a test shot using the camera’s manual mode to determine the correct exposure. You’ll want to select 1/400th as your shutter speed and an aperture of F8 (for good depth of field). Try setting your ISO to 200 and use the light meter to fine adjust ISO as need for proper exposure. Once you get the “right” exposure your ready to activate the camera “multiple exposure”. Nikon example given below.
Step Three: Go into the shooting menu, scroll down and select multiple exposure.
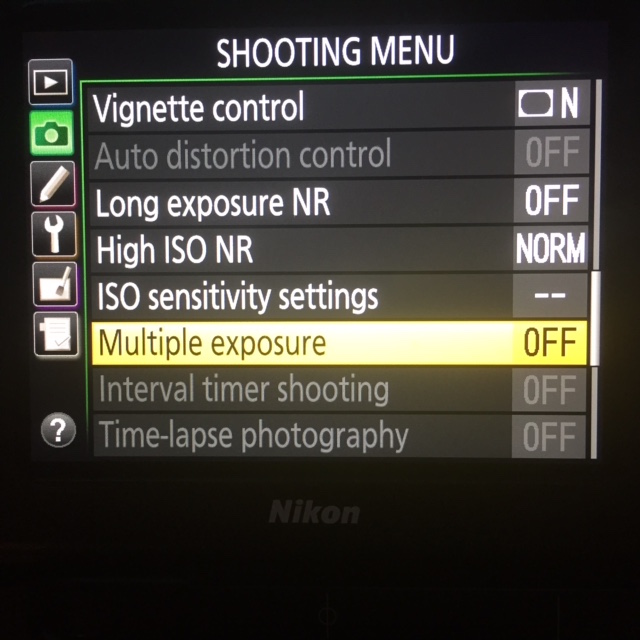
Go to Shooting Menu, choose Multiple Exposure option.
You’ll have the opportunity to activate this mode. Select “On (series)”: The camera will stay in multiple exposure mode until you turn this feature off.
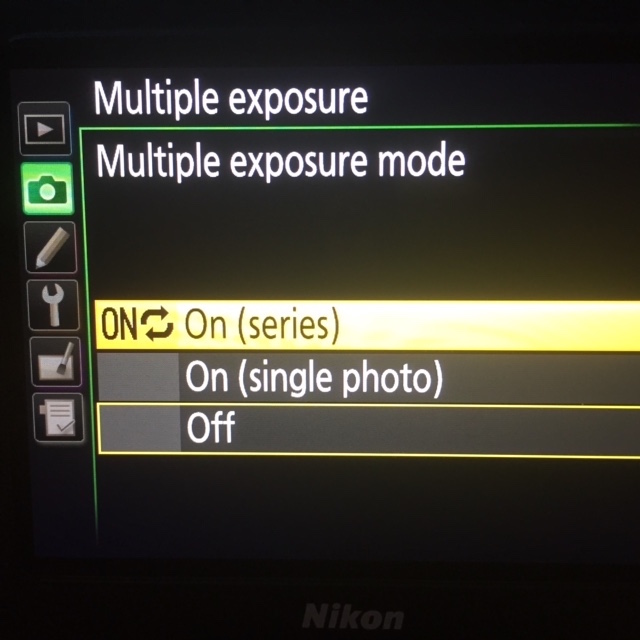
Select “On (sereies””
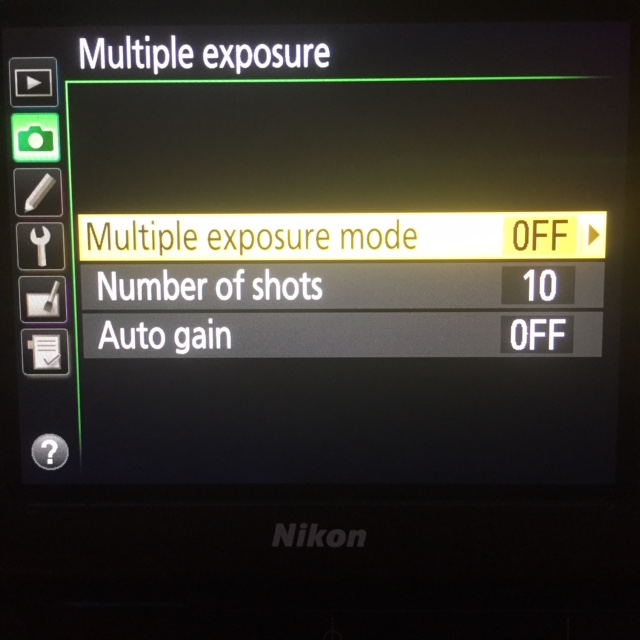
Once you select “on (series), you’ll be directed back to the previous menu. Then Set the number of exposure to 10.
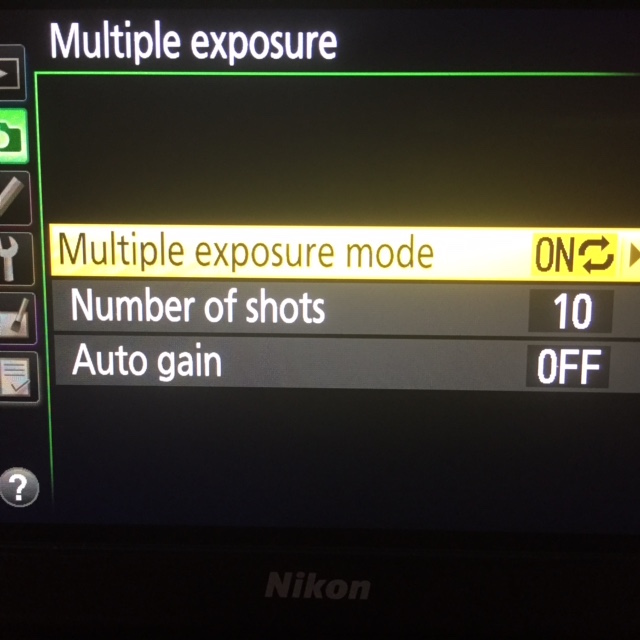
Select 10 shots (Canon only goes up to 9).
Set the Autogain to off.
Your now going to take 10 photos in rapid succession, with each photo stacked on top of the other in one “in camera” file. To accomplish this your going to take the shutter speed used in your test shot (1/400) and divide by 10 (1/4000). Why? Your taking 10 shots, that’s 10x more light. Each shot therefore needs to let 1/10th of the light in. Trust me on this…try it…it works!
Focus on your subject, lock the focus and full depress the shutter button. Your camera will rapidly fire off 10 shots in rapid succession. Then look at your photo on the camera’s rear screen. Feel free to adjust the aperture up or down as needed to fine tune the exposure.
If your photo has a magenta tint to it, odds are your color space is set incorrectly. Make sure it’s set to AdobeRGB.
Enjoy! Remember to turn off the multiple exposure option when done